Kubernetes Storage – Part 1 – NFS complete tutorial
In this series of articles, I will discuss available Kubernetes storage solutions with the complete manual for deploying them to/for Kubernetes. This series of tutorials is helpful for everyone who knows the Kubernetes storage architecture and concepts and wants to deploy storage for Stateful applications in Kubernetes.
Follow our social media:
https://www.linkedin.com/in/ssbostan
https://www.linkedin.com/company/kubedemy
https://www.youtube.com/@kubedemy
Resource Requirements:
- A running Kubernetes cluster. 1.18+ is suggested.
- A running node with some available storage.
I will run the steps on Ubuntu-based systems. I suggest you do so.
For this demonstration, I use two nodes with the following configuration:
A running node used as the NFS server:
OS: Ubuntu 20.04
FQDN: node004.b9tcluster.local
IP Address: 192.168.12.7
A single-node Kubernetes cluster:
OS: Ubuntu 20.04
Kubernetes: 1.21.5 (k3s distribution)
FQDN: node005.b9tcluster.local
IP Address: 192.168.12.8
1- Deploy and configure NFS server:
Run the following commands on the node you considered for the NFS server. You can deploy a clustered NFS server with high availability support.
apt update && apt -y upgrade

apt install -y nfs-server

mkdir /data

cat <<EOF >> /etc/exports
/data 192.168.12.8(rw,no_subtree_check,no_root_squash)
EOF

systemctl enable --now nfs-server

exportfs -ar
These commands install NFS server and export /data , which is accessible by the Kubernetes cluster. In the case of a multi-node Kubernetes cluster, you should allow all Kubernetes worker nodes.
2- Prepare Kubernetes worker nodes:
Now, to connect to the NFS server, the Kubernetes nodes need the NFS client package. You should run the following command only on the Kubernetes worker nodes – and control-plane nodes if they act as workers too.
apt install -y nfs-commonImportant tip! Each storage solution may need client packages to connect to the storage server. You should install them in all Kubernetes worker nodes.
For NFS, the nfs-common package is required.
3- Using NFS in Kubernetes:
Method 1 — Connecting to NFS directly with Pod manifest:
To connect to the NFS storage directly using the Pod manifest, use the NFSVolumeSource in the PodSpec. Here is an example:
apiVersion: v1
kind: Pod
metadata:
  name: test
  labels:
    app.kubernetes.io/name: alpine
    app.kubernetes.io/part-of: kubernetes-complete-reference
    app.kubernetes.io/created-by: ssbostan
spec:
  containers:
    - name: alpine
      image: alpine:latest
      command:
        - touch
        - /data/test
      volumeMounts:
        - name: nfs-volume
          mountPath: /data
  volumes:
    - name: nfs-volume
      nfs:
        server: node004.b9tcluster.local
        path: /data
        readOnly: no
Method 2 — Connecting using the PersistentVolume resource:
Use the following manifest to create the PersistentVolume object for the NFS volume. You should note that the storage size does not take any effect.
apiVersion: v1
kind: PersistentVolume
metadata:
  name: nfs-volume
  labels:
    storage.k8s.io/name: nfs
    storage.k8s.io/part-of: kubernetes-complete-reference
    storage.k8s.io/created-by: ssbostan
spec:
  accessModes:
    - ReadWriteOnce
    - ReadOnlyMany
    - ReadWriteMany
  capacity:
    storage: 10Gi
  storageClassName: ""
  persistentVolumeReclaimPolicy: Recycle
  volumeMode: Filesystem
  nfs:
    server: node004.b9tcluster.local
    path: /data
    readOnly: no
Method 3 — Dynamic provisioning using StorageClass:
You must install the NFS provisioner to provision PersistentVolume dynamically using StorageClasses. I use the nfs-subdir-external-provisioner to achieve this. The following commands install everything we need using the Helm package manager.
helm repo add nfs-subdir-external-provisioner https://kubernetes-sigs.github.io/nfs-subdir-external-provisioner

helm install nfs-subdir-external-provisioner nfs-subdir-external-provisioner/nfs-subdir-external-provisioner \
  --create-namespace \
  --namespace nfs-provisioner \
  --set nfs.server=node004.b9tcluster.local \
  --set nfs.path=/data
To create the PersistentVolumeClaim, use the following manifest:
apiVersion: v1
kind: PersistentVolumeClaim
metadata:
  name: nfs-test
  labels:
    storage.k8s.io/name: nfs
    storage.k8s.io/part-of: kubernetes-complete-reference
    storage.k8s.io/created-by: ssbostan
spec:
  accessModes:
    - ReadWriteMany
  storageClassName: nfs-client
  resources:
    requests:
      storage: 1Gi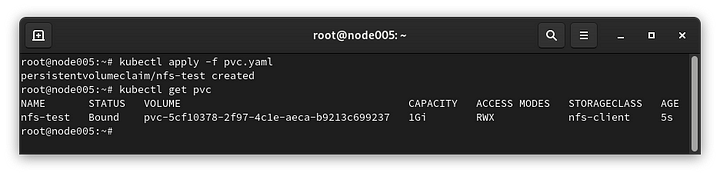
4- Kubernetes and NFS storage specification:
NFS has the following specifications in the Kubernetes world. It would help to consider them before using the NFS storage in production.
- ReadWriteOnce, ReadOnlyMany, and ReadWriteMany access modes.
- The storage size does not take any effect!
- In the case of dynamic provisioning, volumes are separated into different directories but without access controls or proper isolation.
If you like this series of articles, please share them and write your thoughts as comments here. Your feedback encourages me to complete this massively planned program.
Follow my LinkedIn https://www.linkedin.com/in/ssbostan
Follow Kubedemy LinkedIn https://www.linkedin.com/company/kubedemy
Follow Kubedemy Telegram https://telegram.me/kubedemy
Related Posts

Kubernetes Hacks and Tricks – #4 Find worker node info from Pod spec info
Kubernetes Storage – Part 2 – GlusterFS complete tutorial