
AWS EKS – Part 26 – Increase VPC CNI Allocatable IP Addresses
Every AWS EC2 instance comes with a limitation in the number of maximum network interfaces which can be assigned to the node and the maximum number of IP addresses which can be assigned to each network interface. This limitation can also affect the number of Pods you can run in your EKS cluster, as every Pod needs its own IP address. Sometimes, you may face a situation where your worker node has free compute resources, but you cannot deploy new Pods due to network limitations. In this lesson, you will learn how to overcome this limitation by using the IP Prefixes feature.
Follow our social media:
https://linkedin.com/in/ssbostan
https://linkedin.com/company/kubedemy
Register for the FREE EKS Tutorial:
If you want to access the course materials, register from the following link:
Register for the FREE AWS EKS Black Belt Course
What is IP Prefix, and how does it work?
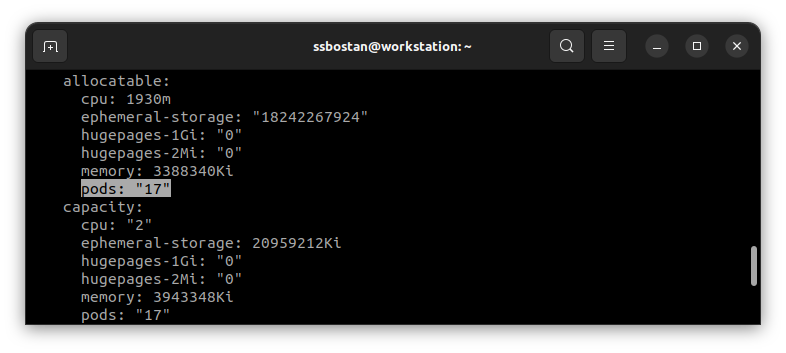
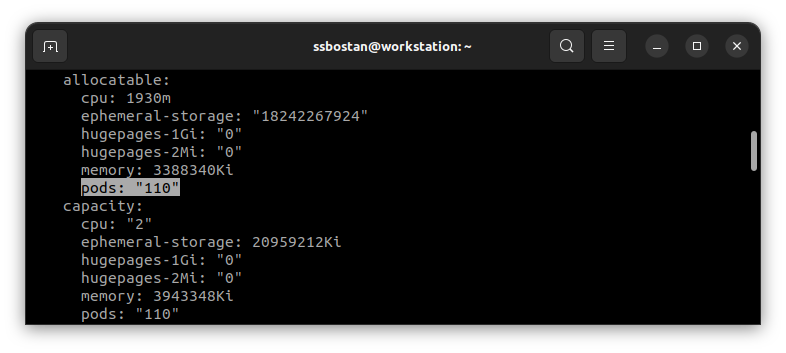
Every Kubernetes Pod needs its own IP address to be reachable in the network; when using AWS VPC CNI, the VPC CNI assigns a secondary IP address to an available network interface on the worker node so if anyone wants to access the Pod, it can reach to that worker node directly. Every EC2 instance has a limitation in the number of maximum network interfaces created in the node and the maximum number of IP addresses assigned to each network interface. For example, in a t3.medium instance, the maximum number of network interfaces is three, and each one can take up to six IP addresses, which means it can take up to 18 IP addresses. One IP address will be used for the node itself, and you can use the other 17 for Kubernetes Pods. So, on an instance with t3.medium type, you can run up to 18 Kubernetes Pods. The IP Prefix feature can significantly increase the number of Pods deployed to the worker node by assigning IP Prefixes from /28 subnets to the network interfaces instead of individual IP addresses. So, on the same instance type, t3.medium, you can run up to 242 Kubernetes Pods at the same time instead of 17 Pods, which is impressive for running budget-friendly nodes with more network capacity. AWS also provides a handy tool, max-pods-calculator, to find the recommended and maximum number of Pods per instance.
Considerations:
- If you use different instance types in your Kubernetes cluster, the smallest number of maximum Pods for an instance in the cluster is applied to all nodes in the clusters. For example, if you have
t3.medium17 maximum Pods andt3.large35 maximum Pods; you can only run 17 Pods ont3.largenodes. This limitation can almost be solved if IP Prefixes are used because you can increase the maximum number to 110 Pods, which is the recommended value for these instance types. - To be able to use the IP Prefixes feature, subnets used for worker nodes must have significant contiguous
/28blocks, or you will get the “InsufficientCidrBlocks: The specified subnet does not have enough free CIDR blocks to satisfy the request” error in AWS VPC CNI logs, which means the subnet specified is not suitable. - When you want to migrate from IP Addresses to IP Prefixes, it’s better to deploy new node groups instead of changing the current ones because, on current worker nodes, you may have some assigned IP addresses that conflict with IP prefixes.
AWS VPC CNI IP Prefixes setup procedure:
- Customise AWS VPC CNI and enable IP Prefixes.
- Find the maximum Pods that can be run with IP Prefixes enabled.
- Deploy new worker nodes after enabling IP Prefixes.
Step 1 – Enable IP Prefixes in AWS VPC CNI:
To enable the IP Prefixes “Prefix Delegation” feature in AWS VPC CNI in the EKS cluster, add the following environment variables to the aws-node DaemonSet.
kubectl -n kube-system set env ds aws-node ENABLE_PREFIX_DELEGATION=true

kubectl -n kube-system set env ds aws-node WARM_PREFIX_TARGET=1
To learn more about what is the WARM_PREFIX_TARGET option, read more on this page. This option allows you to assign some addresses available to be used by the node and reduces the delay when a set of Pods comes to the node.
Step 2 – Find Recommended and Maximum Pods:
To check the current maximum Pods that can be run on node:
curl -O https://raw.githubusercontent.com/awslabs/amazon-eks-ami/master/templates/al2/runtime/max-pods-calculator.sh

chmod +x max-pods-calculator.sh

./max-pods-calculator.sh --instance-type t3.medium --cni-version 1.18.1-eksbuild.1
To check the recommended number after enabling IP Prefixes:
./max-pods-calculator.sh --instance-type t3.medium --cni-version 1.18.1-eksbuild.1 --cni-prefix-delegation-enabledTo check the maximum number of Pods when IP Prefixes is enabled:
./max-pods-calculator.sh --instance-type t3.medium --cni-version 1.18.1-eksbuild.1 --cni-prefix-delegation-enabled --show-max-allowed
Step 3 – Deploy new worker nodes:
As mentioned above, it’s better to deploy new nodes to avoid possible conflicts. By enabling the IP Prefixes feature and configuring the VPC CNI, as soon as you deploy new worker nodes, they find the Prefix Delegation is enabled, and the maximum number of Pods that can be run will be increased to the recommended value introduced by AWS. If you want to be able to deploy up to the maximum number, you must deploy worker nodes using custom launch templates and override --max-pods option.
AWS EKS – Part 4 – Deploy worker nodes using custom launch templates
Conclusion:
AWS VPC CNI supports a variety of features to cover your networking needs. In this lesson, you’ve learned how to increase allocatable IP addresses to increase the number of Pods that can be deployed into worker nodes. In future articles, you will learn more about networking with VPC CNI and how to implement different use cases.
If you like this series of articles, please share them and write your thoughts as comments here. Your feedback encourages me to complete this massively planned program. Just share them and provide feedback. I’ll make you an AWS EKS black belt.
Follow my LinkedIn https://linkedin.com/in/ssbostan
Follow Kubedemy’s LinkedIn https://linkedin.com/company/kubedemy
Follow Kubedemy’s Telegram https://telegram.me/kubedemy
Related Posts
AWS EKS – Part 34 – Kubernetes Storage using EBS CSI Driver
AWS EKS – Part 31 – Setup Calico CNI on EKS Clusters