
AWS EKS – Part 4 – Deploy Worker Nodes using Custom Launch Templates
In this article, we deploy a managed node group with a custom EC2 Launch Template. By using custom Launch Templates, you can customize kubelet configuration, as well as installing and managing your requirements on worker nodes.
Follow our social media:
https://www.linkedin.com/in/ssbostan
https://www.linkedin.com/company/kubedemy
https://www.youtube.com/@kubedemy
Register for the FREE EKS Tutorial:
If you want to access the course materials, register from the following link:
Register for the FREE AWS EKS Black Belt Course
Watch on YouTube:
Fully managed vs Managed launch template:
In fully managed node groups, AWS is responsible for creating new versions, creating new launch templates, notifying you when a new upgrade is available, etc., but in managed node groups using custom launch templates, you are responsible for creating new launch templates for new versions, and nobody notifies you about image patches, etc. In the case of this type of deployment, EKS takes care of zero downtime deployment like fully managed node groups, as discussed in the previous article.
Custom launch template considerations:
- You can create a custom security group for them or use the EKS-created one.
- You should select the proper AMI for launch templates.
- You can customize
kubeletconfiguration to join the cluster with custom settings. - You need to check and create new launch templates for upgrades.
Custom launch templates deploying procedure:
- Create a custom security group for EC2 instances.
- Allow traffic between cluster security group and custom security group.
- Find an EKS-optimized AMI image for worker nodes.
- Retrieve EKS cluster information needed for worker nodes.
- Find the maximum allowed number of pods for the worker node instance.
- Create cloud-init User-data to run
bootstrap.shor custom script. - Create a new EC2 Launch Template for worker nodes.
- Create an EKS node group based on the launch template.
- Confirm worker node installation with kubectl.
Here is the flow and diagram of what we should do:
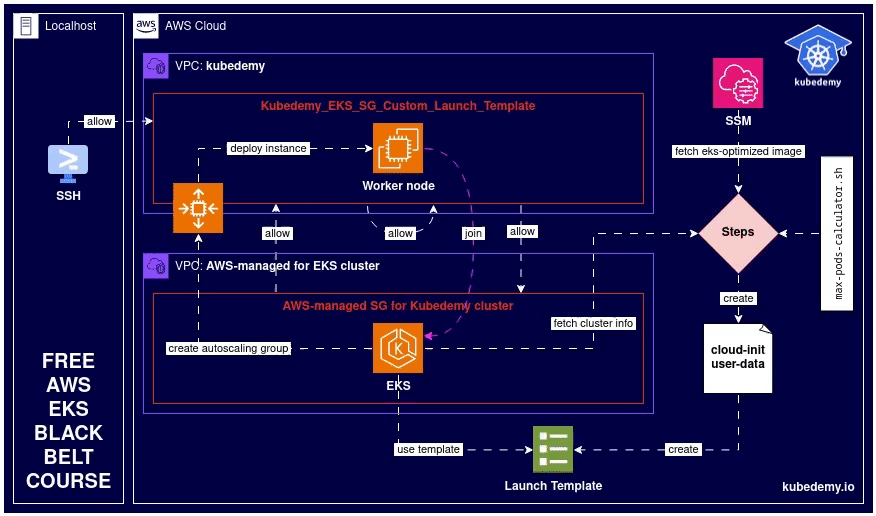
Step 1 – Create Security Group:
This security group should allow communication between worker nodes and the control plane. You can ignore this step and use the already EKS-created security group, but I suggest you create a new security group to be familiar with that.
To create a new security group, run this command:
aws ec2 create-security-group \
  --description "Kubedemy EKS cluster custom launch template" \
  --group-name Kubedemy_EKS_SG_Custom_Launch_Template \
  --vpc-id vpc-09a71d02067cf835d \
  --tag-specifications "ResourceType=security-group,Tags=[{Key=owner,Value=kubedemy}]"
Note: Worker nodes should also be able to communicate with each other.
Step 2 – Assign Security Group inbound rules:
To allow traffic between worker nodes themselves:
aws ec2 authorize-security-group-ingress \
  --group-id sg-0fa2c48c8e5d4e059 \
  --source-group sg-0fa2c48c8e5d4e059 \
  --protocol all
To allow traffic from the control plane:
Important: If you don’t allow traffic from the control plane, kubelet can join the cluster without any issues but kube-apiserver cannot connect back to kubelet to perform kubectl exec and kubectl logs commands.
aws ec2 authorize-security-group-ingress \
  --group-id sg-0fa2c48c8e5d4e059 \
  --source-group sg-09ff6d3276b8ff697 \
  --protocol all
To allow traffic to the control plane:
Important: If you don’t allow traffic to the cluster control plane, kubelet cannot connect to kube-apiserver and worker nodes are not able to join the cluster.
aws ec2 authorize-security-group-ingress \
  --group-id sg-09ff6d3276b8ff697 \
  --source-group sg-0fa2c48c8e5d4e059 \
  --protocol all
Note: It’s better to specify an additional security group to cluster during cluster deployment and edit that additional security group for some purposes like this instead of editing the cluster EKS-managed security group.
To allow SSH traffic to worker nodes:
aws ec2 authorize-security-group-ingress \
  --group-id sg-0fa2c48c8e5d4e059 \
  --cidr 0.0.0.0/0 \
  --protocol tcp \
  --port 22
Step 3 – Find EKS-optimized AMI:
AWS provides a bunch of optimized AMIs for EKS clusters. These images contain all necessary configurations and tools to setup and deploy worker nodes. In addition to Kubernetes-specific tools, AWS also provides a script called bootstrap.sh to setup kubelet with ease. To learn more about the script, check this file.
Run this command to find the EKS-optimized image:
aws ssm get-parameter \
  --name /aws/service/eks/optimized-ami/1.28/amazon-linux-2/recommended/image_id \
  --query "Parameter.Value" \
  --output text
Step 4 – Retrieve EKS cluster information:
Worker nodes “kubelet component” need Kubernetes API Server address, API Server CA “Certificate Authority”, and the cluster DNS server address to be able to join the cluster. To find these values, execute the following commands:
aws eks describe-cluster \
  --name kubedemy \
  --query "cluster.endpoint" \
  --output text

aws eks describe-cluster \
  --name kubedemy \
  --query "cluster.certificateAuthority.data" \
  --output text

aws eks describe-cluster \
  --name kubedemy \
  --query "cluster.kubernetesNetworkConfig.serviceIpv4Cidr" \
  --output text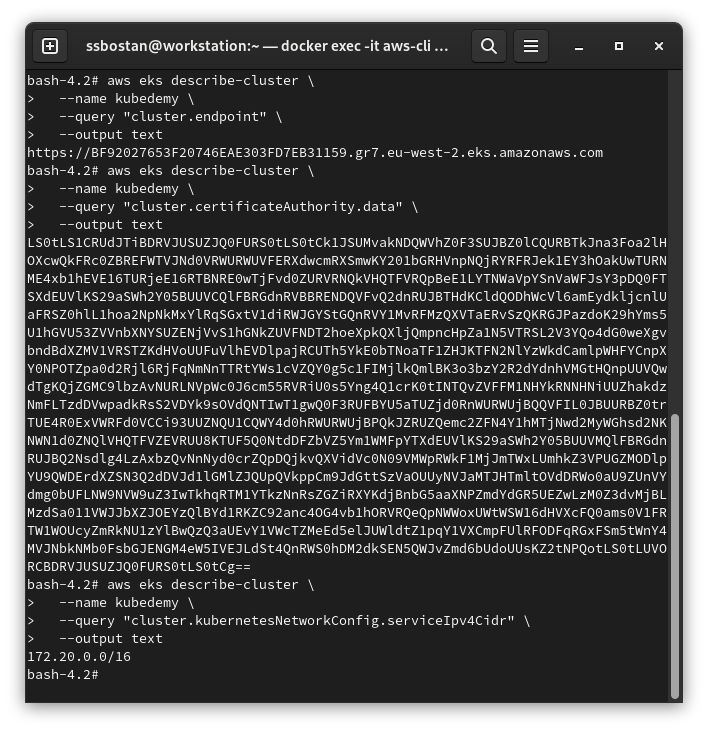
Step 5 – Find max Pods can be run on EC2 instance:
In the AWS ecosystem, each EC2 Instance Type has its limitation for the number of allowed network interfaces and the number of allowed IP addresses that can be assigned to each interface. This limitation affects the number of Pods you can run on each worker node. Read more here on EKS documentation.
To find the right size, AWS provided a script to find the maximum number of Pods that can be run on the worker node. To check how many Pods you can run, execute the following commands. We need this value in the next step.
yum install -y jq curl

curl -O https://raw.githubusercontent.com/awslabs/amazon-eks-ami/master/files/max-pods-calculator.sh

chmod +x max-pods-calculator.sh

./max-pods-calculator.sh --instance-type t3.medium --cni-version 1.15.3-eksbuild.1
Note: Are you shocked? As you can see, we can’t run too many Pods on the worker node. This limitation exists because of AWS EKS VPC CNI, but don’t worry. In future articles, I’ll explain how we can increase the amount of allocatable IP addresses for Pods with VPC CNI and BYO CNI “third-party CNIs” methods.
Step 6 – Create cloud-init User-data file:
Cloud-init user-data is a code “cloud-config, bash script, etc.” run during instance setup. In the worker node setup process, we run bootstrap.sh file to join the worker node to cluster. Replace the following values with your cluster values.
cat <<EOF | base64 -w0 > userdata.txt
MIME-Version: 1.0
Content-Type: multipart/mixed; boundary="==KUBEDEMY=="

--==KUBEDEMY==
Content-Type: text/x-shellscript; charset="us-ascii"

#!/bin/bash

set -ex

EKS_CLUSTER_API="API SERVER ADDRESS"
EKS_CLUSTER_CA="API SERVER CERTIFICATE AUTHORITY"
EKS_CLUSTER_DNS_IP="172.20.0.10"

/etc/eks/bootstrap.sh kubedemy \\
  --apiserver-endpoint "\$EKS_CLUSTER_API" \\
  --b64-cluster-ca "\$EKS_CLUSTER_CA" \\
  --dns-cluster-ip "\$EKS_CLUSTER_DNS_IP" \\
  --container-runtime containerd \\
  --kubelet-extra-args '--max-pods=17' \\
  --use-max-pods false

--==KUBEDEMY==--
EOF
Note: 172.20.0.10 is the CoreDNS service IP within the cluster.
Step 7 – Create EC2 Launch Template for EKS:
It’s time to bring everything together and create an EC2 Launch Template:
- Replace ImageId with the selected EKS-optimized Image ID.
- Replace InstanceType with the instance type chosen.
- Replace UserData with
userdata.txtfile content. - Replace SecuirtyGroupIds with the previously created one.
cat <<EOF > launch-template.json
{
    "ImageId": "ami-07b42e8fa1b744cd4",
    "InstanceType": "t3.medium",
    "UserData": "userdata.txt content",
    "SecurityGroupIds": ["sg-0fa2c48c8e5d4e059"],
    "KeyName": "kubedemy",
    "TagSpecifications": [
        {
            "ResourceType": "volume",
            "Tags": [
                {
                    "Key": "owner",
                    "Value": "kubedemy"
                }
            ]
        },
        {
            "ResourceType": "spot-instances-request",
            "Tags": [
                {
                    "Key": "owner",
                    "Value": "kubedemy"
                }
            ]
        },
        {
            "ResourceType": "network-interface",
            "Tags": [
                {
                    "Key": "owner",
                    "Value": "kubedemy"
                }
            ]
        },
        {
            "ResourceType": "instance",
            "Tags": [
                {
                    "Key": "owner",
                    "Value": "kubedemy"
                }
            ]
        }
    ],
    "PrivateDnsNameOptions": {
        "EnableResourceNameDnsARecord": true
    },
    "Monitoring": {
        "Enabled": true
    }
}
EOF

aws ec2 create-launch-template \
  --launch-template-name Kubedemy_EKS_Custom_Launch_Template \
  --launch-template-data file://launch-template.json \
  --tag-specifications "ResourceType=launch-template,Tags=[{Key=owner,Value=kubedemy}]"
Step 8 – Create EKS Nodegroup with Launch Template:
Create cluster critical node group:
These worker nodes will be used to deploy cluster-critical applications like ingress controller, dashboard, monitoring, GitOps, CI/CD, security, etc. tools.
- Worker nodes label
node.kubernetes.io/scope=system - These worker nodes are tainted with
CriticalAddonsOnlykey.
aws eks create-nodegroup \
  --cluster-name kubedemy \
  --nodegroup-name system-custom-launch-template-workers-001 \
  --scaling-config minSize=2,maxSize=5,desiredSize=2 \
  --subnets subnet-0ff015478090c2174 subnet-01b107cea804fdff1 subnet-09b7d720aca170608 \
  --node-role arn:aws:iam::231144931069:role/Kubedemy_EKS_Managed_Nodegroup_Role \
  --launch-template name=Kubedemy_EKS_Custom_Launch_Template,version=1 \
  --capacity-type ON_DEMAND \
  --update-config maxUnavailable=1 \
  --taints "key=CriticalAddonsOnly,value=true,effect=NO_SCHEDULE" "key=CriticalAddonsOnly,value=true,effect=NO_EXECUTE" \
  --labels node.kubernetes.io/scope=system \
  --tags owner=kubedemy
Create application node group:
These worker nodes will be used to deploy our workloads and applications.
- Worker nodes label
node.kubernetes.io/scope=application
aws eks create-nodegroup \
  --cluster-name kubedemy \
  --nodegroup-name application-custom-launch-template-workers-001 \
  --scaling-config minSize=2,maxSize=5,desiredSize=2 \
  --subnets subnet-0ff015478090c2174 subnet-01b107cea804fdff1 subnet-09b7d720aca170608 \
  --node-role arn:aws:iam::231144931069:role/Kubedemy_EKS_Managed_Nodegroup_Role \
  --launch-template name=Kubedemy_EKS_Custom_Launch_Template,version=1 \
  --capacity-type ON_DEMAND \
  --update-config maxUnavailable=1 \
  --labels node.kubernetes.io/scope=application \
  --tags owner=kubedemy
To wait for node groups to be active, run the following commands:
aws eks wait nodegroup-active \
  --cluster-name kubedemy \
  --nodegroup-name system-custom-launch-template-workers-001

aws eks wait nodegroup-active \
  --cluster-name kubedemy \
  --nodegroup-name application-custom-launch-template-workers-001
Step 9 – Confirm worker nodes installation:
To check and confirm node installation, run the following commands:
kubectl get nodes

# To check maximum number of pods per node.
kubectl get no -o jsonpath='{range .items[*]}{.metadata.name}{" --> "}{.status.capacity.pods}{"\n"}{end}'

kubectl get po -A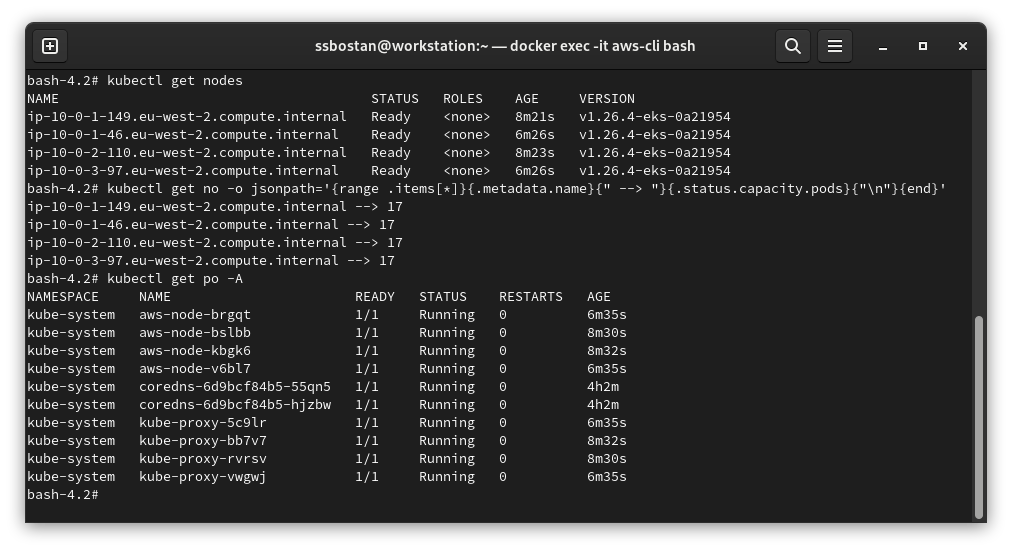
Step 10 – Investigate AWS resources:
AWS EKS-created resources are the same as what I explained in the previous article.
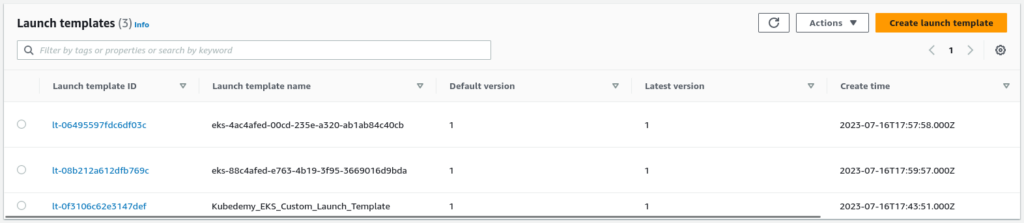
EC2 Launch Templates:
When we create node groups from our custom launch template, EKS copies that configuration and creates a new one for each node group.
Results:
Here are the results of the previous commands; we need them in the next articles:
| Custom Security Group ID | sg-0fa2c48c8e5d4e059 |
| Custom Security Group Name | Kubedemy_EKS_SG_Custom_Launch_Template |
| Cluster Security Group ID (from 2nd article) | sg-09ff6d3276b8ff697 |
| EC2 Launch Template Name | Kubedemy_EKS_Custom_Launch_Template |
| EC2 Launch Template ID | lt-0f3106c62e3147def |
| EKS-optimized Image ID for Kubernetes 1.28 | ami-07b42e8fa1b744cd4 |
| EC2 Instance Type | t3.medium |
| Max Pods per Worker Node | 17 |
| Cluster CoreDNS service IP Address | 172.20.0.10 |
Conclusion:
EKS with custom EC2 Launch Templates allows us to customize the configuration of worker nodes. In this article, you learned how to create and use them, and in future articles, I will explain a couple of customization we need in production environments.
If you like this series of articles, please share them and write your thoughts as comments here. Your feedback encourages me to complete this massively planned program. Just share them and provide feedback. I’ll make you an AWS EKS black belt.
Follow my LinkedIn https://www.linkedin.com/in/ssbostan
Follow Kubedemy LinkedIn https://www.linkedin.com/company/kubedemy
Follow Kubedemy Telegram https://telegram.me/kubedemy
Related Posts
AWS EKS – Part 20 – Authentication and Authorization with Access Entries
AWS EKS – Part 32 – Setup Cilium CNI on EKS Clusters
Thanks for the amazing videos and documentation. I just want to give a suggestion on saving the bill. As we cannot continue to practice daily and we have to keep the EKS cluster Active. This increases the bill. Can you add a document or a statement when you ask the learners to delete the resources at the end of each practicals?
Thanks for your feedback. Will do it.