
AWS EKS – Part 22 – Deploy and Manage EKS Cluster Addons
AWS provides dozens of additional components, “Operators”, to extend EKS functionalities called Addons. These addons can be easily deployed to the EKS cluster to extend its features or add new functionalities like backup/restore, monitoring, logging, security, storage and load balancer integration, secret management, etc. In the Kubernetes ecosystem, we can extend its functionalities using Operators and Controllers. Operators are the de facto method for extending Kubernetes features. In EKS, Addons look like regular Kubernetes operators but are integrated, tested and managed by AWS EKS product teams or partners. This lesson will dive deep into EKS addons to prepare you to install, configure, manage and use them.
Follow our social media:
https://www.linkedin.com/in/ssbostan
https://www.linkedin.com/company/kubedemy
https://www.youtube.com/@kubedemy
Register for the FREE EKS Tutorial:
If you want to access the course materials, register from the following link:
Register for the FREE AWS EKS Black Belt Course
What is Kubernetes Operator?
Kubernetes Operators are a set of applications that add new features to Kubernetes without changing its upstream codes. Think of a Kubernetes operator as a USB device like a USB disk, which can extend your computer storage without any changes, or a USB wireless adaptor, which can bring a wireless network functionality to your computer without changing your hardware. These functionalities can be added to your system through a standard interface called USB; in Kubernetes, operators bring new functionalities without changing Kubernetes codes through a standard interface called CustomResourceDefinition(CRD). So to speak, the Kubernetes API server provides an interface, “CRD”, to let applications extend Kubernetes functionalities. From the user side, you use the new functionalities by creating objects of CRD resources, and from the operators’ side, they listen to their CRDs to implement and provide the promised functionalities. Kubernetes operators can be developed in any programming language like Go, Python, JavaScript, etc., and deployed in or out of Kubernetes clusters.
What are EKS Addons?
They are the same as the regular Kubernetes operators that can be deployed quickly to EKS clusters. AWS EKS product teams or partners thoroughly test, integrate, and manage them. You can enable EKS addons through standard EKS API, and EKS will take the rest of it. In the case of management and upgrades, they’re fully managed by EKS through its standard upgrade process, so you don’t need to worry about their compatibility with your EKS cluster version. Some of them are free, and some are chargeable.
What is EKS Blueprint?
EKS Blueprint is a packaging pattern for managing a set of addons to standardize the cluster tooling. Imagine you have two different clusters for Dev and Prod environments and want to keep them as same as possible. In that case, using EKS Blueprint helps keep your dev/prod parity with ease. EKS Blueprint installs the same addons with the same version and configuration in both clusters. EKS Blueprint can be deployed using AWS CDK, OpenTofu, Pulumi, Terraform, etc. You can also implement yours.
AWS EKS Supported Addons:
- CoreDNS: Kubernetes-native DNS server and service discovery.
- kube-proxy: Service networking agent for Kubernetes.
- Amazon VPC CNI: Container Network Interface for EKS clusters.
- CSI Snapshot Controller: Enable Storage snapshots within the cluster.
- EBS CSI Driver: Enable Kubernetes workloads to consume EBS storage.
- CloudWatch Observability: CloudWatch Agent and enable container insights.
- S3 CSI Driver: Enable Kubernetes workloads to consume S3 storage.
- OpenTelemetry: Enable Kubernetes cluster observability.
- Pod Identity Agent: Enable access to AWS resources without IRSA.
- GuardDuty: Kubernetes Runtime security for EKS clusters.
- EFS CSI Driver: Enable Kubernetes workloads to consume EFS storage.
You can also find other addons from AWS partners on the AWS Marketplace.
How does EKS manage Addons within the cluster?
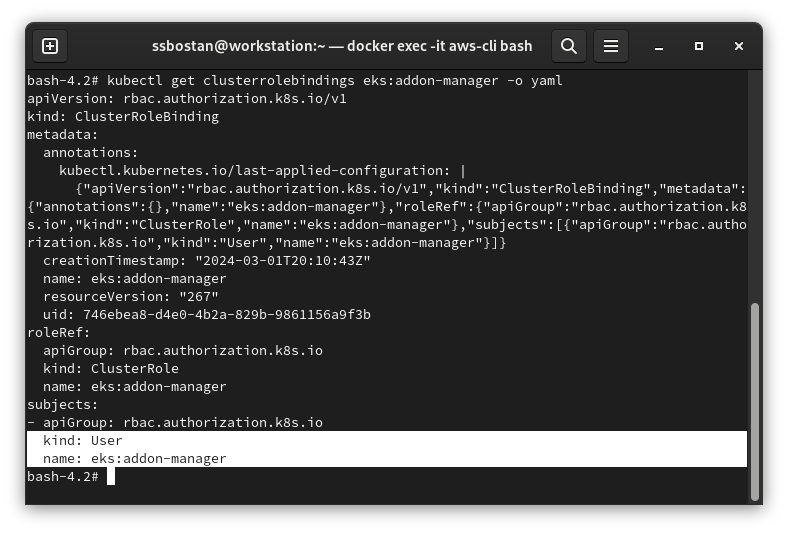
AWS EKS creates a ClusterRole eks:addon-manager and a ClusterRoleBinding eks:addon-manager which allows eks:addon-manager user to access the cluster. EKS uses x509 certificates for this user authentication. If you remove this ClusterRoleBinding, it cannot access the cluster, install and manage addons.
EKS Addons setup and configure procedure:
- Find available EKS addons and their configurations.
- Install and deploy addons to EKS clusters.
- EKS Addons permissions, policies and IRSA integration.
- Upgrade EKS Addons without downtime.
Step 1 – Find the list of available EKS addons:
You can list all available addons for the desired Kubernetes version using the following command. This command also provides a way to select different types of addons like networking, storage, security, etc., in addition to their providers.
aws eks describe-addon-versions \
  --kubernetes-version 1.28 \
  --publishers eks \
  --owners aws \
  --output table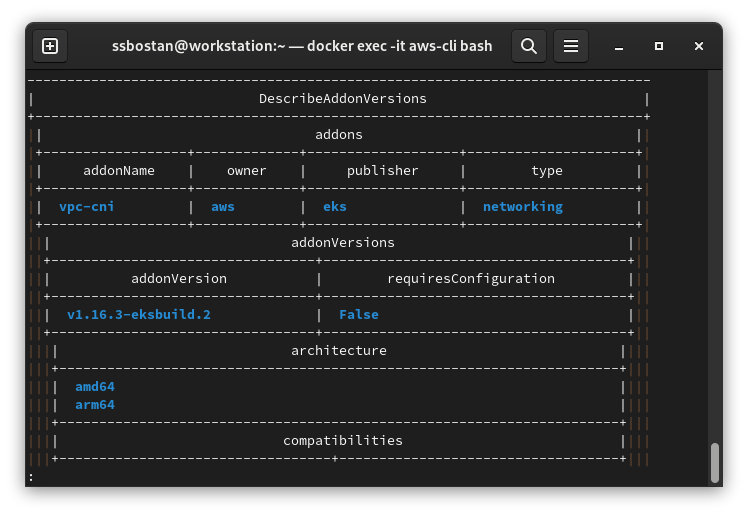
For example, in the above image, vpc-cni v1.16.3-eksbuild.2 is available.
After finding the desired addon and version, you can find all the available options to customize and configure it. To find its configuration schema, run this command:
aws eks describe-addon-configuration \
  --addon-name vpc-cni \
  --addon-version v1.16.3-eksbuild.2 \
  --output json | jq -r .configurationSchema | jq .
The above command shows the addon’s JSON schema to validate the configuration.
Note: jq should be installed on your machine.
Step 2 – Install and Deploy EKS Addons:
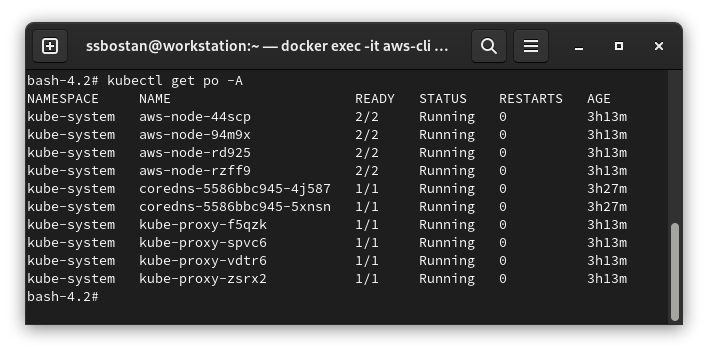
All Kubernetes clusters need at least kube-proxy, CoreDNS, and the CNI plugin to operate correctly. So, when you deploy your EKS clusters, even if you don’t install these addons, they will be automatically deployed by the EKS service.
Most EKS addons need some IAM policies to access AWS resources on your behalf to do their job. For example, VPC CNI needs a couple of IAM policies to access and manage EC2 network interfaces and create and assign IP addresses to Pods. At the moment, the required permissions for VPC CNI have already been added to the worker node IAM role. For the other EKS addons, you may need to add more policies to the worker node IAM role, which can extend your attack surface because when you add a policy to the worker node IAM role, all the Pods in the cluster can access resources granted by that policy if you didn’t disable the IMDS service. On the other hand, if you disable IMDS in the cluster, Pods cannot access AWS resources as they can’t fetch access tokens. Here is where IRSA comes into the picture. In the next step, you will learn how to take advantage of IRSA to setup a least privilege principle for Pods and keep the cluster safe.
To install a new addon, run the following command:
# Create addon configuration.
cat <<EOF > vpc-cni-configuration.yaml
tolerations:
  - operator: Exists
EOF

aws eks create-addon \
  --cluster-name kubedemy \
  --addon-name vpc-cni \
  --addon-version v1.16.3-eksbuild.2 \
  --resolve-conflicts OVERWRITE \
  --configuration-values file://vpc-cni-configuration.yaml \
  --tags owner=kubedemy
Important note: Cluster Addons deployed using Kubernetes DaemonSet should always tolerate all the taints to be deployed into all the worker nodes. For example, VPC CNI, which provides networking functionality, should be deployed to all the worker nodes. Those addons deployed using other Kubernetes resources, like Deployment, should always tolerate CriticalAddonsOnly taint and have a nodeAffinity to be deployed to system worker nodes. Moreover, the proper amount of resources for cluster critical addons should always be requested to avoid service interruption.
EKS Addon Resolve Conflicts options:
This option is honoured when you have the same addon in your cluster using a self-managed method. Otherwise, EKS will ignore this option and use the default value.
| NONE | EKS doesn’t change the addon values inside the cluster. |
| OVERWRITE | EKS will override the self-managed addon values with the AWS-provided default values. |
| PRESERVE | It’s the same as NONE but has different behaviours for addon upgrades. For upgrades, it preserves the already supplied values. |
Step 3 – Setup IRSA for EKS Addons:
I assume you already followed and implemented the previous articles about IRSA and IMDS to secure AWS account access. If you didn’t, read and implement EKS security best practices explained in the following articles:
AWS EKS – Part 13 – Setup IAM Roles for Service Accounts (IRSA)
AWS EKS – Part 15 – Restrict Node IMDS access to Secure AWS account access
In light of these security best practices, if you assign policies to the worker node IAM role, your installed addon, which needs those policies, cannot do its job due to the IMDS service restriction. This sentence is correct only for those Pods running with an isolated network namespace. As mentioned in the IRSA article, those Pods using the host machine network namespace can still use the IMDS service.
For example, the VPC CNI uses the host network namespace. Although you’ve already disabled the IMDS service, it can use the IMDS service, fetch tokens and access the AWS resources to do its job. All the CNI plugins need to be run in the host network namespace, and they can bypass IMDS access restrictions.
Let’s try to install the EBS CSI Driver without using IRSA and check the result:
Add the following IAM Policy to the worker node IAM role:
aws iam attach-role-policy \
  --policy-arn arn:aws:iam::aws:policy/service-role/AmazonEBSCSIDriverPolicy \
  --role-name Kubedemy_EKS_Managed_Nodegroup_Role
To install the EBS CSI Driver, run these commands:
cat <<EOF > ebs-csi-driver-configuration.yaml
controller:
tolerations:
- operator: Exists
affinity:
nodeAffinity:
preferredDuringSchedulingIgnoredDuringExecution:
- weight: 100
preference:
matchExpressions:
- key: node.kubernetes.io/scope
operator: In
values:
- system
EOF
aws eks create-addon \
--cluster-name kubedemy \
--addon-name aws-ebs-csi-driver \
--addon-version v1.28.0-eksbuild.1 \
--resolve-conflicts OVERWRITE \
--configuration-values file://ebs-csi-driver-configuration.yaml \
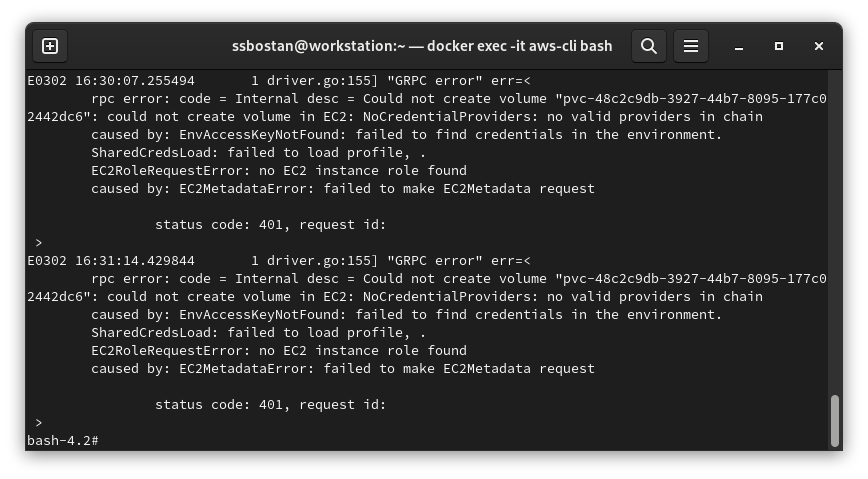
--tags owner=kubedemyInstallation will be successful, but when you try to create a PersistentVolumeClaim, the resource will stay Pending for as long as the sky is blue. If you check the EBS CSI controller logs, it shows it cannot create the volume because of access restrictions. As the IMDS is disabled, and we didn’t use IRSA for the addon, it failed.
To test the EBS driver, use the following manifest:
cat <<EOF | kubectl apply -f -
apiVersion: v1
kind: PersistentVolumeClaim
metadata:
  name: test
spec:
  resources:
    requests:
      storage: 1Gi
  accessModes:
    - ReadWriteOnce
---
apiVersion: v1
kind: Pod
metadata:
  name: test
spec:
  containers:
    - name: test
      image: nginx:alpine
      volumeMounts:
        - name: test
          mountPath: /test
  volumes:
    - name: test
      persistentVolumeClaim:
        claimName: test
EOF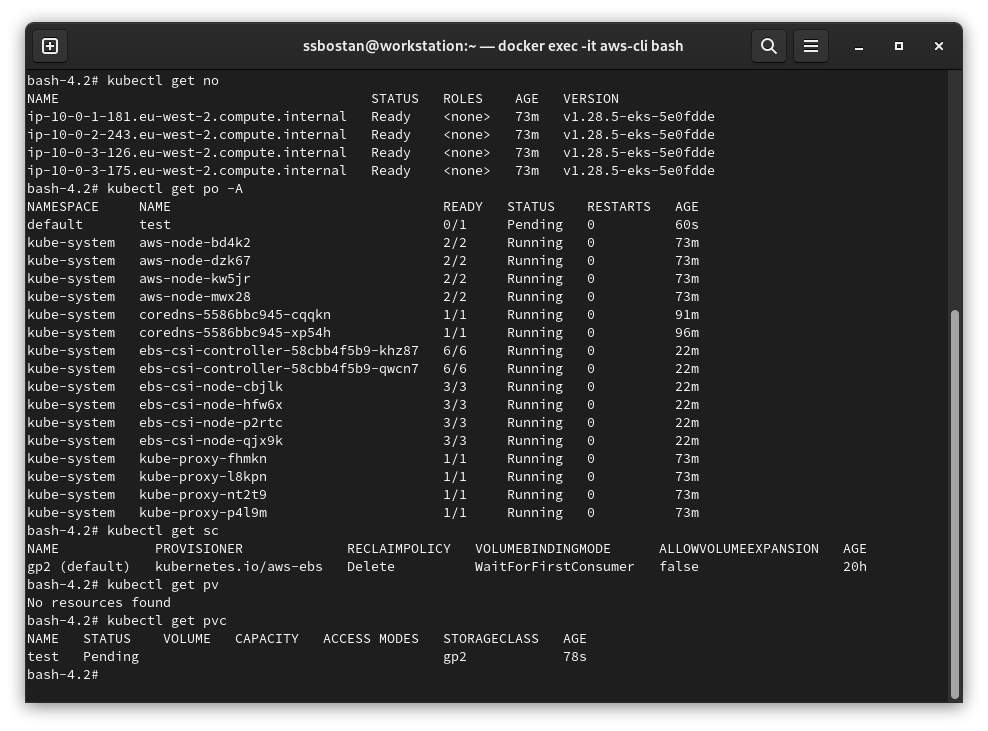
Let’s install the EBS CSI Driver with IRSA and check the results:
To clean up the previous changes, run these commands:
aws iam detach-role-policy \
  --policy-arn arn:aws:iam::aws:policy/service-role/AmazonEBSCSIDriverPolicy \
  --role-name Kubedemy_EKS_Managed_Nodegroup_Role

# Run this command to delete the EKS addon.
aws eks delete-addon \
  --cluster-name kubedemy \
  --addon-name aws-ebs-csi-driver
Create an IRSA role for the EBS CSI Driver:
cat <<EOF > irsa-trust-policy.json
{
  "Version": "2012-10-17",
  "Statement": [
    {
      "Effect": "Allow",
      "Principal": {
        "Federated": "arn:aws:iam::231144931069:oidc-provider/oidc.eks.eu-west-2.amazonaws.com/id/70233F0C484DBD86DB4515BD1EF7668D"
      },
      "Action": "sts:AssumeRoleWithWebIdentity",
      "Condition": {
        "StringEquals": {
          "oidc.eks.eu-west-2.amazonaws.com/id/70233F0C484DBD86DB4515BD1EF7668D:aud": "sts.amazonaws.com",
          "oidc.eks.eu-west-2.amazonaws.com/id/70233F0C484DBD86DB4515BD1EF7668D:sub": "system:serviceaccount:kube-system:ebs-csi-controller-sa"
        }
      }
    }
  ]
}
EOF

aws iam create-role \
  --role-name Kubedemy_EKS_IRSA_Kube_System_EBS_CSI_Driver \
  --assume-role-policy-document file://irsa-trust-policy.json \
  --tags Key=owner,Value=kubedemy

aws iam attach-role-policy \
  --policy-arn arn:aws:iam::aws:policy/service-role/AmazonEBSCSIDriverPolicy \
  --role-name Kubedemy_EKS_IRSA_Kube_System_EBS_CSI_Driver
Now, install the EBS CSI Driver addon with the IRSA role ARN option:
aws eks create-addon \
--cluster-name kubedemy \
--addon-name aws-ebs-csi-driver \
--addon-version v1.28.0-eksbuild.1 \
--resolve-conflicts OVERWRITE \
--configuration-values file://ebs-csi-driver-configuration.yaml \
--service-account-role-arn arn:aws:iam::231144931069:role/Kubedemy_EKS_IRSA_Kube_System_EBS_CSI_Driver \
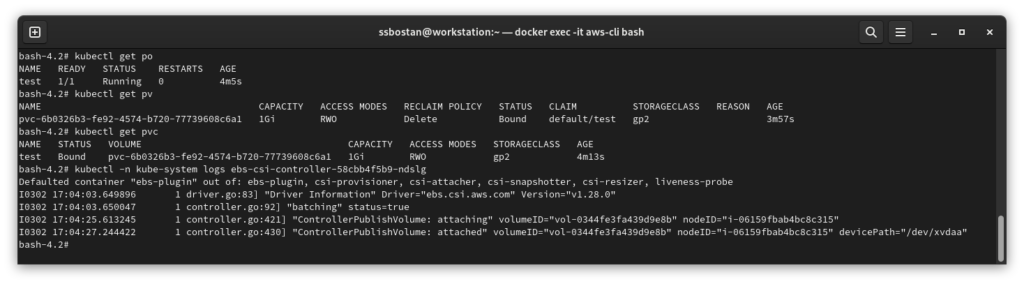
--tags owner=kubedemyAfter successful installation, if you create the same manifest mentioned in the previous step, everything goes well, and the PVC will be created to be mounted to the Pod.
Note: Remember to delete the PVC after the test.
Step 4 – Upgrade EKS Addons without downtime:
Upgrading Kubernetes addons need extra care as the upgrade process may fail and cause a downtime in your environments. Kubernetes itself has a different mechanism to avoid workload downtime, and as all the addons are running using Kubernetes workload resources, like Deployment, DaemonSet, StateFulSet, etc., every available feature for these resources can be used in addon upgrading as well.
Zero downtime Kubernetes Deployments:
Kubernetes Deployments can be upgraded with zero downtime if a proper number of replicas are being run and an appropriate update strategy is being used. For every Deployment, “addons, components, applications”, consider at least two replicas in two different worker nodes or even better zones. The rolling update strategy is the best choice, and it’s better to set the maximum number of unavailable Pods to one. In this scenario, if you upgrade the Deployment, only one Pod will be terminated in a given time, and at least one Pod will be up and running to serve the requests. Remember, to assist the Kubernetes Deployment controller in considering the Pod healthy and trying to upgrade the next one, you should always set proper liveness and readiness probes for applications. Without probes, the Deployment controller will deploy all the new Pods one by one without checking their readiness status, which may cause downtime.
Zero downtime Kubernetes DaemonSets:
Kubernetes DaemonSets are mainly used for addons, like VPC CNI node driver, EBS CSI node driver, Prometheus node exporter, Logging drivers, etc. The DaemonSet controller also supports rolling updates for DaemonSets to provide better control and a zero downtime model. Upgrading critical components mostly requires deleting the old Pods and deploying the new ones. So, between the deletion process and deploying the new one, you will face downtime. For example, imagine you have a DaemonSet resource that deploys a local proxy to every worker node, and this proxy is responsible for forwarding user requests to your applications in that node. In that case, if you upgrade the DaemonSet, the old proxy should be deleted first, and the new version should be deployed after that; this upgrade will cause downtime in your environment as the proxy is not available for some time, 1 second, 10 seconds, more, less. To achieve zero downtime, you should have at least two nodes, and all the applications should be deployed with at least two replicas across these nodes. So when the upgrade process starts, the first node will go for the upgrade process with downtime, but because the second node serves the same things, users can access the applications without downtime. Again, remember to set proper liveness and readiness probes for DaemonSet Pods. If you don’t set a proper readiness probe, the DaemonSet controller will deploy all the new Pods one by one without checking their readiness status.
Zero downtime in upgrading EKS addons:
All EKS Addons, both of which use Deployments and DaemonSets, are provided while they’ve implemented all the best practices, the proper update strategy, maximum unavailable, proper liveness and readiness probes, and the only thing needed is to deploy a cluster based on the best practices and deploy your applications with an appropriate number of replicas across different node/zones.
To upgrade an EKS addon, run the following command:
aws eks update-addon \
  --cluster-name kubedemy \
  --addon-name vpc-cni \
  --addon-version v1.16.3-eksbuild.2 \
  --resolve-conflicts OVERWRITE
You can also change the configuration and service account role:
aws eks update-addon \
  --cluster-name kubedemy \
  --addon-name vpc-cni \
  --addon-version v1.16.3-eksbuild.2 \
  --resolve-conflicts OVERWRITE \
  --configuration-values file://vpc-cni-new-configuration.yaml \
  --service-account-role-arn arn:aws:iam::231144931069:role/Kubedemy_EKS_IRSA_Kube_System_VPC_CNI
Note: If you provide a new configuration, it overrides the previous configuration.
Note: Some updates, “like changing service account role arn”, do not force the Pods to be redeployed. You must restart them using the following command:
kubectl rollout restart TYPE NAME

# Restart AWS VPC CNI:
kubectl -n kube-system rollout restart daemonset aws-node

# Restart AWS EBS CSI Driver:
kubectl -n kube-system rollout restart deployment ebs-csi-controller
kubectl -n kube-system rollout restart daemonset ebs-csi-node
Note: Before upgrading addons, check their compatibility with Kubernetes version.
Conclusion:
AWS provides an easy way to deploy and manage dozens of addons to integrate EKS clusters with other AWS services. If they are correctly used, they can significantly reduce your management overhead and provide a reliable way to deploy and manage addons.
If you like this series of articles, please share them and write your thoughts as comments here. Your feedback encourages me to complete this massively planned program. Just share them and provide feedback. I’ll make you an AWS EKS black belt.
Follow my LinkedIn https://www.linkedin.com/in/ssbostan
Follow Kubedemy LinkedIn https://www.linkedin.com/company/kubedemy
Follow Kubedemy Telegram https://telegram.me/kubedemy
Related Posts
AWS EKS – Part 33 – Bring Your Own CNI (BYOCNI) Approach
AWS EKS – Part 36 – Backup and Restore EBS with Snapshots