
AWS EKS – Part 9 – Deploy Worker Nodes using Fargate Instances
AWS Fargate is a serverless pay-as-you-go compute engine that lets you deploy applications without managing servers. It can be used on both ECS “to run tasks” and EKS “to run Pods” services. As it’s provided in the PAYG model, it reduces your running cost, and you can even mix it with Spot and Graviton instances to reduce more than ever. In this lesson, we’ll work on Fargate to deploy Kubernetes Pods in AWS EKS clusters.
Follow our social media:
https://www.linkedin.com/in/ssbostan
https://www.linkedin.com/company/kubedemy
https://www.youtube.com/@kubedemy
Register for the FREE EKS Tutorial:
If you want to access the course materials, register from the following link:
Register for the FREE AWS EKS Black Belt Course
Fargate considerations and limitations:
- Fargate does not support Privileged containers.
- Fargate Pods can only be deployed into Private subnets.
- Fargate Pods are completely isolated from the others, and there are no shared resources between them. All Linux namespaces are also isolated.
- DaemonSet resources cannot be deployed into Fargate instances. If you need something on the Pod’s worker node, run it as a sidecar.
- Fargate does not support GPU capability. (At the time of writing this article)
- IMDS service is disabled on Fargate nodes, and IRSA should be used.
- AWS will automatically patch the Fargate instance OS, and it may cause Pod redeployment. To avoid downtime, some actions should be done.
- Fargate supports only AWS VPC CNI, and other CNIs cannot be used.
- EBS volumes cannot be mounted into Fargate instances.
- For Fargate, AWS runs a fully managed VM behind the scenes.
Read all other Fargate considerations and limitations in the following page:
https://docs.aws.amazon.com/eks/latest/userguide/fargate.html
Important tips before using Fargate Pods:
- To allow Fargate instances to join the EKS cluster, the EKS cluster should be deployed with a private API endpoint, or the public API endpoint should be accessible over the internet. If you want to use the public endpoint, the Fargate instance should be deployed behind a NAT gateway to be able to communicate.
- Although you provide an IAM role to Fargate instances, the Fargate Pods cannot consume that IAM role. If the Pod needs to get access to the AWS account, you must use the IAM Role for Service Accounts (IRSA) method.
- Kubernetes
affinityandantiAffinityoptions are ignored on Fargate. In Fargate, one node equals one Pod. 1 Instance (Worker node) = 1 Pod. - You can’t change the Fargate profiles after creation. To change, a new one should be created, and the old one should be removed. If the Fargate profile gets deleted, all the running Pods which are using that profile will be deleted and rescheduled again.
- You can’t use dynamic storage provisioning with Fargate nodes “as the CSI node driver cannot be deployed there”, but you can use statically provisioned volumes in Fargate Pods. So, Fargate is not a good choice for StatefulSet applications with
volumeClaimTemplatesoption. Remember: EBS volumes are not available at all, but you can easily mount EFS volumes in Fargate instances/Pods.
Fargate instances and Pods deployment procedure:
- Create private subnets and NAT Gateway for Fargate instances.
- Create a Fargate IAM role for new EKS Fargate profiles.
- Create separate Fargate profiles for each private subnet.
- Deploy a Kubernetes Pod and test the environment.
- Play with Fargate Pods and discover more about Fargate in EKS clusters.
- Investigate Fargate inside and outside of the Kubernetes cluster.
Step 1 – Create private subnets and NAT gateway:
To make Fargate work, we need some private subnets as well as a NAT gateway. We deployed all of them as a part of cluster requirements in the first lesson.
AWS EKS – Part 1 – Deploy EKS Cluster Requirements
Step 2 – Create IAM role for Fargate instances:
AWS deploys a fully managed VM behind the scenes. The kubelet component on the managed machine needs to join the cluster. To do so, we must create a new IAM role for our Fargate instances and attach a proper policy to that.
Important: AWS will add the IAM role ARN in aws-auth configmap.
Important: It’s better to create a separate Fargate IAM role for each cluster.
To create a trust policy for the Fargate IAM role, run this:
cat <<EOF > fargate-trust-policy.json
{
    "Version": "2012-10-17",
    "Statement": [
        {
            "Action": "sts:AssumeRole",
            "Effect": "Allow",
            "Principal": {
                "Service": "eks-fargate-pods.amazonaws.com"
            },
            "Condition": {
                "ArnLike": {
                    "aws:SourceArn": "arn:aws:eks:eu-west-2:231144931069:fargateprofile/kubedemy/*"
                }
            }
        }
    ]
}
EOF
As you can see, I mentioned the cluster name as the source ARN for the role.
To create the IAM role, run the following command:
aws iam create-role \
  --assume-role-policy-document file://fargate-trust-policy.json \
  --role-name Kubedemy_EKS_Fargate_Role \
  --tags Key=owner,Value=kubedemy
Now attach the AmazonEKSFargatePodExecutionRolePolicy policy to the role. This policy allows Fargate instance to communicate and download images from AWS ECR service. To attach the policy, run the following command:
aws iam attach-role-policy \
  --policy-arn arn:aws:iam::aws:policy/AmazonEKSFargatePodExecutionRolePolicy \
  --role-name Kubedemy_EKS_Fargate_Role
Step 3 – Create Fargate Profiles for the EKS cluster:
You can create a Fargate profile and assign a couple of private subnets “in different zones” to it. Normally, Fargate instances are spread across different subnets and zones, but not in an equal manner, and there is a chance to deploy all of the application replicas into the same subnet/zone. To avoid this behaviour, which can cause application downtime on AZ failures, the best practice is to create a Fargate profile per zone. In our example, we have three private subnets and will create three Fargate profiles.
- Fargate uses Namespace and Label to mutate the Pod manifest.
- You can use
*and?wildcards in both of them. - If the Pod matches nothing, it remains in the Pending state.
- If the Pod matches more than one profile, it uses the first one alphabetically.
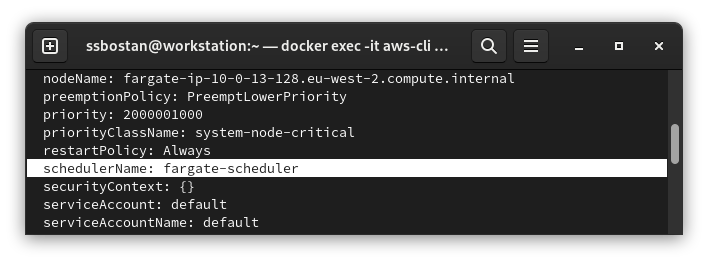
- After matching to a profile, Fargate mutates the Pod and changes the scheduler to
fargate-schedulerinstead ofdefault-scheduler. - To use a specific profile, set
eks.amazonaws.com/fargate-profilelabel. - You are allowed to provide up to 5 labels for each Fargate profile.
To create Fargate profiles for the EKS cluster, run these commands:
aws eks create-fargate-profile \
  --cluster-name kubedemy \
  --fargate-profile-name default-eu-west-2a \
  --pod-execution-role-arn arn:aws:iam::231144931069:role/Kubedemy_EKS_Fargate_Role \
  --subnets subnet-02a9b470ef3111fd4 \
  --selectors namespace=default,labels={fargate=true} \
  --tags owner=kubedemy

aws eks create-fargate-profile \
  --cluster-name kubedemy \
  --fargate-profile-name default-eu-west-2b \
  --pod-execution-role-arn arn:aws:iam::231144931069:role/Kubedemy_EKS_Fargate_Role \
  --subnets subnet-066e961abfc243923 \
  --selectors namespace=default,labels={fargate=true} \
  --tags owner=kubedemy

aws eks create-fargate-profile \
  --cluster-name kubedemy \
  --fargate-profile-name default-eu-west-2c \
  --pod-execution-role-arn arn:aws:iam::231144931069:role/Kubedemy_EKS_Fargate_Role \
  --subnets subnet-0774243a62c6808aa \
  --selectors namespace=default,labels={fargate=true} \
  --tags owner=kubedemy
Important: Fargate profiles cannot be created at the same time. The first one should be created and become ready, and then the second one should be created, and so on.
Step 4 – Deploy Kubernetes Pod using Fargate:
Based on the previous step, to run a Pod using the Fargate compute engine, we must run the Pod in default namespace, and the Pod should have fargate=true label.
apiVersion: v1
kind: Pod
metadata:
  name: nginx
  namespace: default
  labels:
    fargate: "true"
spec:
  containers:
    - name: nginx
      image: nginx:alpine
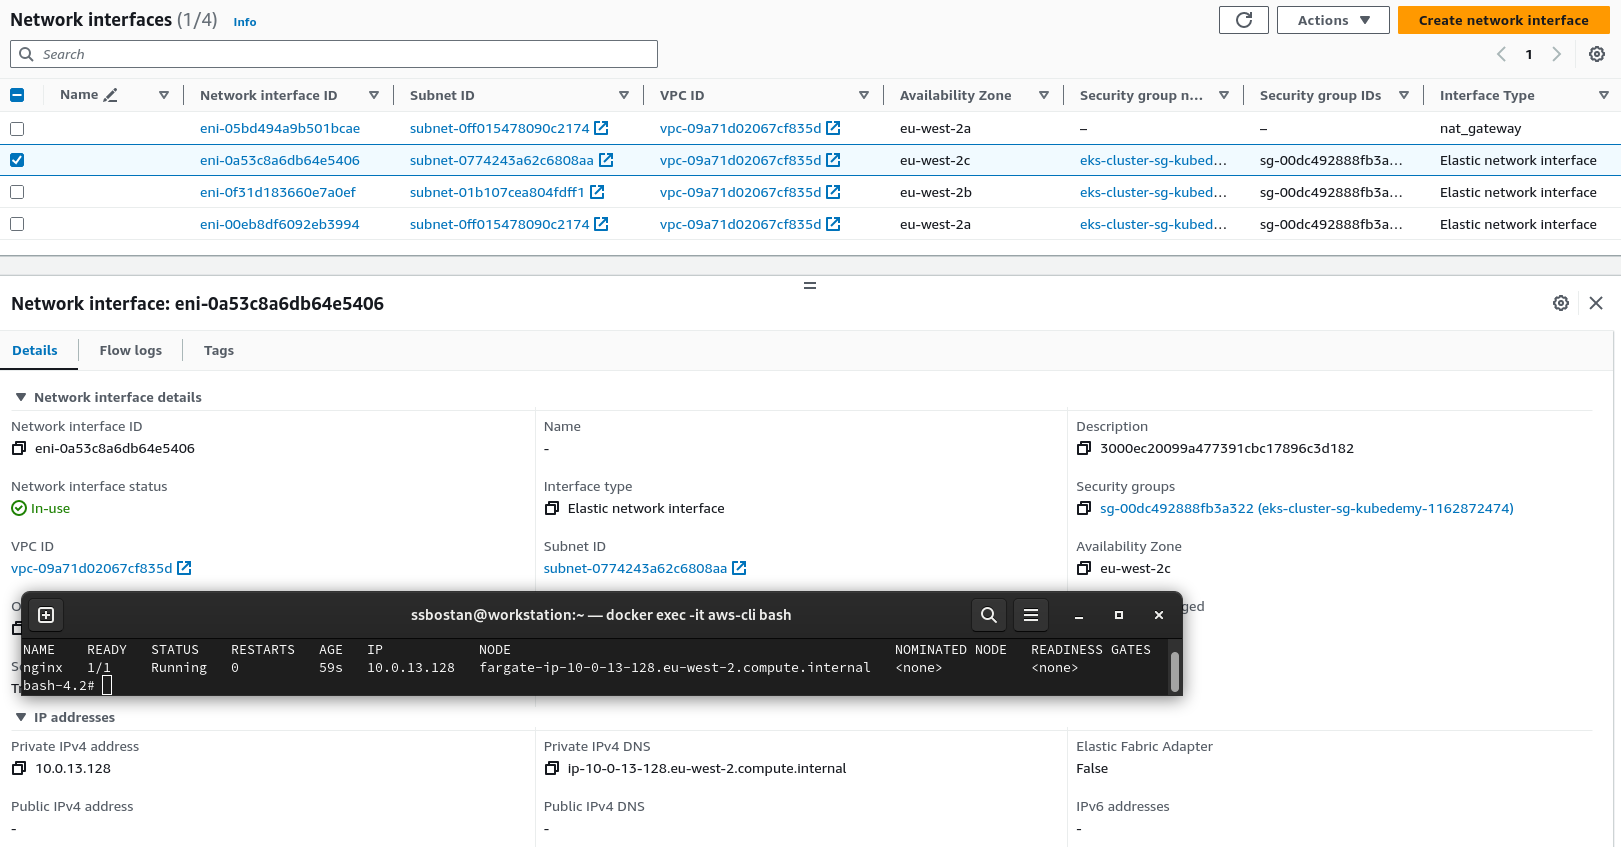
As you can see, we have 1 Pod and 1 Node running the Pod.
Step 5 – Play with Fargate in EKS Cluster:
In this section, I want to provide you with some tips, tricks, and best practices about Fargate, which will make it more clear how to use Fargate compute.
Fargate and Pod resources:
Fargate instances will be created based on Pod resource requests. There is a table on AWS EKS documentation that shows the available Fargate instance resources.
| vCPU value | Memory value |
| .25 vCPU | 0.5 GB, 1 GB, 2 GB |
| .5 vCPU | 1 GB, 2 GB, 3 GB, 4 GB |
| 1 vCPU | 2 GB, 3 GB, 4 GB, 5 GB, 6 GB, 7 GB, 8 GB |
| 2 vCPU | Between 4 GB and 16 GB in 1-GB increments |
| 4 vCPU | Between 8 GB and 30 GB in 1-GB increments |
| 8 vCPU | Between 16 GB and 60 GB in 4-GB increments |
| 16 vCPU | Between 32 GB and 120 GB in 8-GB increments |
https://docs.aws.amazon.com/eks/latest/userguide/fargate-pod-configuration.html
- If you don’t provide any resource requests, the minimum resources will be provisioned. The minimum one is 0.25vCPU and 0.5GB memory.
- Resource limits should be the same as resource requests because, in Fargate, one node is one Pod. So, a different amount of limit doesn’t make sense.
- As every Fargate node has only one Pod, there is no Pod Eviction process.
- All Fargate Pods will be run in the Guaranteed QoS class.
If you run a Pod with minimum resources “0.25vCPU 0.5GB” and check the node capacity, you will find that the amount of allocated resources is different. It’s because Kubernetes components also need some resources. An annotation CapacityProvisioned on the Pod shows the exact amount of resources available to the Pod.

Pod resource calculation:
To calculate the Pod resource requests, follow this algorithm:
- Find the highest resources needed in
initContainerscontainers. - Sum all resources needed by normal containers.
- Take the biggest number from the above calculations.
- Sum the biggest value + 256MB for Kubernetes components.
- The final value will round up to the next available one in the above table.
Select Fargate profile for Pod:
As mentioned, if the Pod matches more than one Fargate profile, the first one will be chosen automatically “alphabetically”. You can also set an exact Fargate profile to run your Pod. To do so, set the following label to the Pod:
apiVersion: v1
kind: Pod
metadata:
  name: nginx
  namespace: default
  labels:
    fargate: "true"
    eks.amazonaws.com/fargate-profile: default-eu-west-2c
spec:
  containers:
    - name: nginx
      image: nginx:alpine
Step 6 – Investigate Fargate in/out of EKS Cluster:
Network Interfaces:
For each Node/Pod, one network interface is deployed in the selected subnet.
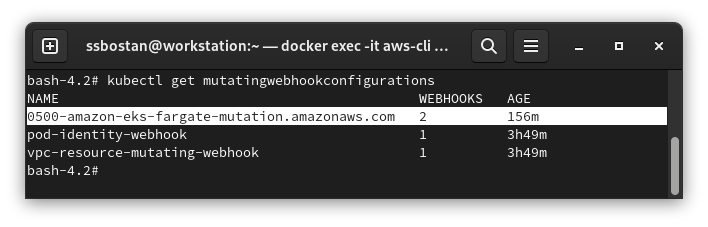
Fargate Mutating Webhook:
When you create a Pod in the proper namespaces and set the required labels, the Fargate Mutating Webhook changes the Pod scheduler field to fargate-scheduler. Fargate Scheduler is a controller which is run as a managed service along with the cluster control plane. So you don’t need to deploy or manage it.
Results:
Here are the results of the previous commands; we need them in the next articles:
| Fargate IAM role name | Kubedemy_EKS_Fargate_Role |
| Fargate IAM role ARN | arn:aws:iam::231144931069:role/Kubedemy_EKS_Fargate_Role |
| Fargate Policy Name | AmazonEKSFargatePodExecutionRolePolicy |
| Fargate Profiles | default-eu-west-2a – subnet-02a9b470ef3111fd4 – 10.0.11.0/24 default-eu-west-2b – subnet-066e961abfc243923 – 10.0.12.0/24 default-eu-west-2c – subnet-0774243a62c6808aa – 10.0.13.0/24 |
| Allowed namespaces | default |
| Required labels | fargate=true |
Conclusion:
In this lesson, you learned many things about EKS+Fargate. In future, you will learn more about monitoring, logging, storage and networking for Fargate instances. Fargate is a cool AWS feature that can minimize your management procedure.
If you like this series of articles, please share them and write your thoughts as comments here. Your feedback encourages me to complete this massively planned program. Just share them and provide feedback. I’ll make you an AWS EKS black belt.
Follow my LinkedIn https://www.linkedin.com/in/ssbostan
Follow Kubedemy LinkedIn https://www.linkedin.com/company/kubedemy
Follow Kubedemy Telegram https://telegram.me/kubedemy
Related Posts
AWS EKS – Part 12 – Deploy Fully Air-gapped Cluster without Internet
AWS EKS – Part 7 – Deploy ARM-based Kubernetes Worker Nodes