
AWS EKS – Part 31 – Setup Calico CNI on EKS Clusters
AWS EKS supports almost all CNI plugins other than VPC CNI through two main methods: the chaining mode, “only few CNI plugins support this mode”, and the BYOCNI “Bring Your Own CNI” mode. In this lesson, you will learn how to use Calico CNI in the chaining mode with the VPC CNI. In future articles, the BYOCNI mode will be explained completely.
Follow our social media:
https://linkedin.com/in/ssbostan
https://linkedin.com/company/kubedemy
Register for the FREE EKS Tutorial:
If you want to access the course materials, register from the following link:
Register for the FREE AWS EKS Black Belt Course
What is Kubernetes CNI?
Kubernetes CNI (Container Network Interface) is a framework and specification used to manage network interfaces in containers within Kubernetes. It enables the integration of different networking solutions, allowing pods to communicate with each other and external networks. CNI plugins, such as Calico and Cilium, implement this specification to provide networking features and enforce network policies. The CNI framework ensures flexible, scalable, and secure networking for Kubernetes workloads.
How does Kubernetes CNI work?
Kubernetes CNI uses plugins “like Cilium and Calico” to manage container network interfaces. When a pod is created, the Kubernetes kubelet calls the CNI plugin to set up the network, which includes configuring the network namespace, setting up virtual interfaces, and assigning IP addresses. The CNI plugin also handles connecting pods to the appropriate network and configuring routes, and this prepared network is then attached to containers. This setup allows pods to communicate with each other and external networks based on configured network policies.
What is Kubernetes CNI Chaining?
CNI chaining is the process of combining multiple CNI plugins to manage different aspects of container networking. In a chained setup, one plugin handles initial tasks like IP address assignment, while subsequent plugins manage additional functions like network policies or advanced routing. This modular approach allows for greater flexibility and customization of the networking stack, enabling complex network configurations and the integration of various networking capabilities within a Kubernetes cluster.
AWS VPC CNI in chaining with Calico CNI:
In this chaining mode, the VPC CNI is responsible for the main CNI functionality, IPAM, and routing, which will be managed through the VPC-native routing. The Calico CNI will implement and manage network policies for Pods within the Kubernetes.
EKS VPC CNI + Calico setup procedure:
- Check if the VPC CNI is deployed and working correctly.
- Install Calico in Chaining mode using the Tigera operator.
- Create and test Kubernetes-native Network Policies.
- Create and test Calico-native Network Policies.
Step 1 – Check if VPC CNI is installed:
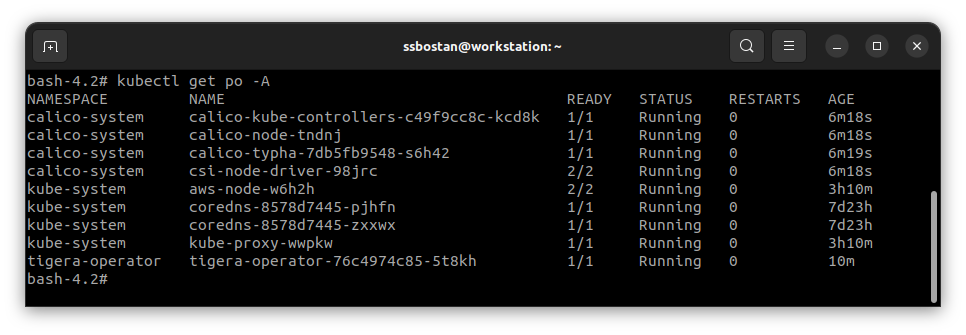
By using the following command, you can check if the VPC CNI is available:
kubectl -n kube-system get ds aws-nodeThe VPC CNI is deployed into all nodes using a DaemonSet resource.
Step 2 – Install Calico CNI in chaining mode:
To install the Calico CNI, we need to install the Tigera operator first. This operator is responsible for installing the Calico CNI within the cluster.
kubectl apply --server-side -f https://raw.githubusercontent.com/projectcalico/calico/v3.28.0/manifests/tigera-operator.yamlTo install the Calico CNI itself in the chaining mode:
cat <<EOF | kubectl apply -f -
apiVersion: operator.tigera.io/v1
kind: Installation
metadata:
  name: default
  namespace: tigera-operator
spec:
  kubernetesProvider: EKS
  cni:
    type: AmazonVPC
  calicoNetwork:
    bgp: Disabled
EOF
Important note: The resource name should be default always.
The above manifest asks the Tigera operator to install the Calico CNI in chaining mode with the VPC CNI. It also mentions that BGP routing must be disabled as AWS doesn’t support BGP routing, and we should use VPC-native routing instead.
Step 3 – Use Kubernetes-native Network Policies:
Now, we have the Calico CNI in place to implement Network Policies. Kubernetes provides a native resource, NetworkPolicy, to implement network policies for Pods. Note that this resource offers only the specifications and needs a CNI that implements the network policy feature to use the user-defined policies in Kubernetes and configure the underlying network to secure the workloads. Without a CNI that supports the network policy feature, none of the created NetworkPolicy resources are enforced. The Calico CNI uses IPTables as an underlying technology to implement network policies.
To test Network Policies, create two Pods and run the following tests:
cat <<EOF | kubectl apply -f -
apiVersion: v1
kind: Pod
metadata:
  name: moon
  labels:
    app: moon
spec:
  containers:
    - name: alpine
      image: alpine:latest
      command: ["sleep", "infinity"]
---
apiVersion: v1
kind: Pod
metadata:
  name: earth
  labels:
    app: earth
spec:
  containers:
    - name: alpine
      image: alpine:latest
      command: ["sleep", "infinity"]
EOF
We don’t have network policies in the namespace. So, Pods can connect anywhere.
kubectl get po -o wide

kubectl exec moon -- ping -c 1 EARTH_POD_IP_ADDRESS
kubectl exec moon -- ping -c 1 8.8.8.8

kubectl exec earth -- ping -c 1 MOON_POD_IP_ADDRESS
kubectl exec earth -- ping -c 1 8.8.8.8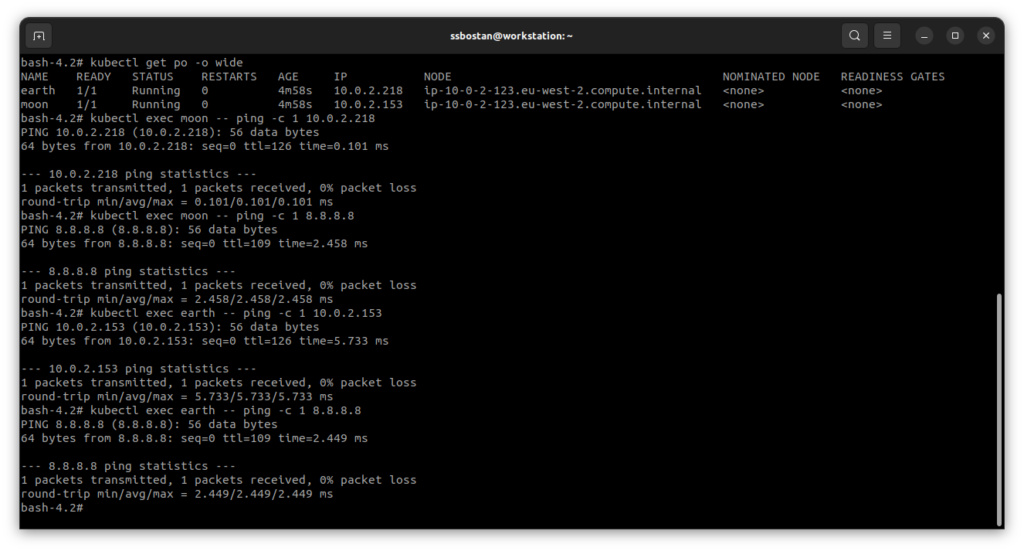
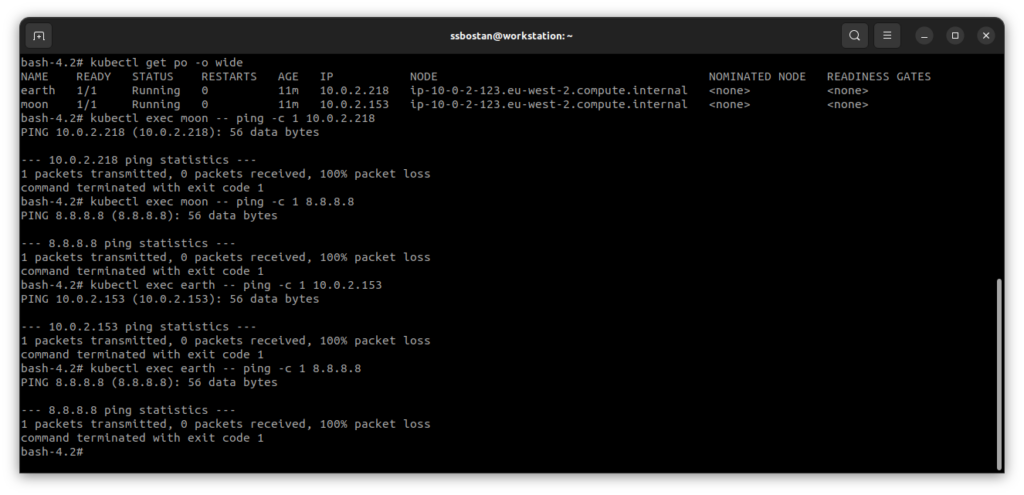
The following network policy will deny everything:
cat <<EOF | kubectl apply -f -
apiVersion: networking.k8s.io/v1
kind: NetworkPolicy
metadata:
  name: deny-everything
spec:
  podSelector: {}
  policyTypes:
    - Ingress
    - Egress
EOF
Test the above commands again and check the results:
The following policy allows access to the Internet:
cat <<EOF | kubectl apply -f -
apiVersion: networking.k8s.io/v1
kind: NetworkPolicy
metadata:
name: allow-internet
spec:
podSelector:
matchExpressions:
- key: app
operator: In
values:
- moon
- earth
policyTypes:
- Egress
egress:
- {}
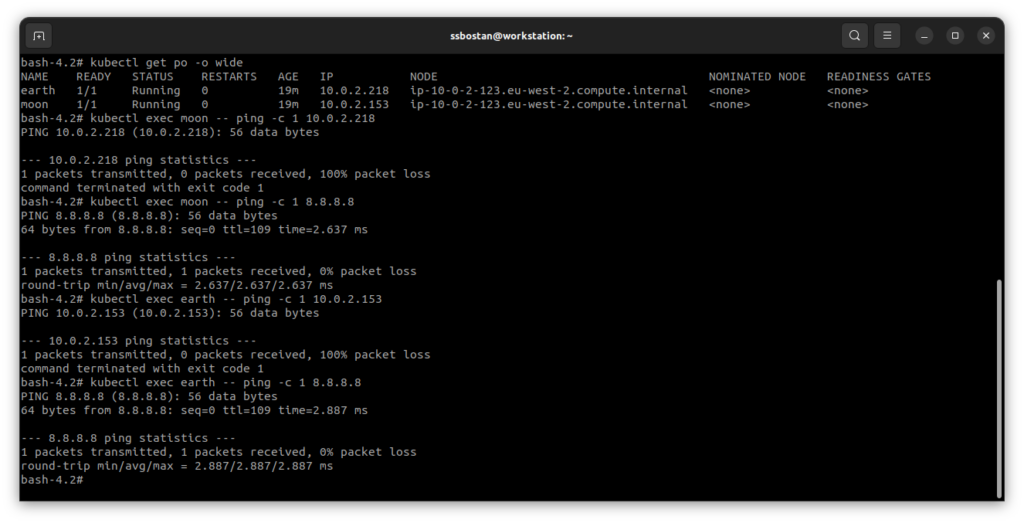
EOFTry the same commands again, and you will find that both Pods can access the Internet but not each other. Although we allowed Egress traffic to everything, the Ingress still blocked and prevented access to the Pods. Note that NetworkPolicy is a namespaced resource and enforces policies across the namespace, which means when you open the Egress to everything, Pods in that namespace can also access Pods in another namespace if no policy is defined in that namespace to prevent Ingress traffic.
To learn more about Network Policies, read the following documentation:
https://kubernetes.io/docs/concepts/services-networking/network-policies
Step 4 – Use Calico Network Policies:
Although Kubernetes provides a native NetworkPolicy resource, it’s limited and doesn’t support some functionalities, such as advanced conditions, global network policies, node policies, Layer-7 policies, etc. The Calico CNI provides these functionalities through its CustomResourceDefinitions (CRDs) to extend the native network policy features.
Global Network Policies: These policies allow you to enforce policies across the whole cluster and all namespaces. GlobalNetworkPolicy is not a namespaced resource and can only be managed by the cluster admin. If you want to enforce a policy across the cluster with Kubernetes-native NetworkPolicy, you must create the policy in every namespace, but with GlobalNetworkPolicy, you define it once at the cluster level.
cat <<EOF | kubectl apply -f -
apiVersion: crd.projectcalico.org/v1
kind: GlobalNetworkPolicy
metadata:
  name: deny-everything
spec:
  types:
    - Ingress
    - Egress
EOF
Advanced Selectors: Calico supports different expressions for label selectors on both NetworkPolicy and GlobalNetworkPolicy resources. For example, the following policy selects all Pods that have labels project=kubedemy and app=web-* and allows Ingress traffic to a specific path with a particular HTTP method.
cat <<EOF | kubectl apply -f -
apiVersion: crd.projectcalico.org/v1
kind: NetworkPolicy
metadata:
  name: allow-ingress-website-healthcheck
spec:
  selector: project == 'kubedemy' && app starts with 'web-'
  types:
    - Ingress
  ingress:
    - action: Allow
      protocol: TCP
      destination:
        ports: [80]
      http:
        methods: ['GET']
        paths:
          - exact: '/ping'
EOF
To learn more about other features, read the following links:
https://docs.tigera.io/calico/latest/reference/resources/networkpolicy
https://docs.tigera.io/calico/latest/reference/resources/globalnetworkpolicy
https://docs.tigera.io/calico/latest/network-policy/hosts
Conclusion:
Chaining VPC CNI and Calico CNI provides the benefits of these two Kubernetes CNI plugins. You can use the VPC CNI to use VPC-native routing, which is excellent for performance, and deploying Calico CNI in the chaining mode provides you with the Network Policy feature to protect your Kubernetes workloads.
If you like this series of articles, please share them and write your thoughts as comments here. Your feedback encourages me to complete this massively planned program. Just share them and provide feedback. I’ll make you an AWS EKS black belt.
Follow my LinkedIn https://linkedin.com/in/ssbostan
Follow Kubedemy’s LinkedIn https://linkedin.com/company/kubedemy
Follow Kubedemy’s Telegram https://telegram.me/kubedemy
Related Posts
AWS EKS – Part 2 – Deploy Cluster Control Plane
AWS EKS – Part 28 – Deploy Pods in Different VPC Subnets