
AWS EKS – Part 32 – Setup Cilium CNI on EKS Clusters
Cilium is another trending Kubernetes CNI plugin, a graduated CNCF project. It is known for using eBPF in its core to implement various networking functions like enforcing policies, observation, load balancing, etc. Like Calico CNI, it can be installed standalone or chained with the AWS VPC CNI. In this lesson, you will learn how to install the Cilium CNI in the chaining mode on top of the AWS VPC CNI to implement network policies and some other cool features. Cilium also provides a runtime security tool called Tetragon, which can be installed in addition to the Cilium to provide runtime observation.
Follow our social media:
https://linkedin.com/in/ssbostan
https://linkedin.com/company/kubedemy
Register for the FREE EKS Tutorial:
If you want to access the course materials, register from the following link:
Register for the FREE AWS EKS Black Belt Course
What is eBPF?
eBPF (extended Berkeley Packet Filter) is a powerful and flexible technology in the Linux kernel that allows for efficient execution of user-defined programs within the kernel space. Initially designed for network packet filtering, eBPF has evolved to support a wide range of performance monitoring, security enforcement, and networking tasks. It enables dynamic, safe, and efficient execution of custom code, providing capabilities for real-time observability, troubleshooting, and extending kernel functionality without the need to modify the kernel or load kernel modules. eBPF programs are verified for safety and run in a restricted environment to prevent harmful operations.
What does Cilium offer?
- Kubernetes CNI: Implement CNI specification to manage Pod networking.
- Cluster Mesh: Multi-cluster networking like they are in the same network.
- Kube-proxy replacement: Replace kube-proxy and use eBPF instead of IPTables.
- Egress Gateway: Assign a static identity to Pods when traffic leaves the cluster.
- Service Mesh: Implement service mesh using eBPF instead of sidecars.
- L4 Load Balancer: Provide LoadBalancer without additional tooling.
- Gateway API: Replace Ingress with Kubernetes Gateway API.
- Network Policies: L3/L4 and even L7 network policies are supported.
- Runtime security: Runtime security and enforcement using eBPF.
- Transparent Encryption: Implement encryption at the network layer.
- Observation: Monitor almost every network traffic within the cluster.
How does Cilium work in chaining mode?
AWS VPC CNI is responsible for creating the Pod network and managing IPAM and routing. When the Pod network is ready to use, the Cilium CNI is called to attach eBPF programs to the network devices created by the VPC CNI for the Pod in order to enforce network policies, load balancing, encryption, observation, etc.
AWS VPC CNI + Cilium CNI setup procedure:
- Check if the VPC CNI is deployed and working correctly.
- Install Cilium in chaining mode using its Helm chart.
- Create and test Kubernetes-native Network Policies.
- Create and test Cilium-native Network Policies.
Step 1 – Check if VPC CNI is installed:
By using the following command, you can check if the VPC CNI is available:
kubectl -n kube-system get ds aws-nodeThe VPC CNI is deployed into all nodes using a DaemonSet resource.
Step 2 – Install Cilium CNI in chaining mode:
To install the Cilium CNI in chaining mode with AWS VPC CNI, use its official Helm chart with the following configuration. This configuration tells Cilium to be deployed in chaining mode, turns off IPv4 masquerading and traffic tunnelling, and enables per-endpoint routing as they’re managed natively within VPC through standard networking.
helm repo add cilium https://helm.cilium.io
cat <<EOF > cilium-values.yaml
cni:
chainingMode: aws-cni
exclusive: false
enableIPv4Masquerade: false
routingMode: native
endpointRoutes:
enabled: true
EOF
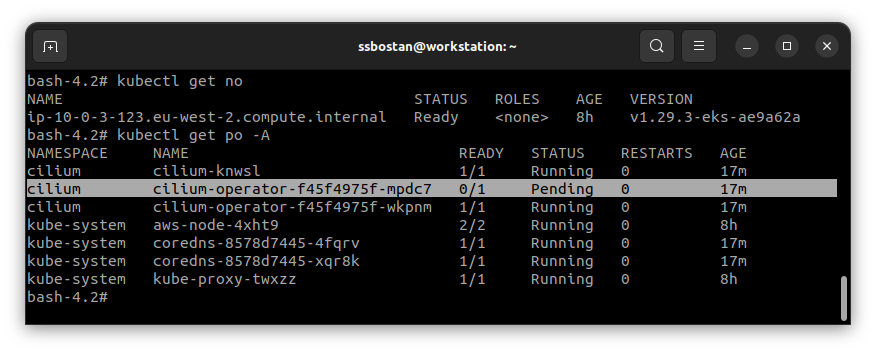
helm install cilium cilium/cilium -f cilium-values.yaml -n cilium --create-namespaceThe Cilium Operator will be deployed as a highly available service using two replicas in two nodes. So, you need at least two system nodes to deploy it, or it gets stuck in pending. Node agents will be deployed into all nodes using DaemonSet.
Step 3 – Use Kubernetes-native Network Policies:
We have a CNI plugin supporting network policies, so we can use the Kubernetes-native NetworkPolicy resource to secure our workloads. As mentioned in the previous post, Kubernetes provides only NetworkPolicy specifications, and we need to install the right CNI to implement network policies. Cilium CNI implements network policies using eBPF instead of IPTables, which provides less latency and more performance.
To test Network Policies, create two Pods and run the following tests:
cat <<EOF | kubectl apply -f -
apiVersion: v1
kind: Pod
metadata:
  name: moon
  labels:
    app: moon
spec:
  containers:
    - name: alpine
      image: alpine:latest
      command: ["sleep", "infinity"]
---
apiVersion: v1
kind: Pod
metadata:
  name: earth
  labels:
    app: earth
spec:
  containers:
    - name: alpine
      image: alpine:latest
      command: ["sleep", "infinity"]
EOF
We don’t have any policies in the namespace. So, Pods can connect anywhere.
kubectl get po -o wide

kubectl exec moon -- ping -c 1 EARTH_POD_IP_ADDRESS
kubectl exec moon -- ping -c 1 8.8.8.8

kubectl exec earth -- ping -c 1 MOON_POD_IP_ADDRESS
kubectl exec earth -- ping -c 1 8.8.8.8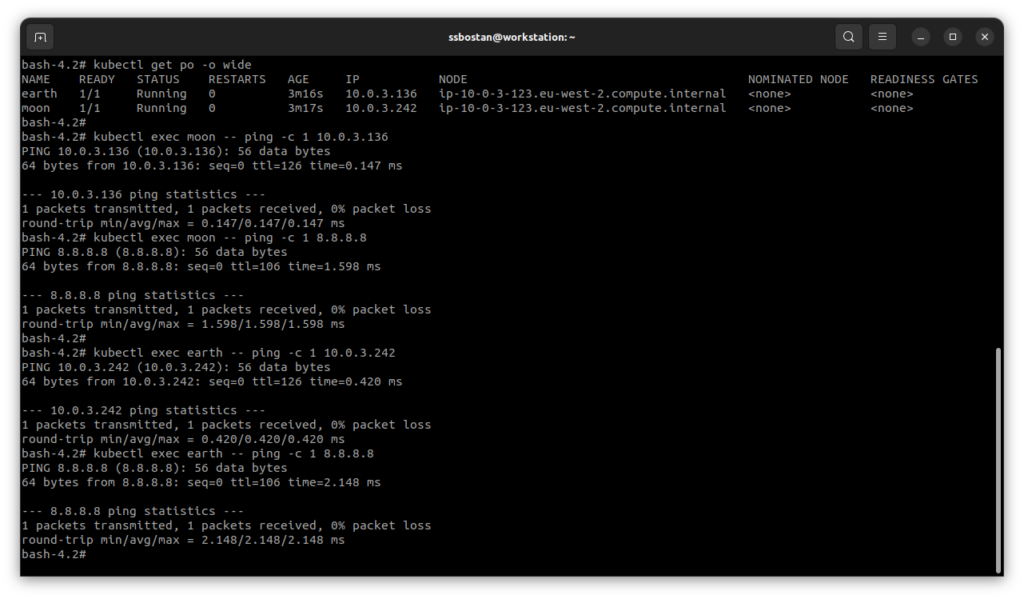
The following network policy will deny everything:
cat <<EOF | kubectl apply -f -
apiVersion: networking.k8s.io/v1
kind: NetworkPolicy
metadata:
  name: deny-everything
spec:
  podSelector: {}
  policyTypes:
    - Ingress
    - Egress
EOF
Test the above commands again and check the results. You will see that you cannot connect anywhere because of a network restriction within the namespace. Note that the NetworkPolicy resource is namespaced, which only affects workloads in the namespace. To enforce policies in the whole cluster, you must create them in all namespaces.
The following policy allows access to a specific IP address:
cat <<EOF | kubectl apply -f -
apiVersion: networking.k8s.io/v1
kind: NetworkPolicy
metadata:
  name: allow-google-dns
spec:
  podSelector: {}
  policyTypes:
    - Egress
  egress:
    - to:
        - ipBlock:
            cidr: 8.8.8.8/32
EOF
To learn more about Network Policies, read the following documentation:
https://kubernetes.io/docs/concepts/services-networking/network-policies
Step 4 – Use Cilium Network Policies:
Cilium CNI also provides dozens of CRDs(CustomResourceDefinitions) to provide more features than what Kubernetes-native NetworkPolicy provides. For example, we can define cluster-wide network policies to restrict something across the cluster, or it can support L7 network policies to restrict access to specific HTTP paths or DNS names.
Cluster-wide Network Policies: These work like Calico CNI’s Global Network Policies to enforce policies across the whole cluster within all namespaces. They’re a non-namespaced resource that can only be managed by the cluster admins.
cat <<EOF | kubectl apply -f -
apiVersion: cilium.io/v2
kind: CiliumClusterwideNetworkPolicy
metadata:
  name: allow-coredns-access
spec:
  endpointSelector: {}
  egress:
    - toEndpoints:
        - matchLabels:
            io.kubernetes.pod.namespace: kube-system
            k8s-app: kube-dns
      toPorts:
        - ports:
            - port: "53"
              protocol: UDP
          rules:
            dns:
              - matchPattern: "*"
EOF
Access to specific domains: One of the best features I’ve ever seen in CNIs’ era. Cilium allows access based on the target domain instead of its IP address, which helps you easily define policies. Imagine you want to allow the application to access various external resources so that their IP addresses may be changed during the time. In this case, if you use the native NetworkPolicy, you must update your policy every time the IP address gets changed, but with this feature, Cilium uses the CoreDNS to look at the address and caches the latest IP address and update the policies itself.
cat <<EOF | kubectl apply -f -
apiVersion: cilium.io/v2
kind: CiliumNetworkPolicy
metadata:
  name: allow-google-domain-access
spec:
  endpointSelector: {}
  egress:
    - toFQDNs:
        - matchName: google.com
      toPorts:
        - ports:
            - port: "80"
    - toEndpoints:
        - matchLabels:
            io.kubernetes.pod.namespace: kube-system
            k8s-app: kube-dns
      toPorts:
        - ports:
            - port: "53"
              protocol: UDP
          rules:
            dns:
              - matchPattern: "*"
EOF
The above policy allows access to CoreDNS Pods for DNS requests and google.com on the HTTP port. Note that Pod must be able to access CoreDNS to resolve domains.
To learn more about other features, read the following links:
https://docs.cilium.io/en/stable/security/policy
https://docs.cilium.io/en/stable/security/network
Conclusion:
Cilium CNI is one of the feature-rich open-source CNIs on the market. It’s a CNCF project, which means it will always be open-source and provide all new features for free. It also has a UI called Hubble that shows live traffic reports, which helps you to understand your traffic flows and develop proper network policies.
If you like this series of articles, please share them and write your thoughts as comments here. Your feedback encourages me to complete this massively planned program. Just share them and provide feedback. I’ll make you an AWS EKS black belt.
Follow my LinkedIn https://linkedin.com/in/ssbostan
Follow Kubedemy’s LinkedIn https://linkedin.com/company/kubedemy
Follow Kubedemy’s Telegram https://telegram.me/kubedemy
Related Posts
AWS EKS – Part 10 – Deploy Cluster with Private API Endpoint
AWS EKS – Part 22 – Deploy and Manage EKS Cluster Addons