
AWS EKS – Part 5 – Deploy Self-managed Worker Nodes
In EKS, self-managed worker nodes are nodes you are responsible for managing their whole lifecycle. From choosing suitable AMIs, creating EC2 Launch Templates, creating EC2 Auto-scaling groups, upgrading nodes, patching the operating system, and draining nodes before upgrading and every single task related to the nodes’ lifecycle will be managed directly by you, and AWS doesn’t provide any automation for them.
Follow our social media:
https://www.linkedin.com/in/ssbostan
https://www.linkedin.com/company/kubedemy
https://www.youtube.com/@kubedemy
Register for the FREE EKS Tutorial:
If you want to access the course materials, register from the following link:
Register for the FREE AWS EKS Black Belt Course
Watch on YouTube:
Why we need Self-managed nodes:
- Fan of managing everything by yourself.
- Customize worker nodes for specific use cases.
- Use different cluster auto-scaling strategies.
- Add on-premises nodes to the EKS cluster.
- Deploy worker nodes in different regions.
Self-managed nodes with EC2 Considerations:
If you want to use AWS EC2 instances in combination with EC2 Auto-scaling groups to create EKS node groups, the following rules are applied:
- All nodes should be the same instance type.
- All nodes should be running with the same AMI image.
- All nodes should use the same IAM node role.
Self-managed nodes deployment procedure:
- Create a different IAM role for self-managed nodes.
- Add IAM role to
aws-authConfigMap in Kubernetes cluster. - Create an IAM Instance Profile and add the node role.
- Create an EC2 Launch Template for worker nodes.
- Create an EC2 Auto-scaling Group to deploy worker nodes.
- Confirm self-managed node installation with kubectl.
Here is the flow and diagram of what we should do:
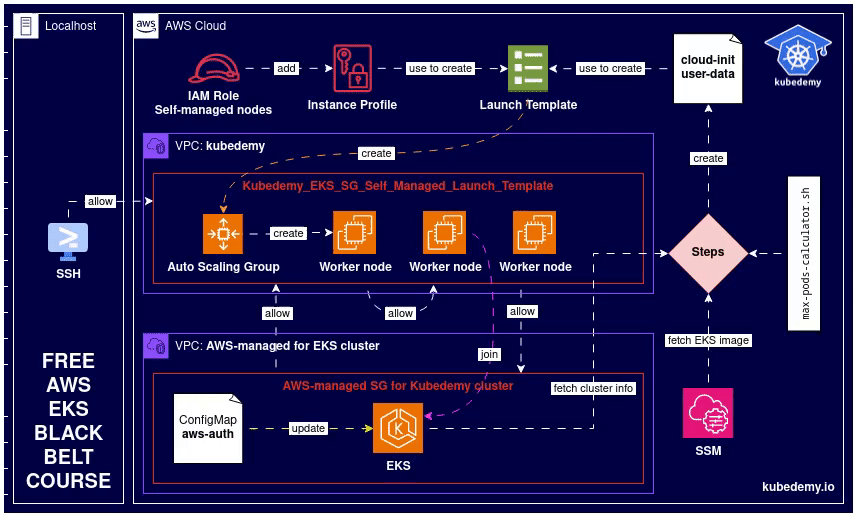
Step 1 – Create IAM role for self-managed nodes:
Although you can use the same IAM node role you used for managed nodes, you must create a new one for self-managed nodes. If you have a couple of managed and self-managed node groups in the same cluster using the same IAM node role and you remove all of the managed ones, EKS will remove the role from aws-auth ConfigMap in the cluster without caring about your self-managed nodes. Removing the IAM node role from the cluster will cause self-managed worker nodes to be unable to join the cluster. This tip is one of the most common mistakes I’ve seen in mix deployment.
To create a new IAM node role, follow the previous articles:
AWS EKS – Part 3 – Deploy Worker nodes using Managed Nodegroups
Step 2 – Add node IAM role to cluster:
To allow kubelet to connect and join the cluster, we must add the IAM role to the aws-auth ConfigMap in the cluster so that kubelet can use that IAM role assigned to the EC2 instance to authenticate and join the EKS cluster.
Run the following command to edit aws-auth ConfigMap:
kubectl -n kube-system edit configmap aws-authEdit this ConfigMap and add the self-managed node role like this:
apiVersion: v1
kind: ConfigMap
metadata:
  name: aws-auth
  namespace: kube-system
data:
  mapRoles: |
    - rolearn: arn:aws:iam::231144931069:role/Kubedemy_EKS_Managed_Nodegroup_Role
      username: system:node:{{EC2PrivateDNSName}}
      groups:
        - system:bootstrappers
        - system:nodes
    - rolearn: arn:aws:iam::231144931069:role/Kubedemy_EKS_Self_Managed_Nodegroup_Role
      username: system:node:{{EC2PrivateDNSName}}
      groups:
        - system:bootstrappers
        - system:nodes
Note: If you don’t have any worker nodes in your cluster, this ConfigMap does not exist on your cluster, and you must create it by yourself.
Step 3 – Create IAM Instance Profile:
Instance profiles are containers you create to pass IAM role information to EC2 instances when they start. Right now, we have an IAM role created in the previous step, and we want to assign it to self-managed worker nodes. We can’t assign roles directly to Launch Templates or Auto-scaling Groups and need an IAM instance profile.
To create a new IAM instance profile:
aws iam create-instance-profile \
  --instance-profile-name Kubedemy_EKS_Self_Managed_Instance_Profile \
  --tags Key=owner,Value=kubedemy
To add the node role to the instance profile:
aws iam add-role-to-instance-profile \
  --instance-profile-name Kubedemy_EKS_Self_Managed_Instance_Profile \
  --role-name Kubedemy_EKS_Self_Managed_Nodegroup_Role
Step 4 – Create EC2 Launch Template:
Although you can create just an EC2 instance, assign the node role, install components and join the node to the cluster, if you want to scale worker nodes, you need an EC2 Launch Template and EC2 auto-scaling group to setup worker nodes.
To create a new EC2 Launch Template for EKS, follow the previous articles:
AWS EKS – Part 4 – Deploy Worker nodes using Custom Launch Templates
Your launch template should be something like this:
cat <<EOF > launch-template.json
{
    "ImageId": "ami-07b42e8fa1b744cd4",
    "InstanceType": "t3.medium",
    "UserData": "userdata.txt content",
    "SecurityGroupIds": ["sg-09a3e12035b5a9532"],
    "KeyName": "kubedemy",
    "IamInstanceProfile": {
        "Name": "Kubedemy_EKS_Self_Managed_Instance_Profile"
    },
    "PrivateDnsNameOptions": {
        "EnableResourceNameDnsARecord": true
    },
    "Monitoring": {
        "Enabled": true
    }
}
EOF
As you can see:
- We have a new option
IamInstanceProfilein template. - We didn’t set
TagSpecificationsin template.
To create an EC2 Launch Template, run this command:
aws ec2 create-launch-template \
  --launch-template-name Kubedemy_EKS_Self_Managed_Launch_Template \
  --launch-template-data file://launch-template.json \
  --tag-specifications "ResourceType=launch-template,Tags=[{Key=owner,Value=kubedemy}]"
Step 5 – Create EC2 Auto Scaling Group:
Now, it’s time to create an EC2 Auto-scaling Group to deploy our self-managed worker nodes for the EKS cluster. In the following command, you should set Launch Template, Subnets, Min, Max, Desired state and a few options to deploy instances.
aws autoscaling create-auto-scaling-group \
  --auto-scaling-group-name Kubedemy_EKS_Self_Managed_Auto_Scaling_Group \
  --launch-template LaunchTemplateName=Kubedemy_EKS_Self_Managed_Launch_Template,Version=1 \
  --vpc-zone-identifier subnet-0ff015478090c2174,subnet-01b107cea804fdff1,subnet-09b7d720aca170608 \
  --tags Key=owner,Value=kubedemy,PropagateAtLaunch=true \
  --health-check-grace-period 15 \
  --new-instances-protected-from-scale-in \
  --capacity-rebalance \
  --min-size 2 \
  --max-size 2 \
  --desired-capacity 2
You can change Min, Max, and Desired capacity to anything you want.
Step 6 – Confirm Self-managed nodes installation:
To check EKS self-managed nodes installation, check nodes status with kubectl:
kubectl get no

kubectl get po -A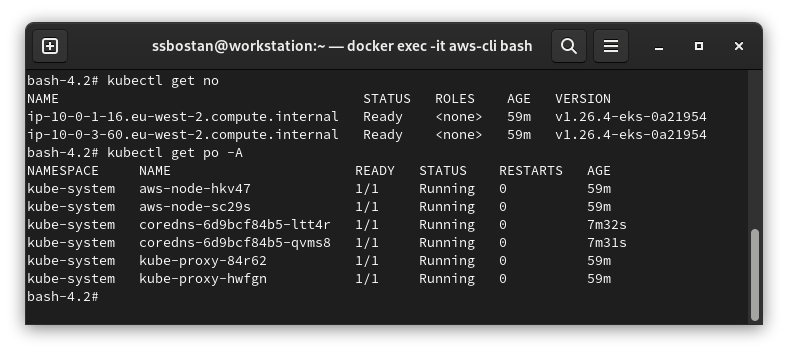
Results:
Here are the results of the previous commands; we need them in the following articles:
| IAM node role Name | Kubedemy_EKS_Self_Managed_Nodegroup_Role |
| IAM node role ARN | arn:aws:iam::231144931069:role/Kubedemy_EKS_Self_Managed_Nodegroup_Role |
| IAM Instance Profile Name | Kubedemy_EKS_Self_Managed_Instance_Profile |
| Security Group ID | sg-09a3e12035b5a9532 |
| Security Group name | Kubedemy_EKS_SG_Self_Managed_Launch_Template |
| Launch Template name | Kubedemy_EKS_Self_Managed_Launch_Template |
| Auto Scaling Group name | Kubedemy_EKS_Self_Managed_Auto_Scaling_Group |
Conclusion:
AWS provides various ways to deploy worker nodes for EKS clusters, but I recommend you use managed ones as much as you can and only use self-managed worker nodes if you want to achieve something that cannot be done with managed nodes.
If you like this series of articles, please share them and write your thoughts as comments here. Your feedback encourages me to complete this massively planned program. Just share them and provide feedback. I’ll make you an AWS EKS black belt.
Follow my LinkedIn https://www.linkedin.com/in/ssbostan
Follow Kubedemy LinkedIn https://www.linkedin.com/company/kubedemy
Follow Kubedemy Telegram https://telegram.me/kubedemy
Related Posts
AWS EKS – Part 10 – Deploy Cluster with Private API Endpoint
AWS EKS – Part 34 – Kubernetes Storage using EBS CSI Driver