
AWS EKS – Part 3 – Deploy Worker Nodes using Managed Nodegroups
In this article, I want to talk about managed node groups, how to create them, and lots of information and tips about them. As its name suggests, managed nodes are managed by AWS EKS, and you don’t need to worry about their configuration and lifecycle.
Follow our social media:
https://www.linkedin.com/in/ssbostan
https://www.linkedin.com/company/kubedemy
https://www.youtube.com/@kubedemy
Register for the FREE EKS Tutorial:
If you want to access the course materials, register from the following link:
Register for the FREE AWS EKS Black Belt Course
Watch on YouTube:
Node group deploying procedure:
- An IAM role with a couple of managed policies for node group.
- Create managed node group using AWS CLI, Terraform or eksctl tool.
- Confirm worker nodes in the Kubernetes cluster.
- Manage and scale managed node groups.
- Investigate nodegroup-created resources in our AWS account.
Step 1 – Create Node IAM role and attach policies:
Worker nodes need at least two managed policies, AmazonEKSWorkerNodePolicy and AmazonEC2ContainerRegistryReadOnly, to be created, join the EKS cluster and work properly. You can attach any policy you want to the node role, and all applications in instances which are using that IAM role can assume the role and access AWS resources. When I say “all applications”, it means all system services, regular applications, pods and containers running on the worker node. I will discuss EKS security in future articles and teach you best practices to keep your cluster and worker nodes secure.
Note: For each cluster, you should create a separate node role.
Note: For each node type “managed, self-managed”, you must create a separate role.
Run this command to create the trust relationship policy:
cat <<EOF > nodegroup-trust-policy.json
{
    "Version": "2012-10-17",
    "Statement": [
        {
            "Effect": "Allow",
            "Action": "sts:AssumeRole",
            "Principal": {
                "Service": [
                    "ec2.amazonaws.com"
                ]
            }
        }
    ]
}
EOF
Now, create the IAM role for managed node groups:
aws iam create-role \
  --assume-role-policy-document file://nodegroup-trust-policy.json \
  --role-name Kubedemy_EKS_Managed_Nodegroup_Role \
  --tags Key=owner,Value=kubedemy
To attach necessary policies, run these commands:
aws iam attach-role-policy \
  --policy-arn arn:aws:iam::aws:policy/AmazonEKSWorkerNodePolicy \
  --role-name Kubedemy_EKS_Managed_Nodegroup_Role

aws iam attach-role-policy \
  --policy-arn arn:aws:iam::aws:policy/AmazonEC2ContainerRegistryReadOnly \
  --role-name Kubedemy_EKS_Managed_Nodegroup_Role
To make VPC CNI work, attach its policy to the node role:
aws iam attach-role-policy \
  --policy-arn arn:aws:iam::aws:policy/AmazonEKS_CNI_Policy \
  --role-name Kubedemy_EKS_Managed_Nodegroup_Role
Important: Although adding VPC CNI policy to the node role works fine, it may cause security breaches in the cluster. In future articles, I will teach you how to setup IRSA for EKS clusters and avoid adding policies to node roles.
Here is the architecture diagram of what we did in the previous steps:
Step 2 – Create EKS managed node group:
I recommend you create at least two node groups, “one for cluster critical addons, one for applications”, but you can create just one. Creating node groups may take a while, and of course, you can run aws eks wait nodegroup-active command to wait for node groups to be active. To create node groups, run these commands:
Create cluster critical node group:
These worker nodes will be used to deploy cluster-critical applications like ingress controller, dashboard, monitoring, GitOps, CI/CD, security, etc. tools.
- Worker nodes label
node.kubernetes.io/scope=system - These worker nodes are tainted with
CriticalAddonsOnlykey.
aws eks create-nodegroup \
  --cluster-name kubedemy \
  --nodegroup-name system-managed-workers-001 \
  --scaling-config minSize=2,maxSize=5,desiredSize=2 \
  --subnets subnet-0ff015478090c2174 subnet-01b107cea804fdff1 subnet-09b7d720aca170608 \
  --node-role arn:aws:iam::231144931069:role/Kubedemy_EKS_Managed_Nodegroup_Role \
  --remote-access ec2SshKey=kubedemy \
  --instance-types t3.medium \
  --ami-type AL2_x86_64 \
  --capacity-type ON_DEMAND \
  --update-config maxUnavailable=1 \
  --taints "key=CriticalAddonsOnly,value=true,effect=NO_SCHEDULE" "key=CriticalAddonsOnly,value=true,effect=NO_EXECUTE" \
  --labels node.kubernetes.io/scope=system \
  --tags owner=kubedemy
Create application node group:
These worker nodes will be used to deploy our workloads and applications.
- Worker nodes label
node.kubernetes.io/scope=application
aws eks create-nodegroup \
  --cluster-name kubedemy \
  --nodegroup-name application-managed-workers-001 \
  --scaling-config minSize=2,maxSize=5,desiredSize=2 \
  --subnets subnet-0ff015478090c2174 subnet-01b107cea804fdff1 subnet-09b7d720aca170608 \
  --node-role arn:aws:iam::231144931069:role/Kubedemy_EKS_Managed_Nodegroup_Role \
  --remote-access ec2SshKey=kubedemy \
  --instance-types t3.medium \
  --ami-type AL2_x86_64 \
  --capacity-type ON_DEMAND \
  --update-config maxUnavailable=1 \
  --labels node.kubernetes.io/scope=application \
  --tags owner=kubedemy
To wait for node groups to be active, run the following commands:
aws eks wait nodegroup-active \
  --cluster-name kubedemy \
  --nodegroup-name system-managed-workers-001

aws eks wait nodegroup-active \
  --cluster-name kubedemy \
  --nodegroup-name application-managed-workers-001
Node group creation tips and tricks:
- Node groups can be run in different subnets than cluster ones.
- In public subnets, MapPublicIpOnLaunch should be enabled in subnets.
- You can specify more than one instance type, and it’s helpful for Spot instances.
- AMI image type can vary, but it is recommended to use Amazon Linux 2.
Step 3 – Confirm worker nodes:
Now it’s time to confirm if everything got created correctly.
kubectl get no

kubectl get po -A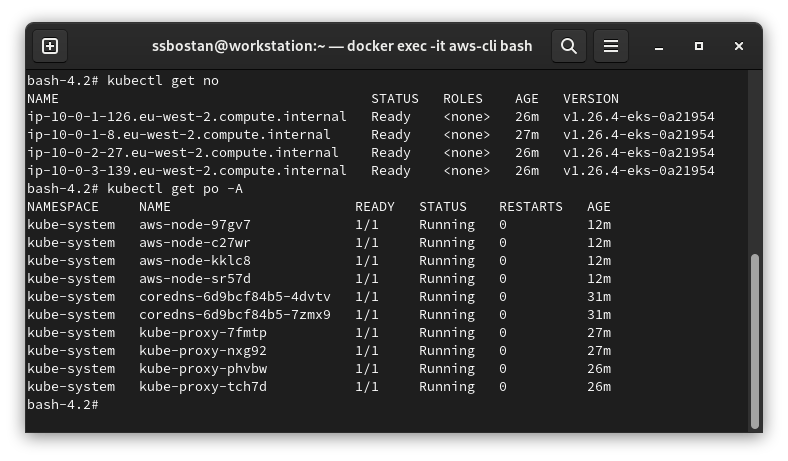
Here is the architecture diagram of what we did in the previous steps:
Step 4 – Investigate EKS resources:
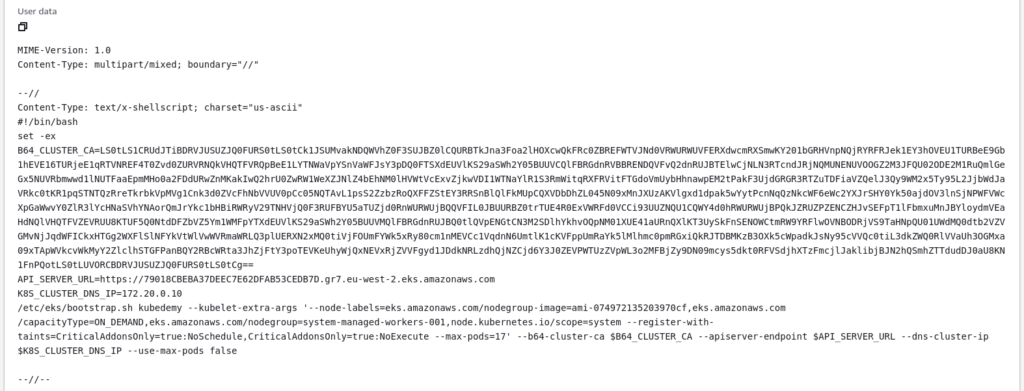
EC2 Launch Templates:
When you create a managed node group, EKS creates a new EC2 Launch Template. AWS recommends not touching or editing that launch template as it may cause issues with scaling worker nodes or joining the cluster.

If you take a look at one of them, you will find the cloud-init script for joining the cluster:
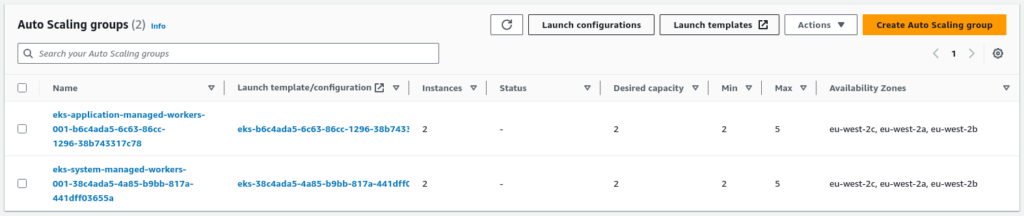
EC2 Auto Scaling Groups:
For each node group, EKS creates a new auto-scaling group and assigns its launch template with min, max and desired number of instances.
EC2 Instances:
Based on your node groups and desired state, you will have some EC2 instances.

SSH Remote access security group:
If you enable remote access for your node groups, you can assign an already created security group for remote access, or EKS creates a new security group for each node group automatically. By default, EKS allows “0.0.0.0/0” to connect to EC2 instances.

Managed node group’s lifecycle:
A managed node means you don’t need to worry about its lifecycle, and EKS manages it on your behalf but with your consent. If a new upgrade becomes available in EKS for managed node groups, EKS will notify you to upgrade them, and it takes care of resilience, high availability, zero downtime, etc. So, you have some automation in place.
In a time of upgrading managed node groups:
EKS automatically cordon worker nodes, drain them to evacuate pods and start upgrading nodes. In that case, no nodes more than the maxUnavailable option will get upgraded simultaneously. If you have more than one worker node in the node group “with the proper number of pod replicas”, you don’t get any downtime experience.
In a time of deleting managed node groups:
EKS automatically cordon and drain node group nodes and scales down the auto-scaling group. So, if you have more than one node group without specific taint, your pods move to other ones before removing the host node group.
Results:
Here are the results of the previous commands; we need them in the next articles:
| Node role name | Kubedemy_EKS_Managed_Nodegroup_Role |
| Node role ARN | arn:aws:iam::231144931069:role/Kubedemy_EKS_Managed_Nodegroup_Role |
| Node group names | system-managed-workers-001 application-managed-workers-001 |
| SSH security groups | sg-0aad7d0f3b481f00b sg-0027c65aa4392a74f |
| Nodes security group | sg-0d31d43f349756868 (Same as the cluster) |
| Cluster taints | CriticalAddonsOnly:true:NoSchedule CriticalAddonsOnly:true:NoExecute |
Conclusion:
Now, we have a working cluster and can deploy our workloads. Although it seems everything is good, EKS itself has lots of challenges, which I will explain soon.
If you like this series of articles, please share them and write your thoughts as comments here. Your feedback encourages me to complete this massively planned program. Just share them and provide feedback. I’ll make you an AWS EKS black belt.
Follow my LinkedIn https://www.linkedin.com/in/ssbostan
Follow Kubedemy LinkedIn https://www.linkedin.com/company/kubedemy
Follow Kubedemy Telegram https://telegram.me/kubedemy
Related Posts
AWS EKS – Part 11 – Deploy Workers in Private Subnets behind NAT Gateway
AWS EKS – Part 14 – Setup EKS Pod Identities to Access AWS Resources