
AWS EKS – Part 33 – Bring Your Own CNI (BYOCNI) Approach
BYOCNI stands for “Bring Your Own Container Network Interface”, a feature in EKS that allows the user to install and use any available CNI for Kubernetes instead of the AWS VPC CNI. Although the VPC CNI is fully integrated with EKS, provides many features and can even be used with the other CNIs in the chaining mode, you may need to use your own CNI instead for various reasons. For example, you may need an overlay network for containers instead of the VPC network or specific features not provided by the VPC CNI and cannot be achieved by other CNIs in the chaining mode. In such cases, we must remove the VPC CNI from the cluster and install our CNI in the standalone mode.
Follow our social media:
https://linkedin.com/in/ssbostan
https://linkedin.com/company/kubedemy
Register for the FREE EKS Tutorial:
If you want to access the course materials, register from the following link:
Register for the FREE AWS EKS Black Belt Course
List of Kubernetes CNIs:
- Cilium: eBPF-based CNI, network security and observability platform.
- Antrea: Open vSwitch networking CNI for Kubernetes.
- CNI-Genie: CNI bridge to use different CNIs during Pod deployment.
- Flannel: Simple overlay networking for Kubernetes.
- Kube-OVN: Integrates OVN-based Network Virtualization with Kubernetes.
- Kube-router: All-in-one networking solution for Kubernetes.
- Multus: Allows multiple networks to be attached to Pods.
- Calico: Enterprise-grade CNI and security for Kubernetes.
- Submariner: Enable direct networking between Pods in different clusters.
- Canal: Mix both Flannel and Calico into one good CNI.
Considerations and Limitations:
- Changing CNI on a working cluster causes significant downtime.
- BGP-based CNIs cannot be used in EKS as AWS doesn’t allow BGP routing.
EKS BYOCNI “custom CNI” setup procedure:
- Remove current node groups and worker nodes.
- Remove the AWS VPC CNI DaemonSet from the cluster.
- Deploy new node groups and worker nodes.
- Install the BYOCNI into the EKS cluster.
Step 1 – Remove EKS Worker Nodes:
The simplest way to change the CNI on an existing cluster is to remove all the worker nodes and deploy the new ones after changing the CNI. In that case, no binary and config from the previous CNI are left on the nodes. The other way is to remove the CNI, manually remove the remaining configs from the worker nodes and install the new CNI. Both solutions will cause massive downtime in your environment. There is a third way, which is hard to implement but reduces the impact and downtime. To implement it, you must add a label to all existing worker nodes cni=vpc-cni, edit the aws-node DaemonSet and add a NodeSelector to its template. With this configuration, the VPC CNI will be only deployed into those nodes. Then, deploy the new nodes, add a label cni=cilium and install the CNI with a NodeSelector pointing to that label. Now, you have a cluster with two sets of nodes with different CNIs. Cordon and drain the old nodes to reschedule the pods for the new nodes and remove the old worker nodes.
To find all available node groups:
aws eks list-nodegroups --cluster-name kubedemyTo remove node groups, use the following command:
aws eks delete-nodegroup --cluster-name kubedemy --nodegroup-name NODE_GROUP_NAMEStep 2 – Remove AWS VPC CNI from EKS:
To prevent the VPC CNI from being deployed again, remove its DaemonSet from the cluster. You can also delete its ConfigMap, as we no longer need it.
kubectl -n kube-system delete ds aws-node
kubectl -n kube-system delete cm amazon-vpc-cni
If you installed the VPC CNI through the EKS Addons, to delete:
aws eks delete-addon --cluster-name kubedemy --addon-name vpc-cniStep 3 – Deploy new Worker Nodes in EKS:
Use any of the following methods to deploy the new worker nodes into your cluster:
AWS EKS – Part 3 – Deploy worker nodes using managed node groups
AWS EKS – Part 4 – Deploy worker nodes using custom launch templates
AWS EKS – Part 5 – Deploy self-managed worker nodes
AWS EKS – Part 6 – Deploy Bottlerocket worker nodes and update operator
AWS EKS – Part 7 – Deploy ARM-based Kubernetes Worker nodes
AWS EKS – Part 8 – Deploy Worker nodes using Spot Instances
AWS EKS – Part 9 – Deploy Worker nodes using Fargate Instances
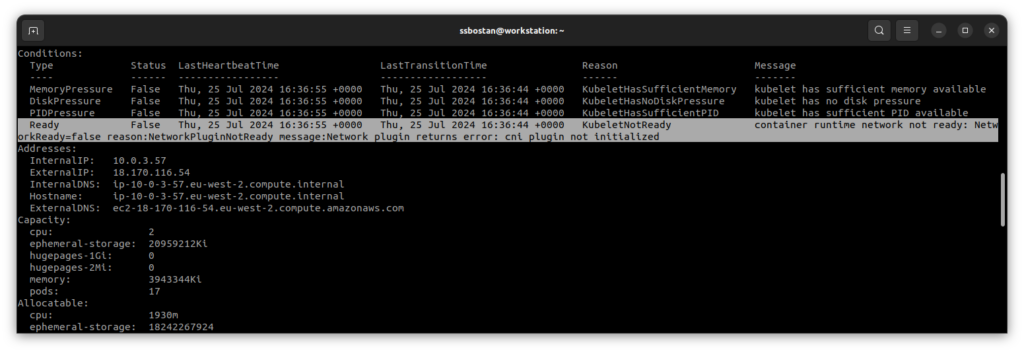
After deploying new nodes, they are not ready because the container networking plugin has not been installed, and after installing the CNI, they will become ready to use.

Step 4 – Install BYOCNI in EKS Cluster:
In this lesson, we will install Cilium in standalone mode, but you can definitely use the CNI of your choice. Remember to configure the CNI to fit your needs and the environment. For example, the Cilium default Pod CIDR is 10.0.0.0/8, which is our VPC CIDR; if used, it creates a conflict between the node and the Kubernetes Pods.
To install the Cilium on EKS in standalone mode:
helm repo add cilium https://helm.cilium.io
cat <<EOF > cilium-values.yaml
ipam:
operator:
clusterPoolIPv4PodCIDRList: ["192.168.0.0/16"]
clusterPoolIPv4MaskSize: 24
enableIPv4Masquerade: true
EOF
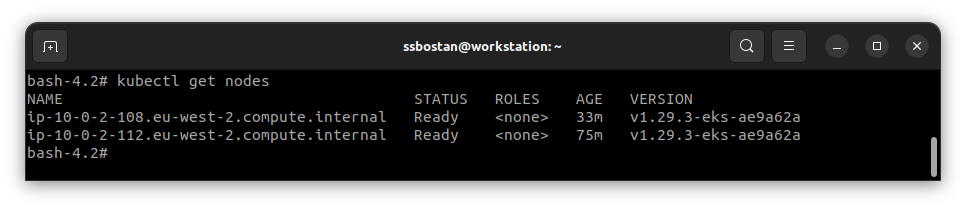
helm install cilium cilium/cilium -f cilium-values.yaml -n cilium --create-namespaceAfter installation, Worker nodes must become ready.
Conclusion:
BYOCNI is another EKS networking feature that helps customise Kubernetes networking to fit our needs. Although there are many exciting Kubernetes networking topics, I think it is enough, and we can start covering Kubernetes Storage in the next articles.
If you like this series of articles, please share them and write your thoughts as comments here. Your feedback encourages me to complete this massively planned program. Just share them and provide feedback. I’ll make you an AWS EKS black belt.
Follow my LinkedIn https://linkedin.com/in/ssbostan
Follow Kubedemy’s LinkedIn https://linkedin.com/company/kubedemy
Follow Kubedemy’s Telegram https://telegram.me/kubedemy
Related Posts
AWS EKS – Part 24 – Delete EKS Cluster and Resources
AWS EKS – Part 15 – Restrict Node IMDS to Secure AWS Account Access