
AWS EKS – Part 12 – Deploy Fully Air-gapped Cluster without Internet
Some industries, like health, pharmacology, military, air force, space, government systems, etc., may be forced to run their infrastructures in fully private networks without internet, called air-gapped, to be safe from external attacks or at least reduce their attack surface. If you are working in such environments, using the cloud, especially AWS and want to run Kubernetes clusters using EKS but in an air-gapped network, this article explains all you need to setup an air-gapped environment and EKS cluster.
Note: To make our environment completely air-gapped, we setup a separate VPC, Subnets, Security Groups, Route tables, routes, VPC endpoints, etc.
Follow our social media:
https://www.linkedin.com/in/ssbostan
https://www.linkedin.com/company/kubedemy
https://www.youtube.com/@kubedemy
Register for the FREE EKS Tutorial:
If you want to access the course materials, register from the following link:
Register for the FREE AWS EKS Black Belt Course
Air-gapped EKS Cluster deployment procedure:
- Create separate IAM roles for the cluster, worker nodes, etc.
- Create separate VPC and subnets for the air-gapped environment.
- Deploy EKS cluster in an Air-gapped network using private subnets.
- Create needed VPC Endpoints in the Air-gapped network.
- Deploy Worker nodes using managed node groups.
- Setup Client VPN Endpoint to connect to cluster and workers.
- Confirm the cluster and worker nodes installation.
- Investigate all resources created in our AWS account.
Step 1 – Create IAM roles for the Air-gapped cluster:
The following codes create IAM roles for our air-gapped cluster and nodes. If you need more details and information, read these articles related to the previous parts:
AWS EKS – Part 2 – Deploy managed cluster control plane
AWS EKS – Part 3 – Deploy worker nodes using managed node groups
cat <<EOF > cluster-trust-policy.json
{
    "Version": "2012-10-17",
    "Statement": [
        {
            "Action": "sts:AssumeRole",
            "Effect": "Allow",
            "Principal": {
                "Service": "eks.amazonaws.com"
            }
        }
    ]
}
EOF

aws iam create-role \
  --assume-role-policy-document file://cluster-trust-policy.json \
  --role-name Kubedemy_EKS_Airgapped_Cluster_Role \
  --tags Key=owner,Value=kubedemy

aws iam attach-role-policy \
  --policy-arn arn:aws:iam::aws:policy/AmazonEKSClusterPolicy \
  --role-name Kubedemy_EKS_Airgapped_Cluster_Role

cat <<EOF > nodegroup-trust-policy.json
{
    "Version": "2012-10-17",
    "Statement": [
        {
            "Effect": "Allow",
            "Action": "sts:AssumeRole",
            "Principal": {
                "Service": [
                    "ec2.amazonaws.com"
                ]
            }
        }
    ]
}
EOF

aws iam create-role \
  --assume-role-policy-document file://nodegroup-trust-policy.json \
  --role-name Kubedemy_EKS_Airgapped_Managed_Nodegroup_Role \
  --tags Key=owner,Value=kubedemy

aws iam attach-role-policy \
  --policy-arn arn:aws:iam::aws:policy/AmazonEKSWorkerNodePolicy \
  --role-name Kubedemy_EKS_Airgapped_Managed_Nodegroup_Role

aws iam attach-role-policy \
  --policy-arn arn:aws:iam::aws:policy/AmazonEC2ContainerRegistryReadOnly \
  --role-name Kubedemy_EKS_Airgapped_Managed_Nodegroup_Role

aws iam attach-role-policy \
  --policy-arn arn:aws:iam::aws:policy/AmazonEKS_CNI_Policy \
  --role-name Kubedemy_EKS_Airgapped_Managed_Nodegroup_Role
Step 2 – Create an air-gapped VPC and Subnets:
In the following code block, you can see all the necessary resources. If you want to learn more about EKS pre-requirements, read the following article:
AWS EKS – Part 1 – Deploy EKS cluster requirements
aws ec2 create-vpc \
  --cidr-block 172.16.0.0/16 \
  --tag-specifications "ResourceType=vpc,Tags=[{Key=owner,Value=kubedemy}]"

aws ec2 modify-vpc-attribute \
  --vpc-id vpc-07fd95f3a0def64e2 \
  --enable-dns-hostnames

aws ec2 create-subnet \
  --vpc-id vpc-07fd95f3a0def64e2 \
  --cidr-block 172.16.1.0/24 \
  --availability-zone eu-west-2a \
  --tag-specifications "ResourceType=subnet,Tags=[{Key=owner,Value=kubedemy}]"

aws ec2 create-subnet \
  --vpc-id vpc-07fd95f3a0def64e2 \
  --cidr-block 172.16.2.0/24 \
  --availability-zone eu-west-2b \
  --tag-specifications "ResourceType=subnet,Tags=[{Key=owner,Value=kubedemy}]"

aws ec2 create-subnet \
  --vpc-id vpc-07fd95f3a0def64e2 \
  --cidr-block 172.16.3.0/24 \
  --availability-zone eu-west-2c \
  --tag-specifications "ResourceType=subnet,Tags=[{Key=owner,Value=kubedemy}]"

aws ec2 modify-subnet-attribute \
  --subnet-id subnet-05e7bf1a014388a57 \
  --no-map-public-ip-on-launch

aws ec2 modify-subnet-attribute \
  --subnet-id subnet-07e0cad04af389e87 \
  --no-map-public-ip-on-launch

aws ec2 modify-subnet-attribute \
  --subnet-id subnet-03e7f1362ce8bd3e8 \
  --no-map-public-ip-on-launch
Step 3 – Deploy Air-gapped EKS Cluster:
To deploy EKS in an air-gapped environment, we must turn off the public endpoint and enable the private endpoint of the cluster. To do so, run the following command, and if you need more detailed information, read this article:
AWS EKS – Part 10 – Deploy cluster with private API endpoint
aws eks create-cluster \
  --name kubedemy-airgapped-cluster \
  --role-arn arn:aws:iam::231144931069:role/Kubedemy_EKS_Airgapped_Cluster_Role \
  --resources-vpc-config subnetIds=subnet-05e7bf1a014388a57,subnet-07e0cad04af389e87,subnet-03e7f1362ce8bd3e8,endpointPublicAccess=false,endpointPrivateAccess=true \
  --kubernetes-network-config serviceIpv4Cidr=172.20.0.0/16,ipFamily=ipv4 \
  --kubernetes-version 1.28 \
  --tags owner=kubedemy
As discussed in the previous articles, EKS creates a security group assigned to cluster ENIs and managed workers. We need the ID of that for the next step.
aws eks describe-cluster \
  --name kubedemy-airgapped-cluster \
  --query "cluster.resourcesVpcConfig.clusterSecurityGroupId" \
  --output text
Step 4 – Create VPC Endpoints using AWS PrivateLink:
We are in an entirely private network, which means we don’t have any internet to access anything over the internet or outside the VPC, including AWS services like EC2, STS, ECR, S3, etc., needed to deploy worker nodes and join them to the cluster, pull images, etc. AWS provides a service called PrivateLink that allows us to use services as if they are in our VPC, and we can use them without Internet Gateway, NAT Gateway, etc.
In AWS, each service has an internal name used to create VPC Endpoints. AWS provides three VPC endpoint types; we must use Interface Endpoints in our use case. Creating an Interface Endpoint will create an ENI in our VPC, which connects to the specified AWS service, and that service can be resolved through a private DNS name. In this article, I don’t want to talk about VPC Endpoints, AWS PrivateLink and other VPC-related concepts too much, and they will be covered in separate articles in the future.
AWS services internal naming convention:
com.amazonaws.REGION_CODE.SERVICE_NAME

# Example:
com.amazonaws.eu-west-2.eks
com.amazonaws.eu-west-2.ec2
com.amazonaws.eu-west-2.sts
For an Air-gapped EKS cluster, we need the following services:
# For EC2 service.
com.amazonaws.eu-west-2.ec2

# For STS service to assume role and get token.
com.amazonaws.eu-west-2.sts

# For ECR and S3 services to pull images.
com.amazonaws.eu-west-2.ecr.api
com.amazonaws.eu-west-2.ecr.dkr
com.amazonaws.eu-west-2.s3

# For ELB service to used by AWS LB controller.
com.amazonaws.eu-west-2.elasticloadbalancing

# For CloudWatch to collect logs.
com.amazonaws.eu-west-2.logs

# For AWS Application Tracing integration.
com.amazonaws.eu-west-2.xray

# For AWS Service Mesh integration.
com.amazonaws.eu-west-2.appmesh-envoy-management
Create Security Group for Interface Endpoints:
Each Interface VPC Endpoint needs at least one security group, or the VPC’s default security group will be used if not specified by the user. It’s better to create a separate security group for each interface endpoint, but in this lab, to reduce setup complexities, we create just one security group and assign it to all interface endpoints.
aws ec2 create-security-group \
  --group-name Kubedemy_SG_Interface_VPC_Endpoints_London \
  --description "Security Group for Interface VPC Endpoints in London Region" \
  --tag-specifications "ResourceType=security-group,Tags=[{Key=owner,Value=kubedemy}]" \
  --vpc-id vpc-07fd95f3a0def64e2
Allow traffic from cluster security group:
aws ec2 authorize-security-group-ingress \
  --group-id sg-0ceccf3c95bda8b2b \
  --source-group sg-075f70bdd5e519a41 \
  --protocol all
Create Interface VPC Endpoints needed for EKS clusters:
aws ec2 create-vpc-endpoint \
  --tag-specifications "ResourceType=vpc-endpoint,Tags=[{Key=owner,Value=kubedemy}]" \
  --vpc-id vpc-07fd95f3a0def64e2 \
  --vpc-endpoint-type Interface \
  --service-name com.amazonaws.eu-west-2.ec2 \
  --subnet-ids subnet-05e7bf1a014388a57 subnet-07e0cad04af389e87 subnet-03e7f1362ce8bd3e8 \
  --security-group-ids sg-0ceccf3c95bda8b2b \
  --ip-address-type ipv4 \
  --private-dns-enabled

aws ec2 create-vpc-endpoint \
  --tag-specifications "ResourceType=vpc-endpoint,Tags=[{Key=owner,Value=kubedemy}]" \
  --vpc-id vpc-07fd95f3a0def64e2 \
  --vpc-endpoint-type Interface \
  --service-name com.amazonaws.eu-west-2.sts \
  --subnet-ids subnet-05e7bf1a014388a57 subnet-07e0cad04af389e87 subnet-03e7f1362ce8bd3e8 \
  --security-group-ids sg-0ceccf3c95bda8b2b \
  --ip-address-type ipv4 \
  --private-dns-enabled

aws ec2 create-vpc-endpoint \
  --tag-specifications "ResourceType=vpc-endpoint,Tags=[{Key=owner,Value=kubedemy}]" \
  --vpc-id vpc-07fd95f3a0def64e2 \
  --vpc-endpoint-type Interface \
  --service-name com.amazonaws.eu-west-2.ecr.api \
  --subnet-ids subnet-05e7bf1a014388a57 subnet-07e0cad04af389e87 subnet-03e7f1362ce8bd3e8 \
  --security-group-ids sg-0ceccf3c95bda8b2b \
  --ip-address-type ipv4 \
  --private-dns-enabled

aws ec2 create-vpc-endpoint \
  --tag-specifications "ResourceType=vpc-endpoint,Tags=[{Key=owner,Value=kubedemy}]" \
  --vpc-id vpc-07fd95f3a0def64e2 \
  --vpc-endpoint-type Interface \
  --service-name com.amazonaws.eu-west-2.ecr.dkr \
  --subnet-ids subnet-05e7bf1a014388a57 subnet-07e0cad04af389e87 subnet-03e7f1362ce8bd3e8 \
  --security-group-ids sg-0ceccf3c95bda8b2b \
  --ip-address-type ipv4 \
  --private-dns-enabled

aws ec2 create-vpc-endpoint \
  --tag-specifications "ResourceType=vpc-endpoint,Tags=[{Key=owner,Value=kubedemy}]" \
  --vpc-id vpc-07fd95f3a0def64e2 \
  --vpc-endpoint-type Interface \
  --service-name com.amazonaws.eu-west-2.s3 \
  --subnet-ids subnet-05e7bf1a014388a57 subnet-07e0cad04af389e87 subnet-03e7f1362ce8bd3e8 \
  --security-group-ids sg-0ceccf3c95bda8b2b \
  --ip-address-type ipv4 \
  --dns-options PrivateDnsOnlyForInboundResolverEndpoint=false \
  --private-dns-enabled

aws ec2 create-vpc-endpoint \
  --tag-specifications "ResourceType=vpc-endpoint,Tags=[{Key=owner,Value=kubedemy}]" \
  --vpc-id vpc-07fd95f3a0def64e2 \
  --vpc-endpoint-type Interface \
  --service-name com.amazonaws.eu-west-2.elasticloadbalancing \
  --subnet-ids subnet-05e7bf1a014388a57 subnet-07e0cad04af389e87 subnet-03e7f1362ce8bd3e8 \
  --security-group-ids sg-0ceccf3c95bda8b2b \
  --ip-address-type ipv4 \
  --private-dns-enabled

aws ec2 create-vpc-endpoint \
  --tag-specifications "ResourceType=vpc-endpoint,Tags=[{Key=owner,Value=kubedemy}]" \
  --vpc-id vpc-07fd95f3a0def64e2 \
  --vpc-endpoint-type Interface \
  --service-name com.amazonaws.eu-west-2.logs \
  --subnet-ids subnet-05e7bf1a014388a57 subnet-07e0cad04af389e87 subnet-03e7f1362ce8bd3e8 \
  --security-group-ids sg-0ceccf3c95bda8b2b \
  --ip-address-type ipv4 \
  --private-dns-enabled
Note: We didn’t create endpoints for AWS X-Ray and AWS AppMesh as we don’t plan to use them in our cluster. In most scenarios, you don’t need them. If you need to access other services from your VPC, you must create endpoints for them.
Step 5 – Deploy cluster Worker nodes:
As I explained in previous articles, you can deploy worker nodes using any supported methods. In this lab, we use fully managed nodegroups to deploy our Kubernetes worker nodes. To learn more, read the following articles:
AWS EKS – Part 3 – Deploy worker nodes using managed node groups
AWS EKS – Part 4 – Deploy worker nodes using custom launch templates
AWS EKS – Part 5 – Deploy self-managed worker nodes
AWS EKS – Part 6 – Deploy Bottlerocket worker nodes and update operator
AWS EKS – Part 7 – Deploy ARM-based Kubernetes Worker nodes
AWS EKS – Part 8 – Deploy Worker nodes using Spot Instances
AWS EKS – Part 9 – Deploy Worker nodes using Fargate Instances
Create cluster critical node group:
These worker nodes will be used to deploy cluster-critical applications like ingress controller, dashboard, monitoring, GitOps, CI/CD, security, etc. tools.
- Worker nodes label
node.kubernetes.io/scope=system - These worker nodes are tainted with
CriticalAddonsOnlykey.
aws eks create-nodegroup \
  --cluster-name kubedemy-airgapped-cluster \
  --nodegroup-name system-managed-workers-001 \
  --scaling-config minSize=2,maxSize=5,desiredSize=2 \
  --subnets subnet-05e7bf1a014388a57 subnet-07e0cad04af389e87 subnet-03e7f1362ce8bd3e8 \
  --node-role arn:aws:iam::231144931069:role/Kubedemy_EKS_Airgapped_Managed_Nodegroup_Role \
  --remote-access ec2SshKey=kubedemy \
  --instance-types t3.medium \
  --ami-type AL2_x86_64 \
  --capacity-type ON_DEMAND \
  --update-config maxUnavailable=1 \
  --taints "key=CriticalAddonsOnly,value=true,effect=NO_SCHEDULE" "key=CriticalAddonsOnly,value=true,effect=NO_EXECUTE" \
  --labels node.kubernetes.io/scope=system \
  --tags owner=kubedemy
Create application node group:
These worker nodes will be used to deploy our workloads and applications.
- Worker nodes label
node.kubernetes.io/scope=application
aws eks create-nodegroup \
  --cluster-name kubedemy-airgapped-cluster \
  --nodegroup-name application-managed-workers-001 \
  --scaling-config minSize=2,maxSize=5,desiredSize=2 \
  --subnets subnet-05e7bf1a014388a57 subnet-07e0cad04af389e87 subnet-03e7f1362ce8bd3e8 \
  --node-role arn:aws:iam::231144931069:role/Kubedemy_EKS_Airgapped_Managed_Nodegroup_Role \
  --remote-access ec2SshKey=kubedemy \
  --instance-types t3.medium \
  --ami-type AL2_x86_64 \
  --capacity-type ON_DEMAND \
  --update-config maxUnavailable=1 \
  --labels node.kubernetes.io/scope=application \
  --tags owner=kubedemy
Step 6 – Setup AWS Client VPN Endpoint:
We reached the challenging step! In this step, we must setup an AWS client VPN endpoint to connect to our environment, the EKS cluster and worker nodes. In typical environments, we have access to the internet through Internet Gateway, NAT Gateway, etc., and we can connect to the cluster directly or by using a bastion host, but in air-gapped environments, there is no external connectivity to connect to the network.
AWS provides OpenVPN, which allows us to deploy it to our air-gapped VPC and access VPC resources from external networks. To set it up, follow these steps:
Create CA, Server and Client certificates:
Clone the OpenVPN Easy-RSA tool and create certificates.
git clone https://github.com/OpenVPN/easy-rsa.git

cd easy-rsa/easyrsa3

./easyrsa init-pki

./easyrsa build-ca nopass

./easyrsa build-server-full server.openvpn.kubedemy.aws.local nopass

./easyrsa build-client-full client.openvpn.kubedemy.aws.local nopass
Import Certificates to AWS Certificate Manager (ACM):
aws acm import-certificate \
  --certificate fileb://pki/issued/server.openvpn.kubedemy.aws.local.crt \
  --private-key fileb://pki/private/server.openvpn.kubedemy.aws.local.key \
  --certificate-chain fileb://pki/ca.crt \
  --tags Key=owner,Value=kubedemy

aws acm import-certificate \
  --certificate fileb://pki/issued/client.openvpn.kubedemy.aws.local.crt \
  --private-key fileb://pki/private/client.openvpn.kubedemy.aws.local.key \
  --certificate-chain fileb://pki/ca.crt \
  --tags Key=owner,Value=kubedemy
Create a new Security Group for Client VPN Endpoint:
aws ec2 create-security-group \
  --group-name Kubedemy_SG_Client_VPN_Endpoint \
  --description "Security Group for Client VPN Endpoint in Air-gapped Network" \
  --tag-specifications "ResourceType=security-group,Tags=[{Key=owner,Value=kubedemy}]" \
  --vpc-id vpc-07fd95f3a0def64e2
Allow traffic from VPN to cluster resources:
aws ec2 authorize-security-group-ingress \
  --group-id sg-075f70bdd5e519a41 \
  --source-group sg-072966835e5a5c336 \
  --protocol all
Create AWS Client VPN Endpoint:
Note: Client CIDR must not conflict with the VPC CIDR block.
Note: Replace the Server and Client certificate ARN with what you got from ACM.
Note: 172.16.0.2 is the VPC’s internal DNS resolver. .2 is a magic number.
Note: We need that DNS server to resolve the EKS cluster API Endpoint.
Note: You can change other configurations as needed.
aws ec2 create-client-vpn-endpoint \
  --client-cidr-block 10.200.0.0/16 \
  --server-certificate-arn arn:aws:acm:eu-west-2:231144931069:certificate/6e3a57da-6805-4026-af81-31d461f7f427 \
  --authentication-options "Type=certificate-authentication,MutualAuthentication={ClientRootCertificateChainArn=arn:aws:acm:eu-west-2:231144931069:certificate/b3c323ff-5a19-4794-b50a-004c78736682}" \
  --connection-log-options Enabled=false \
  --dns-servers 172.16.0.2 \
  --transport-protocol udp \
  --vpn-port 1194 \
  --tag-specifications "ResourceType=client-vpn-endpoint,Tags=[{Key=owner,Value=kubedemy}]" \
  --security-group-ids sg-072966835e5a5c336 \
  --vpc-id vpc-07fd95f3a0def64e2 \
  --self-service-portal enabled
Associate target subnets to Client VPN:
You should associate at least one subnet to connect to resources.
aws ec2 associate-client-vpn-target-network \
  --client-vpn-endpoint-id cvpn-endpoint-0c193f66926fdacef \
  --subnet-id subnet-05e7bf1a014388a57
Authorise VPN clients to connect to VPC CIDR block:
aws ec2 authorize-client-vpn-ingress \
  --client-vpn-endpoint-id cvpn-endpoint-0c193f66926fdacef \
  --target-network-cidr 172.16.0.0/16 \
  --authorize-all-groups
Export OpenVPN client config to connect to VPN server:
aws ec2 export-client-vpn-client-configuration \
  --client-vpn-endpoint-id cvpn-endpoint-0c193f66926fdacef \
  --query "ClientConfiguration" \
  --output text > client.ovpn
Step 7 – Confirm Air-gapped Cluster installation:
So far, we deployed all the necessary resources to bring up our air-gapped environment. The final stage is to confirm installation and access. Before connecting to OpenVPN, update kukeconfig file and then test the cluster.
aws eks update-kubeconfig --name kubedemy-airgapped-clusterRun the OpenVPN command in another terminal:
openvpn \
  --config client.ovpn \
  --cert ./pki/issued/client.openvpn.kubedemy.aws.local.crt \
  --key ./pki/private/client.openvpn.kubedemy.aws.local.key
Check the cluster using kubectl command:
kubectl get no

kubectl get po -A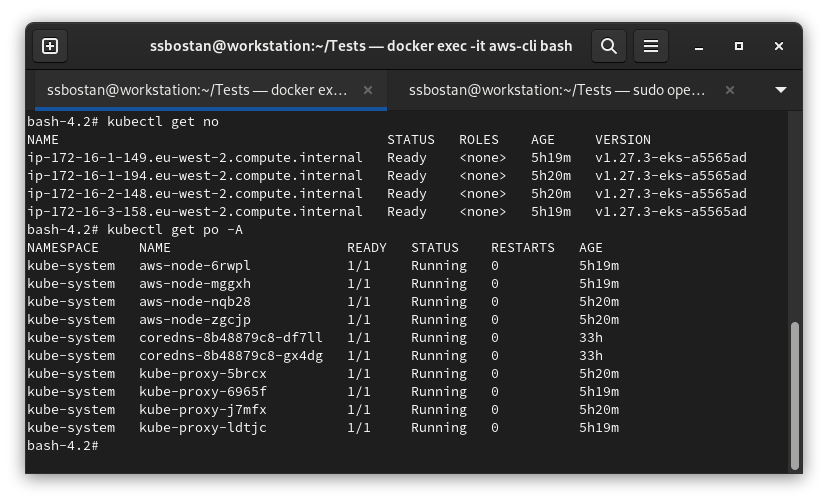
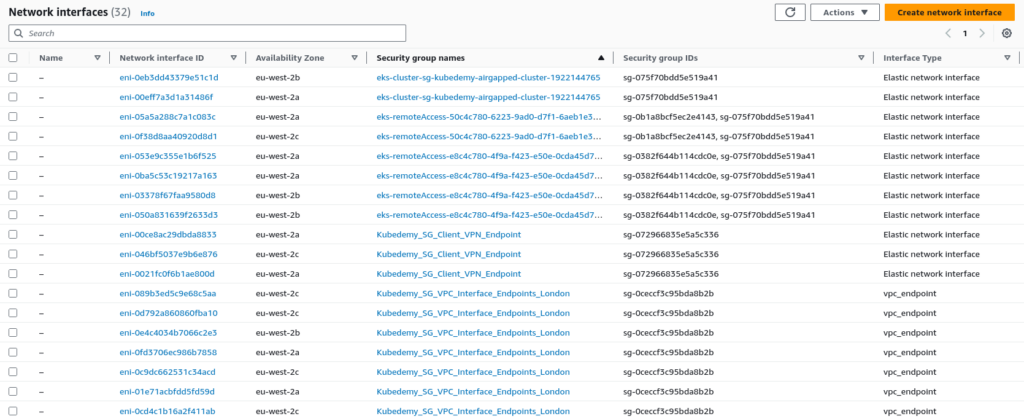
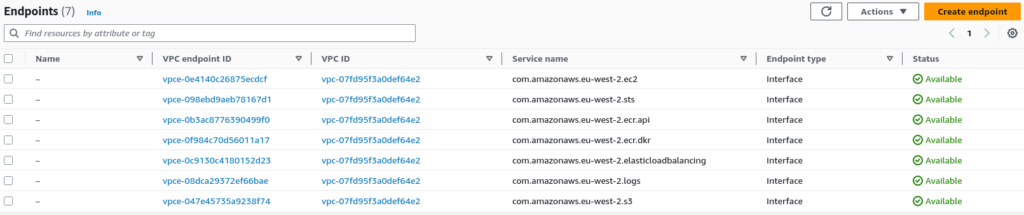
Step 8 – Investigate created AWS resources:
Network Interfaces:
The exciting part is network interfaces. In the deployed scenario, we have 32 network interfaces related to the EKS cluster, worker nodes, VPN and VPC endpoints. As you can see, we have many interfaces here, all of which use IP addresses. So, you should be aware of the CIDR blocks specified for each subnet to avoid a lack of available IPs in future.
VPC Endpoints:
During this lab, we deployed seven interface VPC endpoints.
Results:
Here are the results of the previous commands.
| IAM cluster role | arn:aws:iam::231144931069:role/Kubedemy_EKS_Airgapped_Cluster_Role |
| IAM node role | arn:aws:iam::231144931069:role/Kubedemy_EKS_Airgapped_Managed_Nodegroup_Role |
| VPC CIDR | 172.16.0.0/16 |
| VPC ID | vpc-07fd95f3a0def64e2 |
| Subnets | subnet-05e7bf1a014388a57 – 172.16.1.0/24 subnet-07e0cad04af389e87 – 172.16.2.0/24 subnet-03e7f1362ce8bd3e8 – 172.16.3.0/24 |
| Cluster name | kubedemy-airgapped-cluster |
| Cluster Security Group | sg-075f70bdd5e519a41 |
| VPC Endpoints | com.amazonaws.eu-west-2.ec2 com.amazonaws.eu-west-2.sts com.amazonaws.eu-west-2.ecr.api com.amazonaws.eu-west-2.ecr.dkr com.amazonaws.eu-west-2.elasticloadbalancing com.amazonaws.eu-west-2.logs com.amazonaws.eu-west-2.s3 |
| VPC Endpoints Security Group | sg-0ceccf3c95bda8b2b |
| VPN Endpoint CIDR | 10.200.0.0/16 |
| VPN Endpoint DNS Server | 172.16.0.2 |
| VPN Endpoint Security Group | sg-072966835e5a5c336 |
| ACM Certificates | arn:aws:acm:eu-west-2:231144931069:certificate/6e3a57da-6805-4026-af81-31d461f7f427 – server arn:aws:acm:eu-west-2:231144931069:certificate/b3c323ff-5a19-4794-b50a-004c78736682 – client |
Conclusion:
Important: After deploying, learning and testing this lab, delete all created resources as they are too costly, and you may be charged at least $30 daily.
In this lab, we deployed one of the most challenging EKS scenarios. Designing and deploying air-gapped environments on the cloud is difficult, but we did it for EKS. Keep in mind: I just covered the necessary parts to deploy an Air-gapped EKS cluster, but in the real world, we have to take care of cost and constantly analyse and reduce our cloud costs. In future articles, I will talk about cloud costs and how to minimise them.
If you like this series of articles, please share them and write your thoughts as comments here. Your feedback encourages me to complete this massively planned program. Just share them and provide feedback. I’ll make you an AWS EKS black belt.
Follow my LinkedIn https://www.linkedin.com/in/ssbostan
Follow Kubedemy LinkedIn https://www.linkedin.com/company/kubedemy
Follow Kubedemy Telegram https://telegram.me/kubedemy
Related Posts
AWS EKS – Part 22 – Deploy and Manage EKS Cluster Addons
AWS EKS – Part 26 – Increase VPC CNI Allocatable IP Addresses
Thanks a lot for the amazing post! It truly means a lot to me.
Really great article. I was looking something like this and while doing google I came across this. It helped me a lot.