
AWS EKS – Part 2 – Deploy Cluster Control Plane
AWS provides an easy way to deploy the Kubernetes cluster control plane with the EKS service. Control plane means etcd database and Kubernetes components kube-apiserver kube-controller-manager kube-scheduler cloud-controller-manager which are deployed and managed by AWS in their managed account.
When you create an EKS cluster, all managed components are created in a separate AWS-managed account and provided to you as a service. AWS guarantees cluster high availability by deploying at least two instances of Kubernetes components and at least three instances of etcd database. These components are managed entirely by AWS, and you don’t need to worry about their lifecycle.
Follow our social media:
https://www.linkedin.com/in/ssbostan
https://www.linkedin.com/company/kubedemy
https://www.youtube.com/@kubedemy
Register for the FREE EKS Tutorial:
If you want to access the course materials, register from the following link:
Register for the FREE AWS EKS Black Belt Course
Watch on YouTube:
Cluster requirements and deploying procedure:
- An IAM Role to be used for the EKS cluster.
- Attach AmazonEKSClusterPolicy policy to cluster role.
- Create an EKS cluster with AWS CLI, Terraform or eksctl.
- Confirm cluster installation and create the
kubeconfigfile. - Investigate what we have after creating an EKS cluster.
Step 1 – Create IAM role and attach the policy:
Your EKS cluster needs some permissions to do some things like create and manage volumes, describe network components, create routes, security groups, load balancers, and a bunch of stuff in your account on your behalf.
Important: For each cluster, you should create a separate cluster role.
To create the trust relationship policy, run this command:
cat <<EOF > cluster-trust-policy.json
{
    "Version": "2012-10-17",
    "Statement": [
        {
            "Action": "sts:AssumeRole",
            "Effect": "Allow",
            "Principal": {
                "Service": "eks.amazonaws.com"
            }
        }
    ]
}
EOF
Now run the following command to create the cluster role:
aws iam create-role \
  --assume-role-policy-document file://cluster-trust-policy.json \
  --role-name Kubedemy_EKS_Cluster_Role \
  --tags Key=owner,Value=kubedemy
By running the command, you get the role arn which is needed in the next steps.
And run this command to attach AmazonEKSClusterPolicy policy to the role:
aws iam attach-role-policy \
  --policy-arn arn:aws:iam::aws:policy/AmazonEKSClusterPolicy \
  --role-name Kubedemy_EKS_Cluster_Role
Here is the architecture diagram of what we did in the previous steps:
Step 2 – Create EKS cluster:
To create an EKS cluster, we need a cluster role and at least two subnets in the same VPC. In this lab, we use our previously created public subnets.
Note: As I’m willing to explain how to upgrade clusters, we deploy Kubernetes 1.28 in this lab, and then in the upgrade article, we upgrade it to the 1.29 version of Kubernetes.
Note: In this lab, we create a cluster in public subnets with internet access.
Note: In this lab, we don’t restrict Kubernetes API server communication; it’s accessible over the internet, and anyone with proper credentials can access the cluster.
Replace needed values with your ones.
To deploy the EKS cluster, run the following command:
aws eks create-cluster \
  --name kubedemy \
  --role-arn arn:aws:iam::231144931069:role/Kubedemy_EKS_Cluster_Role \
  --resources-vpc-config subnetIds=subnet-0ff015478090c2174,subnet-01b107cea804fdff1,subnet-09b7d720aca170608,endpointPublicAccess=true,publicAccessCidrs=0.0.0.0/0 \
  --kubernetes-network-config serviceIpv4Cidr=172.20.0.0/16,ipFamily=ipv4 \
  --kubernetes-version 1.28 \
  --tags owner=kubedemy
Some helpful notes about EKS clusters:
- endpointPublicAccess is true by default.
- serviceIpv4Cidr will be 10.100.0.0/16 or 172.20.0.0/16 if not specified.
- publicAccessCidrs is 0.0.0.0/0 by default.
Creating the cluster may take a while. In the meantime, you can run this command to wait for cluster to be active. wait command helps you wait for a bunch of cluster events like active cluster, delete cluster, active nodegroup, delete nodegroup, etc.
aws eks wait cluster-active --name kubedemyNote: I will talk about cluster logging, private clusters, encryption at rest, ipv6 clusters, additional security groups, and a multitude of other things about EKS in future articles.
After 10-15 minutes, the cluster gets ready; you can see cluster information:
bash-4.2# aws eks describe-cluster --name kubedemy

{
    "cluster": {
        "name": "kubedemy",
        "arn": "arn:aws:eks:eu-west-2:231144931069:cluster/kubedemy",
        "createdAt": "2023-07-15T13:28:04.819000+00:00",
        "version": "1.28",
        "endpoint": "https://A4A3FF0AFE51E5E7D73EAFC184328022.gr7.eu-west-2.eks.amazonaws.com",
        "roleArn": "arn:aws:iam::231144931069:role/Kubedemy_EKS_Cluster_Role",
        "resourcesVpcConfig": {
            "subnetIds": [
                "subnet-0ff015478090c2174",
                "subnet-01b107cea804fdff1",
                "subnet-09b7d720aca170608"
            ],
            "securityGroupIds": [],
            "clusterSecurityGroupId": "sg-0dc628bda3bbbc82b",
            "vpcId": "vpc-09a71d02067cf835d",
            "endpointPublicAccess": true,
            "endpointPrivateAccess": false,
            "publicAccessCidrs": [
                "0.0.0.0/0"
            ]
        },
        "kubernetesNetworkConfig": {
            "serviceIpv4Cidr": "172.20.0.0/16",
            "ipFamily": "ipv4"
        },
        "logging": {
            "clusterLogging": [
                {
                    "types": [
                        "api",
                        "audit",
                        "authenticator",
                        "controllerManager",
                        "scheduler"
                    ],
                    "enabled": false
                }
            ]
        },
        "identity": {
            "oidc": {
                "issuer": "https://oidc.eks.eu-west-2.amazonaws.com/id/A4A3FF0AFE51E5E7D73EAFC184328022"
            }
        },
        "status": "ACTIVE",
        "certificateAuthority": {
            "data": "REDACTED FOR CLARITY"
        },
        "platformVersion": "eks.2",
        "tags": {
            "owner": "kubedemy"
        }
    }
}
Step 3 – Connect to EKS Cluster:
To connect to the EKS cluster, you also need the kubectl command.
Now run this command to create kubeconfig file.
bash-4.2# aws eks update-kubeconfig --name kubedemy

Added new context arn:aws:eks:eu-west-2:231144931069:cluster/kubedemy to /root/.kube/config
To check your access to the Kubernetes API Server, run the following:
kubectl auth can-i "*" "*"

kubectl get ns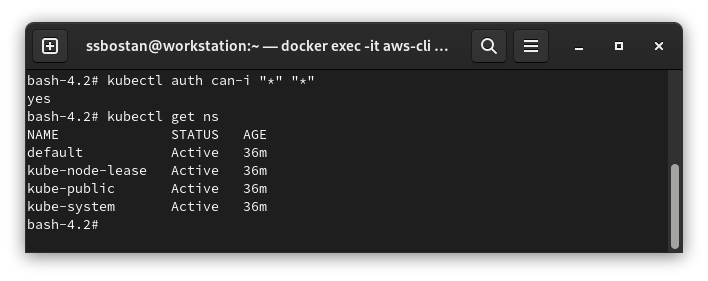
It shows I can do anything, which means I’m the cluster admin.
Important Tips:
- The user-principal who creates the cluster is the cluster admin, which is assigned to Kubernetes
system:mastersRBAC group in the cluster. - You can’t see the ClusterRoleBinding of the cluster owner. AWS manages it behind the scenes and does not appear in any objects.
- You need to keep the cluster owner IAM user, or you may lose cluster access.
- The cluster owner cannot be changed after creating the cluster.
Step 4 – Investigate EKS resources:
Cluster Security Group:
AWS EKS service creates a new security group for each cluster. This security group is assigned to Kubernetes control plane ENIs and managed node groups.

Cluster Control plane ENI:
AWS EKS creates up to 4 ENIs (at least two) for Kubernetes control plane in different subnets. These ENIs allow communication between worker nodes, applications, and other AWS resources within your VPC with the Kubernetes control plane.
Moreover, AWS EKS uses these ENIs to connect to worker nodes to be able to provide kubectl logs and kubectl exec features for the cluster.

Here is the architecture diagram of what we did in the previous steps:
Results:
Here are the results of the previous commands; we need them in the next articles:
| Cluster Name | kubedemy |
| Cluster ARN | arn:aws:eks:eu-west-2:231144931069:cluster/kubedemy |
| Cluster Security Group | sg-0dc628bda3bbbc82b |
| Cluster Role ARN | arn:aws:iam::231144931069:role/Kubedemy_EKS_Cluster_Role |
| Cluster Role Name | Kubedemy_EKS_Cluster_Role |
Conclusion:
So far, we have created an EKS cluster and confirmed that using kubectl command. In the following articles, we will add worker nodes through different methods, such as managed, self-managed, and managed nodes with custom AMI and fargate profiles.
If you like this series of articles, please share them and write your thoughts as comments here. Your feedback encourages me to complete this massively planned program. Just share them and provide feedback. I’ll make you an AWS EKS black belt.
Follow my LinkedIn https://www.linkedin.com/in/ssbostan
Follow Kubedemy LinkedIn https://www.linkedin.com/company/kubedemy
Follow Kubedemy Telegram https://telegram.me/kubedemy
Related Posts
AWS EKS – Part 33 – Bring Your Own CNI (BYOCNI) Approach
AWS EKS – Part 15 – Restrict Node IMDS to Secure AWS Account Access