
AWS EKS – Part 1 – Deploy EKS Cluster Requirements
We proudly announce that we will publish the most comprehensive FREE AWS EKS tutorial. In this series of articles, you will learn how to work deeply with AWS EKS and deploy, manage, upgrade, and operate EKS clusters through the command line “also planned for CloudFormation, Terraform, OpenTofu, Pulumi and Ansible”. EKS stands for Elastic Kubernetes Service and is the AWS-managed Kubernetes you can deploy and use with ease. Easily? Although deploying and managing EKS clusters is easier than On-premises Kubernetes deployments, it has its own challenges. In this lesson, you will learn how to deploy all EKS requirements for both public and private environments.
Follow our social media:
https://www.linkedin.com/in/ssbostan
https://www.linkedin.com/company/kubedemy
https://www.youtube.com/@kubedemy
Register for the FREE EKS Tutorial:
If you want to access the course materials, register from the following link:
Register for the FREE AWS EKS Black Belt Course
Watch on YouTube:
EKS cluster pre-requirements:
To deploy an EKS cluster, we need a couple of other AWS resources:
- An IAM user to deploy cluster and resources and be the cluster owner.
- AWS CLI setup and configured to create required resources.
- An AWS VPC in any EKS-supported region to act as the network infrastructure.
- A couple of public and private subnets to deploy Kubernetes worker nodes.
- An Internet Gateway to be able to connect to the internet from public subnets.
- A NAT Gateway for private subnets to be able to access the internet.
- A new Route Table and NAT Gateway route for private subnets.
- An EC2 keypair to be able to connect to EC2 instances.
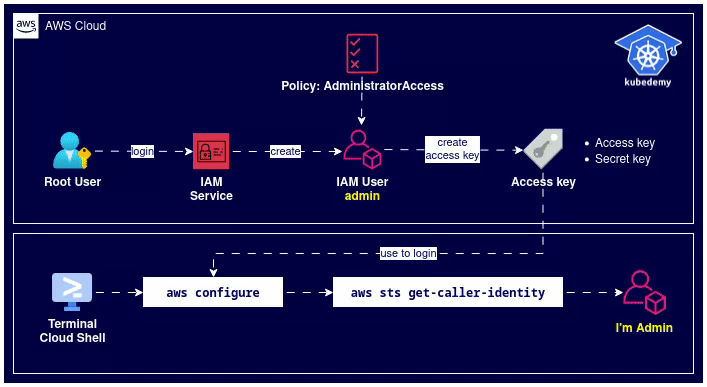
Step 1 – Create an IAM user:
Connect to your AWS account with the root user and create a new IAM user for the next steps. We use this IAM user to create, deploy, manage, etc., in this article and all future articles. Never delete this IAM user, as it will be the owner of the EKS cluster.
IAM > Users > Add users > Set username > Set AdministratorAccess policy.
After creating the user, create an access key from the Security credentials.
Note: I set the AdministratorAccess policy to avoid challenging permissions. You must create an IAM principal with the least privileges to avoid security pitfalls. AWS IAM service and permissions will be explained in a separate thread.
Step 2 – Setup AWS CLI:
There are many ways to install and use AWS CLI; as we love containers, we run it inside one using the lovely Docker. You can also use other methods.
docker run -d --name aws-cli --entrypoint sleep amazon/aws-cli infinity

docker exec -it aws-cli bash
Now, we are inside the AWS CLI container.
Step 3 – Configure AWS CLI and environment:
To setup our environment, we use the previously created IAM user credentials.
bash-4.2# aws configure
AWS Access Key ID [None]: YOUR ACCESS KEY HERE
AWS Secret Access Key [None]: YOUR SECRET KEY HERE
Default region name [None]: eu-west-2
Default output format [None]: json
Note: You can use any EKS-supported region you want.
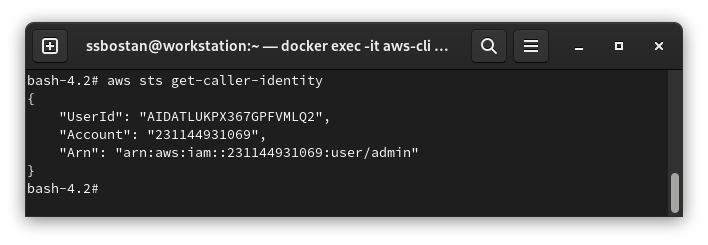
To confirm your configuration, run the following command:
aws sts get-caller-identityThe output should be something like this:
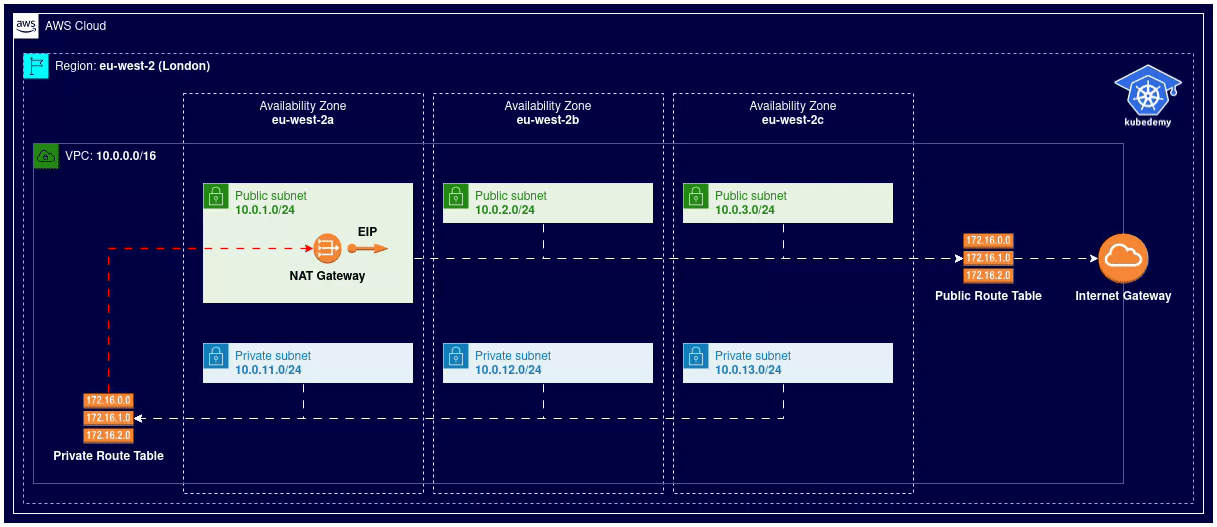
Here is the architecture diagram of what we did in the previous steps:
Step 4 – Create VPC:
Run the following command to create a new VPC in your region:
bash-4.2# aws ec2 create-vpc \
  --cidr-block 10.0.0.0/16 \
  --tag-specifications "ResourceType=vpc,Tags=[{Key=owner,Value=kubedemy}]"

{
    "Vpc": {
        "CidrBlock": "10.0.0.0/16",
        "DhcpOptionsId": "dopt-0c3ad00db38b27d36",
        "State": "pending",
        "VpcId": "vpc-09a71d02067cf835d",
        "OwnerId": "231144931069",
        "InstanceTenancy": "default",
        "Ipv6CidrBlockAssociationSet": [],
        "CidrBlockAssociationSet": [
            {
                "AssociationId": "vpc-cidr-assoc-0aa226721dfc1c806",
                "CidrBlock": "10.0.0.0/16",
                "CidrBlockState": {
                    "State": "associated"
                }
            }
        ],
        "IsDefault": false,
        "Tags": [
            {
                "Key": "owner",
                "Value": "kubedemy"
            }
        ]
    }
}
By running the aws ec2 create-vpc command, you create a new VPC, giving you the VPC ID and some information. We need VPC ID for further steps.
aws ec2 describe-vpcsThis command also shows you the list of available VPCs in this region.
Note: You can ignore this step if you already have a VPC in your active region. Just run aws ec2 describe-vpcs and find the VPC ID for further steps.
Step 5 – Enable VPC DNS Hostnames feature:
Kubernetes worker nodes join the cluster control plane using their DNS hostname, and the control plane verifies them in the same way. So, we must enable the DNS Hostnames feature of VPC to make it possible to setup the EKS cluster.
Replace the VPC ID with your own VPC ID from the last command.
aws ec2 modify-vpc-attribute --vpc-id vpc-09a71d02067cf835d --enable-dns-hostnamesStep 6 – Create Public Subnets:
In each Availability Zone, we need at least two subnets, one public and one private. You can ignore creating any of them, but I will create both public and private subnets for future articles and explain how we can setup clusters in both cases.
To see all availability zones in the active region, run the following command:
aws ec2 describe-availability-zonesSetup public subnets, Internet gateway and route:
Replace the VPC ID and Availability Zone name with your own.
aws ec2 create-subnet \
  --vpc-id vpc-09a71d02067cf835d \
  --cidr-block 10.0.1.0/24 \
  --availability-zone eu-west-2a \
  --tag-specifications "ResourceType=subnet,Tags=[{Key=owner,Value=kubedemy}]"

aws ec2 create-subnet \
  --vpc-id vpc-09a71d02067cf835d \
  --cidr-block 10.0.2.0/24 \
  --availability-zone eu-west-2b \
  --tag-specifications "ResourceType=subnet,Tags=[{Key=owner,Value=kubedemy}]"

aws ec2 create-subnet \
  --vpc-id vpc-09a71d02067cf835d \
  --cidr-block 10.0.3.0/24 \
  --availability-zone eu-west-2c \
  --tag-specifications "ResourceType=subnet,Tags=[{Key=owner,Value=kubedemy}]"
Running each command will show you the Subnet ID of the created subnet.
Important: To deploy worker nodes to a public subnet, the subnet must automatically assign a public IPv4 IP address to nodes. Without a public IP address, the process of joining worker nodes to the cluster will fail.
To enable it, run the following command for each public subnet:
aws ec2 modify-subnet-attribute --subnet-id subnet-0ff015478090c2174 --map-public-ip-on-launch

aws ec2 modify-subnet-attribute --subnet-id subnet-01b107cea804fdff1 --map-public-ip-on-launch

aws ec2 modify-subnet-attribute --subnet-id subnet-09b7d720aca170608 --map-public-ip-on-launch
Now create an Internet Gateway using the following command:
aws ec2 create-internet-gateway --tag-specifications "ResourceType=internet-gateway,Tags=[{Key=owner,Value=kubedemy}]"Assign it to your VPC using this command:
aws ec2 attach-internet-gateway \
  --vpc-id vpc-09a71d02067cf835d \
  --internet-gateway-id igw-046c41e4bc7f0ad14
Find the default route table ID and create a new route to the internet gateway:
aws ec2 describe-route-tables

aws ec2 create-route \
  --route-table-id rtb-0c418972dc98d43ed \
  --destination-cidr-block 0.0.0.0/0 \
  --gateway-id igw-046c41e4bc7f0ad14
If it returns True, it means everything is good.
Step 7 – Create Private Subnets:
AWS recommends deploying Kubernetes worker nodes in private subnets, and to access the internet, they must use NAT Gateway “for IPv4” and Egress-only Internet Gateway “for IPv6” Egress-only is free, but for NAT Gateway, you have to pay at least $1/day without any usage. You can ignore this step if you don’t want to pay for NAT Gateway, and you can come back to this step when I explain deploying clusters in Private subnets.
Setup private subnets, NAT Gateway, Route table and route:
aws ec2 create-subnet \
  --vpc-id vpc-09a71d02067cf835d \
  --cidr-block 10.0.11.0/24 \
  --availability-zone eu-west-2a \
  --tag-specifications "ResourceType=subnet,Tags=[{Key=owner,Value=kubedemy}]"

aws ec2 create-subnet \
  --vpc-id vpc-09a71d02067cf835d \
  --cidr-block 10.0.12.0/24 \
  --availability-zone eu-west-2b \
  --tag-specifications "ResourceType=subnet,Tags=[{Key=owner,Value=kubedemy}]"

aws ec2 create-subnet \
  --vpc-id vpc-09a71d02067cf835d \
  --cidr-block 10.0.13.0/24 \
  --availability-zone eu-west-2c \
  --tag-specifications "ResourceType=subnet,Tags=[{Key=owner,Value=kubedemy}]"
To create a new route table:
aws ec2 create-route-table \
  --vpc-id vpc-09a71d02067cf835d \
  --tag-specifications "ResourceType=route-table,Tags=[{Key=owner,Value=kubedemy}]"
Now associate the new route table to private subnets:
aws ec2 associate-route-table \
  --route-table-id rtb-04e5f753ba648101f \
  --subnet-id subnet-02a9b470ef3111fd4

aws ec2 associate-route-table \
  --route-table-id rtb-04e5f753ba648101f \
  --subnet-id subnet-066e961abfc243923

aws ec2 associate-route-table \
  --route-table-id rtb-04e5f753ba648101f \
  --subnet-id subnet-0774243a62c6808aa
Important: Now we have to create a NAT Gateway. NAT Gateway should be created in a public subnet with internet access through Internet Gateway. We have three public subnets in our example, and we can use one of them.
Before creating a NAT Gateway, we need an Elastic IP. To create one, run:
aws ec2 allocate-address \
  --domain vpc \
  --tag-specifications "ResourceType=elastic-ip,Tags=[{Key=owner,Value=kubedemy}]"
Now run the following command to create a NAT Gateway:
aws ec2 create-nat-gateway \
  --allocation-id eipalloc-0c87f9d1007e5ed0a \
  --subnet-id subnet-0ff015478090c2174 \
  --tag-specifications "ResourceType=natgateway,Tags=[{Key=owner,Value=kubedemy}]" \
  --connectivity-type public
Attention: AWS charges you for NAT Gateway and Elastic IP. Delete them after implementing this lab and recreate them in the next labs as needed.
To allow private subnets to connect to the internet, add the following route:
aws ec2 create-route \
  --route-table-id rtb-04e5f753ba648101f \
  --destination-cidr-block 0.0.0.0/0 \
  --nat-gateway-id nat-0930f9f4426b9c43d
If it returns True, it means everything is good.
Here is the architecture diagram of what we did in the previous steps:
Step 8 – Import SSH Key pair:
Although we recommend not SSH to worker nodes and use the in-cluster method instead for debugging purposes which I will introduce in future articles, we can create or import SSH keypairs into our AWS account to access nodes through SSH. You can also create a keypair in the AWS Dashboard and download its private key.
To create a new key pair, run the following command:
aws ec2 create-key-pair \
  --key-name kubedemy \
  --key-type ed25519 \
  --tag-specifications "ResourceType=key-pair,Tags=[{Key=owner,Value=kubedemy}]" \
  --key-format pem \
  --query "KeyMaterial" \
  --output text > kubedemy.pem
It creates a key pair and saves the private key into kubedemy.pem file.
Results:
Here are the results of the previous commands; we need them in the next articles:
| IAM User | arn:aws:iam::231144931069:user/admin |
| Region | eu-west-2 (London) |
| Availability Zones | eu-west-2a eu-west-2b eu-west-2c |
| VPC ID | vpc-09a71d02067cf835d |
| VPC CIDR | 10.0.0.0/16 |
| Public Subnets | subnet-0ff015478090c2174 – eu-west-2a – 10.0.1.0/24 subnet-01b107cea804fdff1 – eu-west-2b – 10.0.2.0/24 subnet-09b7d720aca170608 – eu-west-2c – 10.0.3.0/24 |
| Private Subnets | subnet-02a9b470ef3111fd4 – eu-west-2a – 10.0.11.0/24 subnet-066e961abfc243923 – eu-west-2b – 10.0.12.0/24 subnet-0774243a62c6808aa – eu-west-2c – 10.0.13.0/24 |
| Route Tables | rtb-0c418972dc98d43ed – VPC default for public subnets rtb-04e5f753ba648101f – Custom for private subnets |
| Internet Gateway | igw-046c41e4bc7f0ad14 |
| Elastic IP | eipalloc-0c87f9d1007e5ed0a |
| NAT Gateway | nat-0930f9f4426b9c43d |
| EC2 Keypair | key-0bfd6b8d9ea941740 |
Conclusion:
So far, we created all requirements to deploy EKS clusters in both public and private subnets. In the next articles, we will work on deploying the Kubernetes cluster.
If you like this series of articles, please share them and write your thoughts as comments here. Your feedback encourages me to complete this massively planned program. Just share them and provide feedback. I’ll make you an AWS EKS black belt.
Follow my LinkedIn https://www.linkedin.com/in/ssbostan
Follow Kubedemy LinkedIn https://www.linkedin.com/company/kubedemy
Follow Kubedemy Telegram https://telegram.me/kubedemy
Related Posts
AWS EKS – Part 29 – Setup AWS Load Balancer Controller
AWS EKS – Part 4 – Deploy Worker Nodes using Custom Launch Templates
This is a wonderful piece of document on implementing eks on AWS cli. It gave a lot of insight on important resource requirements for this project.
THIS IS AMAZIIIIIINNNNGGGG THANKS!!! this is the best tutorial I have ever seen in my life for K8S please keep doing this thanks