
AWS EKS – Part 13 – Setup IAM Roles for Service Accounts (IRSA)
IAM Roles for Service Accounts, for short IRSA, is an authentication method to authenticate to AWS to access cloud resources. IRSA is a Federated Authentication method in AWS that uses the OIDC authentication protocol. This method allows Kubernetes resources, mostly Pods, to access AWS resources using Kubernetes Service Accounts, which are natively supported by Kubernetes.
IRSA should be the first thing you setup after deploying an EKS cluster.
Follow our social media:
https://www.linkedin.com/in/ssbostan
https://www.linkedin.com/company/kubedemy
https://www.youtube.com/@kubedemy
Register for the FREE EKS Tutorial:
If you want to access the course materials, register from the following link:
Register for the FREE AWS EKS Black Belt Course
Why we need IRSA:
As you may know, some tools, like aws-vpc-cni, ebs-csi-driver, efs-csi-driver, aws-load-balancer-controller and a bunch of other Kubernetes-related components should manage AWS resources on your behalf to provide the necessary services you need in Kubernetes clusters. For example, VPC CNI is a component which connects to AWS to manage network interfaces and IP addresses for Pods. This component needs access to your AWS account to be able to do its job or, for example, when you need storage in your Kubernetes cluster, EBS CSI Driver creates an EBS volume on your behalf and to do that, it needs access to your AWS account.
What we did before IRSA:
A couple of years ago, if you wanted to access AWS resources from Pods within the Kubernetes cluster, you had two options, which are explained in the following:
Option 1 – Use Access and Secret Keys:
In this method, you should create an IAM user, assign needed policies to that user, create an Access key and Secret key, and use it in your application within the Pod. This approach also works outside the Kubernetes environment. It’s a good approach, as you can create separate users with different permissions for each application “inside or outside Kubernetes”, but you need a robust Secret management approach to keep Secrets secure, and in the case of using GitOps, how you keep your Secrets secure? Although there are many ways to keep Kubernetes Secrets secure, there is no reason to make complexity.
Option 2 – Assign Policy to worker nodes IAM role:
In this method, we assign all needed policies for our applications to the IAM role assigned to worker nodes. As containers are just isolated processes running on the worker node, they can assume the assigned role to the worker node and access AWS resources. Although this method works great, it can potentially cause security issues as all Pods can assume the worker node IAM role and access AWS resources. In the next article, I will explain how to prevent Pods from assuming the worker node IAM role.
Introducing IRSA and how it works:
As you found in both explained methods above, they are not simple and safe. You had to choose one of them a couple of years ago, but nowadays, there is a third method called IAM Roles for Service Accounts, IRSA, specially designed for Kubernetes. In AWS, every EKS cluster has an OIDC provider to validate Service Account tokens. You can register the cluster OIDC provider to any OIDC-compatible authentication system like IAM to allow Kubernetes service accounts to authenticate with that system using their tokens. In the case of the AWS IAM service, when you add the cluster OIDC provider to the IAM identity providers, cluster service accounts can send their JWT token to the IAM service. The IAM service validates the token with the cluster OIDC provider, and if it gets validated, you’re in. In the case of assuming IAM roles, you can create a role, assign the Service Account identity as Federated Principal, allow sts:AssumeRoleWithWebIdentity action to allow assuming the role after validating the Principal using the OIDC provider, so if you run a Pod with an already configured service account, the Pod can use the service account token to call STS service and get the temporary credentials to access AWS resources.
IAM Roles for Service Accounts setup procedure:
- Deploy a complete and working EKS cluster.
- Add the cluster OIDC provider in the AWS IAM service.
- Create an IAM role with proper configuration.
- Create a Service Account inside the Kubernetes cluster.
- Deploy a Kubernetes Pod with the created Service Account.
- Access to AWS resources from the running Pod.
Step 1 – Deploy an EKS Cluster:
In the previous articles, we covered how to deploy an EKS cluster and worker nodes. Follow the following links to create a cluster and worker nodes:
AWS EKS – Part 2 – Deploy managed cluster control plane
AWS EKS – Part 3 – Deploy worker nodes using managed node groups
AWS EKS – Part 4 – Deploy worker nodes using custom launch templates
AWS EKS – Part 5 – Deploy self-managed worker nodes
AWS EKS – Part 6 – Deploy Bottlerocket worker nodes and update operator
AWS EKS – Part 7 – Deploy ARM-based Kubernetes Worker nodes
AWS EKS – Part 8 – Deploy Worker nodes using Spot Instances
AWS EKS – Part 9 – Deploy Worker nodes using Fargate Instances
AWS EKS – Part 10 – Deploy cluster with private API endpoint
AWS EKS – Part 11 – Deploy workers in private subnets behind the NAT gateway
AWS EKS – Part 12 – Deploy fully air-gapped EKS clusters without internet
Step 2 – Add OIDC Provider to IAM Service:
To add the EKS cluster OIDC provider to IAM Service, you should find the provider URL, get the certificate thumbprint and create an identity provider in IAM Service.
To find the cluster OIDC provider URL, run this command:
aws eks describe-cluster \
  --name kubedemy \
  --query "cluster.identity.oidc.issuer" \
  --output text
To get the provider certificate thumbprint:
< /dev/null openssl s_client -servername oidc.eks.eu-west-2.amazonaws.com \
  -showcerts -connect oidc.eks.eu-west-2.amazonaws.com:443 | openssl x509 > oidc.crt

openssl x509 -noout -fingerprint -sha1 -in oidc.crt | cut -d"=" -f2 | tr -d ":"
Note: Change the oidc.eks.eu-west-2.amazonaws.com to the proper URL based on the cluster region. The URL is the same for all clusters in the London region, as I wrote.
To create an identity provider in IAM service:
aws iam create-open-id-connect-provider \
  --url https://oidc.eks.eu-west-2.amazonaws.com/id/41C415204248C3A34377D6A4D103A9C8 \
  --thumbprint-list 489AE8D9C7C05E9B0704768193172D67551BE3B8 \
  --client-id-list sts.amazonaws.com \
  --tags Key=owner,Value=kubedemy
Note: sts.amazonaws.com is the audience, which means STS can use this provider.
Step 3 – Create IAM role for Service Account:
To create an IAM role which can be assumed by Kubernetes Service Accounts, the authorized principal should be the Kubernetes OIDC provider, and to allow only a specific service account, we can use policy conditions to restrict access for selected ones.
Create a trust relationship policy document:
Change the OIDC provider ARN, provider URL and service account to your own.
cat <<EOF > irsa-trust-policy.json
{
  "Version": "2012-10-17",
  "Statement": [
    {
      "Effect": "Allow",
      "Principal": {
        "Federated": "arn:aws:iam::231144931069:oidc-provider/oidc.eks.eu-west-2.amazonaws.com/id/41C415204248C3A34377D6A4D103A9C8"
      },
      "Action": "sts:AssumeRoleWithWebIdentity",
      "Condition": {
        "StringEquals": {
          "oidc.eks.eu-west-2.amazonaws.com/id/41C415204248C3A34377D6A4D103A9C8:aud": "sts.amazonaws.com",
          "oidc.eks.eu-west-2.amazonaws.com/id/41C415204248C3A34377D6A4D103A9C8:sub": "system:serviceaccount:default:test"
        }
      }
    }
  ]
}
EOF
To create the IAM role, run the following command:
aws iam create-role \
  --role-name Kubedemy_EKS_IRSA_Default_Test \
  --assume-role-policy-document file://irsa-trust-policy.json \
  --tags Key=owner,Value=kubedemy
The command says: test service account in default namespace can assume the role, and to assume it, it should get validated against the identity provider.
Attach policies you need to the IAM role:
aws iam attach-role-policy \
  --role-name Kubedemy_EKS_IRSA_Default_Test \
  --policy-arn arn:aws:iam::aws:policy/AmazonEC2FullAccess
Note: I assigned AmazonEC2FullAccess to test.
Step 4 – Create Kubernetes Service Account:
To create a service account, use the following manifest:
apiVersion: v1
kind: ServiceAccount
metadata:
  name: test
  namespace: default
  annotations:
    eks.amazonaws.com/role-arn: arn:aws:iam::231144931069:role/Kubedemy_EKS_IRSA_Default_Test
  labels:
    owner: kubedemy
Note: It’s important to annotate the eks.amazonaws.com/role-arn with the role arn.
Step 5 – Deploy Kubernetes Pod:
Create a Pod and assign the service account to it so it can be used by the application running within the Pod, and the application can use the service account token to authenticate with AWS, assume the role and access AWS resources.
apiVersion: v1
kind: Pod
metadata:
  name: test
  namespace: default
  labels:
    owner: kubedemy
spec:
  serviceAccountName: test
  containers:
    - name: aws-cli
      image: amazon/aws-cli:latest
      command: ["sleep", "infinity"]
Step 6 – Access AWS resources from Pod:
Now, it’s time to test IRSA. As we assigned AmazonEC2FullAccess to the role, the Pod can do anything related to the EC2 service, and inside the Pod, we have aws command as we deployed aws-cli image so we can talk to AWS API.
kubectl exec -it test -- aws sts get-caller-identity --output json

kubectl exec -it test -- aws ec2 describe-instances --query "Reservations[*].Instances[*].InstanceId" --output text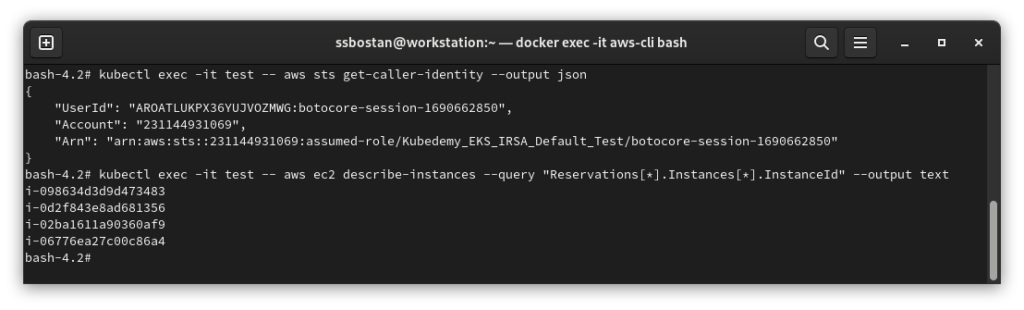
Results:
Here are the results of the previous commands; we need them in the next articles:
| Cluster OIDC URL | https://oidc.eks.eu-west-2.amazonaws.com/id/41C415204248C3A34377D6A4D103A9C8 |
| OIDC Server Name | oidc.eks.eu-west-2.amazonaws.com |
| OIDC Server Thumbprint | 489AE8D9C7C05E9B0704768193172D67551BE3B8 |
| OIDC Audience | sts.amazonaws.com |
| IRSA Role Name | Kubedemy_EKS_IRSA_Default_Test |
| Service Account Identity | system:serviceaccount:default:test |
Conclusion:
IAM Roles for Service Accounts are a fantastic feature in AWS. They allow us to assign needed permissions to a set of specific Pods through native Kubernetes service accounts without worrying about securing credentials or allowing all Pods to assume the role.
If you like this series of articles, please share them and write your thoughts as comments here. Your feedback encourages me to complete this massively planned program. Just share them and provide feedback. I’ll make you an AWS EKS black belt.
Follow my LinkedIn https://www.linkedin.com/in/ssbostan
Follow Kubedemy LinkedIn https://www.linkedin.com/company/kubedemy
Follow Kubedemy Telegram https://telegram.me/kubedemy
Related Posts
AWS EKS – Part 29 – Setup AWS Load Balancer Controller
AWS EKS – Part 6 – Deploy Bottlerocket Workers and Update Operator