
AWS EKS – Part 14 – Setup EKS Pod Identities to Access AWS Resources
In late 2023, AWS introduced a new EKS feature called Pod Identities, a successor of IAM Role for Service Accounts (IRSA). It can replace IRSA by providing more control and flexibility for platform teams in enterprise environments. Both IRSA and Pod Identities are used to access AWS resources like S3, SNS, SQS, ELB, EBS and other AWS services by Kubernetes Pods from within the Kubernetes cluster, but how they are managed and configured is different. As a matter of fact, both methods provide a way to authenticate to the IAM service and fetch a token to assume a role to access AWS resources.
Follow our social media:
https://www.linkedin.com/in/ssbostan
https://www.linkedin.com/company/kubedemy
https://www.youtube.com/@kubedemy
Register for the FREE EKS Tutorial:
If you want to access the course materials, register from the following link:
Register for the FREE AWS EKS Black Belt Course
Pod Identities vs. IRSA:
- Pod Identities doesn’t need to add the cluster OIDC issuer to the IAM service identity providers. In enterprise companies, Kubernetes clusters are mostly managed by platform teams, and access management is managed by security teams. So, to setup IRSA for every cluster, the platform team must ask the security team to add the cluster OIDC provider to the IAM identity providers, which is a time-consuming process and may need many approvals. With Pod Identities, we don’t need to add any OIDC provider to the IAM service.
- Pod Identities doesn’t need to update the role’s trust relationship policy to allow new clusters or service accounts to assume the role. In IRSA, if you want to enable a cluster to assume the role, you must add its OIDC provider ARN as an allowed principal in the role’s relationship policy, or if you would like to allow a service account to assume that role, you must update the trust policy’s conditions, which needs a request to the security team, get approvals, and update the policy. With Pod Identities, security teams create your desired role and allow Pod Identities to assume the role. After that, platform teams will manage the rest. Any clusters and service accounts can use the role through Pod Identities associations in the EKS service without any changes in the IAM service.
How does Pod Identities work?
Unlike IRSA, which uses the cluster OIDC provider, Pod Identities relies on an agent deployed into every worker node using DaemonSet. This agent is responsible for getting temporary tokens to assume roles, and it caches credentials for future uses to reduce the overhead on AWS APIs. In IRSA, every time a new Pod wants to assume a role, it should send a request to the IAM service and get credentials to assume the role. Pod Identities, after fetching the tokens for the first time, caches them, and if a Pod needs credentials to assume the same role, it provides it straight away.
By installing the Pod Identities Agent addon within the cluster, a new MutatingWebhookConfiguration is added to the cluster, which is responsible for mutating Pods and injecting a couple of environment variables and volumes to them when they use a ServiceAccount associated with a role.
Pod Identities considerations and limitations:
- Pod Identities doesn’t support IAM Roles in a different account than the cluster. If you need to assume a Role from another account, you should add it to the current account through delegation and use the delegated role.
- As the Pod Identity Agent runs as a DaemonSet, it doesn’t support Fargate instances. Even if you try to add it as a sidecar, it doesn’t work because this agent works in the privileged mode, which is not supported in Fargate.
- Pod Identities doesn’t work with the addons installed through the EKS APIs, for example, with
aws eks create-addoncommand. EKS addons support only IRSA, but you can use it for self-managed addons.
EKS Pod Identities setup procedure:
- Install the Pod Identity Agent addon.
- Create a new role and allow EKS Pods to assume.
- Manage Pod Identities associations.
- Create a Kubernetes Service Account for Pod Identities.
- Deploy a Pod to access AWS resources.
- Investigate the environment changes to learn more.
Step 1 – Install EKS Pod Identity Agent:
To deploy the Pod Identity Agent into all nodes, “system and application nodes”, first write a toleration config to tolerate all the taints and then deploy the EKS addon with the tolerations. Don’t worry if you’re not familiar with EKS addons. I will explain them completely and in-depth in future articles.
cat <<EOF > tolerate-all-taints.json
"tolerations": [
    {
        "operator": "Exists"
    }
]
EOF

aws eks create-addon \
  --cluster-name kubedemy \
  --addon-name eks-pod-identity-agent \
  --addon-version v1.1.0-eksbuild.1 \
  --configuration-values file://tolerate-all-taints.json \
  --tags owner=kubedemy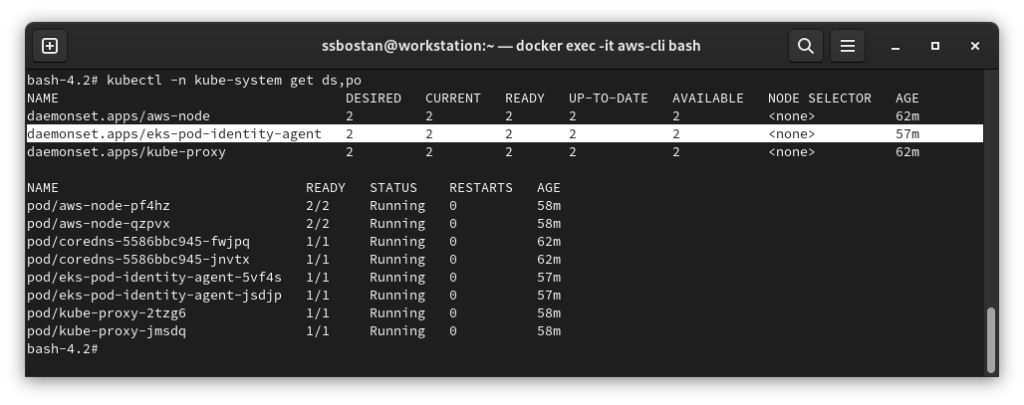
Step 2 – Create and Config IAM Role:
The trust relationship policy for roles is always the same as the following. Once the role is created with this trust policy, you don’t need to update it anymore.
cat <<EOF > pod-identity-trust-policy.json
{
    "Version": "2012-10-17",
    "Statement": [
        {
            "Effect": "Allow",
            "Principal": {
                "Service": [
                    "pods.eks.amazonaws.com"
                ]
            },
            "Action": [
                "sts:AssumeRole",
                "sts:TagSession"
            ]
        }
    ]
}
EOF
Note: We assigned a service principal instead of a federated principal in IRSA.
To create the role, run the following command:
aws iam create-role \
  --role-name Kubedemy_EKS_Pod_Identity_Test \
  --assume-role-policy-document file://pod-identity-trust-policy.json \
  --tags Key=owner,Value=kubedemy
Note: Set the role name based on its permissions to make it easy to find.
In our example, I want to assign EC2 ReadOnly access.
aws iam attach-role-policy \
  --role-name Kubedemy_EKS_Pod_Identity_Test \
  --policy-arn arn:aws:iam::aws:policy/AmazonEC2ReadOnlyAccess
These steps must be done by the security team. As you can see, we didn’t provide an OIDC provider, cluster name, or service account.
Step 3 – Manage Pod Identity Associations:
All associations will be done through EKS APIs, which means the platform team has full access to associate a role to any cluster, any namespace, or any service account. For example, I want to allow kubedemy ServiceAccount in default namespace in kubedemy cluster to assume the previously created role.
aws eks create-pod-identity-association \
  --cluster-name kubedemy \
  --namespace default \
  --service-account kubedemy \
  --role-arn arn:aws:iam::231144931069:role/Kubedemy_EKS_Pod_Identity_Test \
  --tags owner=kubedemy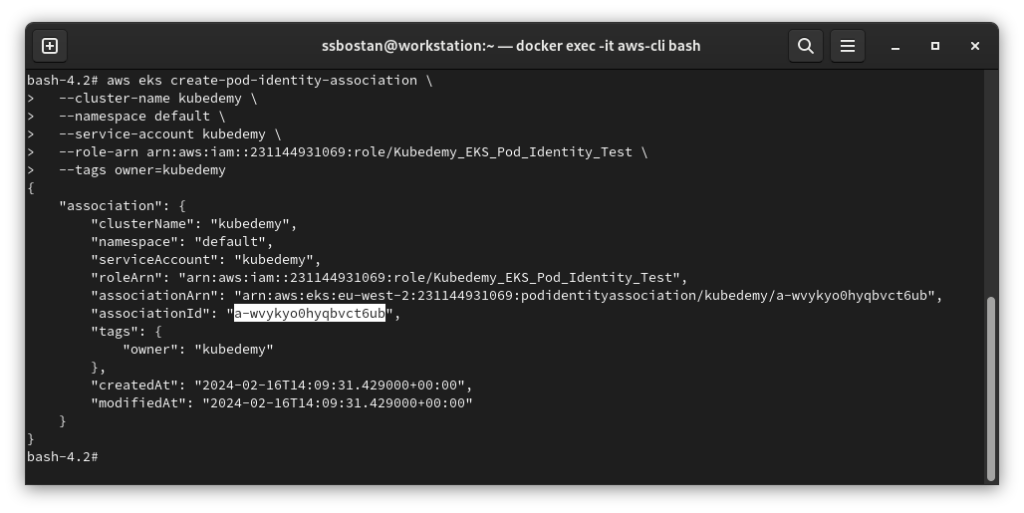
To delete the Pod Identity association:
aws eks delete-pod-identity-association \
  --cluster-name kubedemy \
  --association-id a-wvykyo0hyqbvct6ub
To update the Pod Identity association and change the role:
aws eks update-pod-identity-association \
  --cluster-name kubedemy \
  --association-id a-wvykyo0hyqbvct6ub \
  --role-arn arn:aws:iam::231144931069:role/Kubedemy_EKS_Pod_Identity_S3_Full_Access
To list all Pod Identity associations:
Namespace and ServiceAccount are optional arguments. If not provided, it will list all associations in all namespaces within the cluster.
aws eks list-pod-identity-associations \
  --cluster-name kubedemy \
  --namespace default \
  --service-account kubedemy
Step 4 – Create ServiceAccount for Pod Identities:
Unlike IRSA, which needs an annotation to define the Role ARN in the ServiceAccount, Pod Identity Service accounts do not need anything to define.
cat <<EOF | kubectl apply -f -
apiVersion: v1
kind: ServiceAccount
metadata:
  name: kubedemy
  namespace: default
EOF
Step 5 – Deploy Pod to use Pod Identity:
Deploy the following manifest and test Pod’s access to the AWS resources:
cat <<EOF | kubectl apply -f -
apiVersion: v1
kind: Pod
metadata:
  name: aws-cli
  namespace: default
spec:
  serviceAccount: kubedemy
  containers:
    - name: aws-cli
      image: amazon/aws-cli:latest
      command: ["sleep", "infinity"]
EOF
Check your access to EC2 instances by running:
kubectl exec -it aws-cli -- aws ec2 describe-instancesThis command will show you all the running instances.
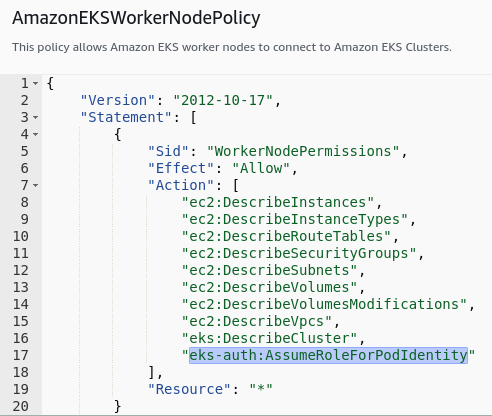
Step 6 – Investigate EKS Pod Identities changes:
Changes in AmazonEKSWorkerNodePolicy IAM policy:
AWS added a new permission/action to its default EKS worker node policy to allow Pod Identity authentication and assume roles using the new feature.
Environment variables and volume injected to Pods:
The pod-identity-webhook mutating webhook injects two environment variables and mounts a token into the Pods that use a ServiceAccount with an association.
    env:
    - name: AWS_CONTAINER_AUTHORIZATION_TOKEN_FILE
      value: "/var/run/secrets/pods.eks.amazonaws.com/serviceaccount/eks-pod-identity-token"
    - name: AWS_CONTAINER_CREDENTIALS_FULL_URI
      value: "http://169.254.170.23/v1/credentials"
    volumeMounts:
    - mountPath: "/var/run/secrets/pods.eks.amazonaws.com/serviceaccount/"
      name: eks-pod-identity-token
  volumes:
  - name: eks-pod-identity-token
    projected:
      defaultMode: 420
      sources:
      - serviceAccountToken:
          audience: pods.eks.amazonaws.com
          expirationSeconds: 86400
          path: eks-pod-identity-token
Conclusion:
Every solution has its pros and cons. In the case of EKS Pod Identity, its pros are ease of setup and configuration, reusability and scalability, and its cons are it doesn’t work with EKS Addons and Fargate instances. So, you should choose between IRSA and Pod Identities based on your needs and circumstances. I don’t suggest using both of them simultaneously because it creates more management processes in your environment.
If you like this series of articles, please share them and write your thoughts as comments here. Your feedback encourages me to complete this massively planned program. Just share them and provide feedback. I’ll make you an AWS EKS black belt.
Follow my LinkedIn https://www.linkedin.com/in/ssbostan
Follow Kubedemy LinkedIn https://www.linkedin.com/company/kubedemy
Follow Kubedemy Telegram https://telegram.me/kubedemy
Related Posts
AWS EKS – Part 12 – Deploy Fully Air-gapped Cluster without Internet
AWS EKS – Part 29 – Setup AWS Load Balancer Controller