
AWS EKS – Part 15 – Restrict Node IMDS to Secure AWS Account Access
Instance Metadata Service, IMDS, is an AWS service allowing EC2 instances to retrieve information about themselves for automation, telemetry, etc. In addition to common information, IMDS can also provide IAM credentials to access AWS resources from within the instance so that if you assign IAM roles to the instance, all applications, libraries, and processes running on that instance can assume the roles, retrieve the credentials, and access AWS resources. The good news is if your applications want to do something in AWS, you don’t need to create a separate IAM user, Access and Secret keys; you just need to create a role with the required permissions and assign it to the instance. The bad news for EKS clusters with EC2 worker nodes is that containers are just isolated processes running on the EC2 instance; so they can also retrieve the credentials and access AWS resources from within the containers within the Kubernetes Pods.
The best practice to keep the cluster and AWS account secure is restricting IMDS for Pods and granting required access to Pods with IRSA. So you grant necessary permissions to Pods granularly, and no one except the allowed Pod can access the AWS resources allowed in the IRSA role. To enable IAM Roles for Service Accounts, IRSA, for your cluster, follow the previous article and setup IRSA for your EKS cluster.
AWS EKS – Part 13 – Setup IAM Roles for Service Accounts (IRSA)
AWS EKS – Part 14 – Setup EKS Pod Identities to access AWS resources
Follow our social media:
https://www.linkedin.com/in/ssbostan
https://www.linkedin.com/company/kubedemy
https://www.youtube.com/@kubedemy
Register for the FREE EKS Tutorial:
If you want to access the course materials, register from the following link:
Register for the FREE AWS EKS Black Belt Course
Instance Metadata Service quick overview:
AWS provides two versions of Instance Metadata Service. IMDSv1 is a request/response service, and you can access it from the EC2 instance without authentication. Although it’s fully secure by design, AWS found some way to access it illegally. Nowadays, if you create an EC2 instance, IMDSv1 is disabled by default, and the instance can only access the IMDS service with IMDSv2, which is a session-oriented service. To access instance information with IMDSv2, you should create a temporary token before communicating with IMDS and send the token for every request. Session duration in IMDSv2 can be a minimum of one second and a maximum of six hours. Remember that you can also customize IMDS settings in the EC2 instance settings.
IMDS in EKS Managed Nodegroups:
All launch templates for managed node groups in EKS enable IMDSv1 by default. They also allow a Hop Limit of 2, meaning Pods can consume the IMDS service.
To check the Metadata settings of the instance, run this command:
aws ec2 get-launch-template-data --instance-id i-081291740872709e0In MetadataOptions of managed worker nodes, you will see:
"MetadataOptions": {
    "HttpTokens": "optional",
    "HttpPutResponseHopLimit": 2,
    "HttpEndpoint": "enabled",
    "HttpProtocolIpv6": "disabled",
    "InstanceMetadataTags": "disabled"
}
It shows HttpTokens are optional, “which means IMDSv1 is enabled“, and ResponseHopLimit is 2, “which means Pods can consume IMDS service“. This config is not suitable for production environments, especially if you have a multi-tenant environment shared with different teams and projects.
Deep dive from Kubernetes Pod:
Before solving the problem, let’s see what we can do from a Pod within the cluster.
Run a Pod with the following manifest:
apiVersion: v1
kind: Pod
metadata:
  name: aws-imds-test
  labels:
    owner: kubedemy
spec:
  containers:
    - name: aws-cli
      image: amazon/aws-cli:latest
      command:
        - sleep
        - infinity
Test IMDSv1 access from Kubernetes Pod:
With curl command without authentication, you will be able to access instance metadata. In the following codes, we get credentials to access AWS resources by assuming a role assigned to the worker node from within the container.
Note: 169.254.169.254 is a magic address to access instance metadata.
kubectl exec -it aws-imds-test -- curl -w "\n" http://169.254.169.254/latest/meta-data

kubectl exec -it aws-imds-test -- curl -w "\n" http://169.254.169.254/latest/meta-data/iam/security-credentials

kubectl exec -it aws-imds-test -- curl -w "\n" http://169.254.169.254/latest/meta-data/iam/security-credentials/Kubedemy_EKS_Managed_Nodegroup_Role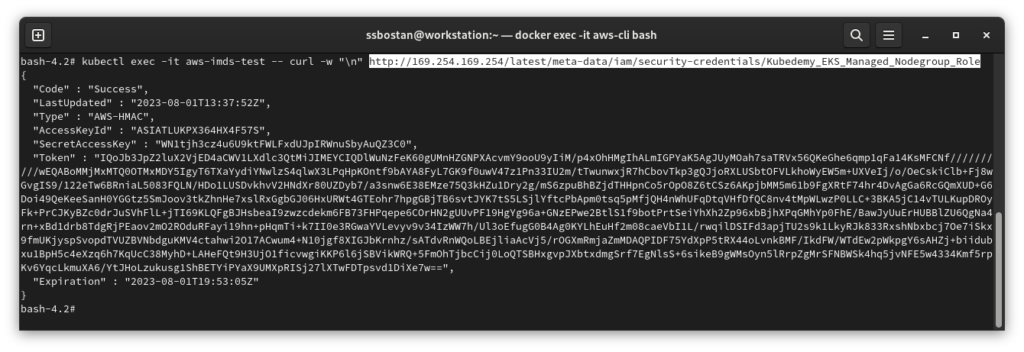
As you can see, we have the credentials to access AWS resources.
Test IMDSv2 access from Kubernetes Pod:
If you disable IMDSv1 by changing HttpTokens=required, you can’t use IMDSv1, and if you try the above commands, you get nothing except an unauthorized access error.
kubectl exec -it aws-imds-test -- curl -i -w "\n" http://169.254.169.254/latest/meta-data/iam/security-credentials/Kubedemy_EKS_Managed_Nodegroup_Role

HTTP/1.1 401 Unauthorized
Content-Length: 0
Date: Tue, 01 Aug 2023 14:36:46 GMT
Server: EC2ws
Connection: close
Content-Type: text/plain
IMDSv2 needs a token to allow access to instance metadata. To create a token:
curl -w "\n" -X PUT "http://169.254.169.254/latest/api/token" -H "X-aws-ec2-metadata-token-ttl-seconds: 21600"And to create it from the Pod:
kubectl exec -it aws-imds-test -- curl -w "\n" -X PUT "http://169.254.169.254/latest/api/token" -H "X-aws-ec2-metadata-token-ttl-seconds: 21600"To access instance metadata, you need to send the token with the request:
kubectl exec -it aws-imds-test -- curl -w "\n" -H "X-aws-ec2-metadata-token: TOKEN" http://169.254.169.254/latest/meta-data

kubectl exec -it aws-imds-test -- curl -w "\n" -H "X-aws-ec2-metadata-token: TOKEN" http://169.254.169.254/latest/meta-data/iam/security-credentials

kubectl exec -it aws-imds-test -- curl -w "\n" -H "X-aws-ec2-metadata-token: TOKEN" http://169.254.169.254/latest/meta-data/iam/security-credentials/Kubedemy_EKS_Managed_Nodegroup_Role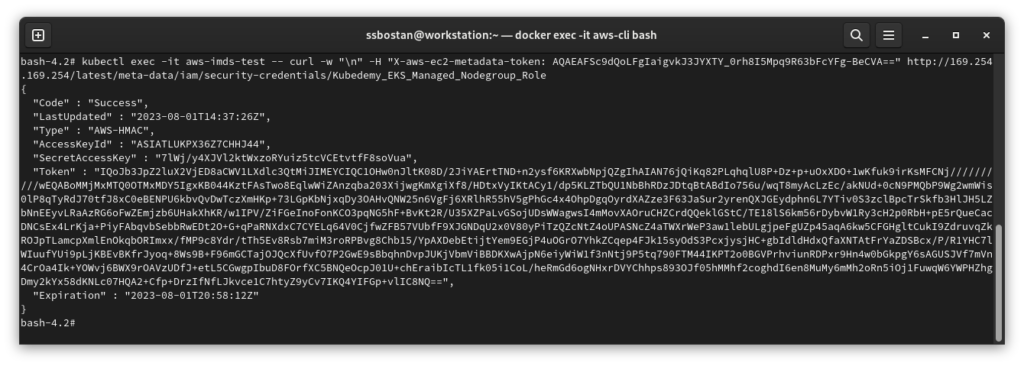
Deploy worker nodes with restricted IMDS access:
- Create a new launch template with restricted IMDS settings.
- Deploy new worker nodes using the launch template.
- Test IMDS from within the cluster with different Pod manifests.
Step 1 – Create IMDS-restricted Launch Template:
To learn more about how to create a new custom EC2 launch template, read the following article. The only difference is I just added the MetadataOptions config to the launch template to restrict the IMDS access by Kubernetes Pods and containers.
AWS EKS – Part 4 – Deploy worker nodes using custom launch templates
cat <<EOF > launch-template.json
{
    "ImageId": "ami-07b42e8fa1b744cd4",
    "InstanceType": "t3.medium",
    "UserData": "userdata.txt content here",
    "SecurityGroupIds": ["sg-0d3a25179e1c9baf8"],
    "KeyName": "kubedemy",
    "PrivateDnsNameOptions": {
        "EnableResourceNameDnsARecord": true
    },
    "Monitoring": {
        "Enabled": true
    },
    "MetadataOptions": {
        "HttpTokens": "required",
        "HttpPutResponseHopLimit": 1,
        "HttpEndpoint": "enabled",
        "HttpProtocolIpv6": "disabled",
        "InstanceMetadataTags": "disabled"
    }
}
EOF
Important: If you just change the HttpTokens value to required and HttpPutResponseHopLimit to something other than 1, Pods can use IMDSv2. If you change HttpPutResponseHopLimit to 1 and keep the HttpTokens value optional, Pods can use IMDSv1. So it’s really important to set both options together.
HttpTokens=required and HttpPutResponseHopLimit=1 means disable IMDSv1, so all applications should use IMDSv2 with the token. To get a token, applications must send an HTTP PUT request and containers can’t get tokens as we limited the hop to one.
Step 2 – Deploy IMDS-restricted Worker nodes:
To learn more about how to deploy worker nodes in EKS, read the following articles:
AWS EKS – Part 3 – Deploy worker nodes using managed node groups
AWS EKS – Part 4 – Deploy worker nodes using custom launch templates
AWS EKS – Part 5 – Deploy self-managed worker nodes
AWS EKS – Part 6 – Deploy Bottlerocket worker nodes and update operator
AWS EKS – Part 7 – Deploy ARM-based Kubernetes Worker nodes
AWS EKS – Part 8 – Deploy Worker nodes using Spot Instances
AWS EKS – Part 9 – Deploy Worker nodes using Fargate Instances
aws eks create-nodegroup \
  --cluster-name kubedemy \
  --nodegroup-name system-imds-restricted-workers-001 \
  --scaling-config minSize=2,maxSize=5,desiredSize=2 \
  --subnets subnet-0ff015478090c2174 subnet-01b107cea804fdff1 subnet-09b7d720aca170608 \
  --node-role arn:aws:iam::231144931069:role/Kubedemy_EKS_Managed_Nodegroup_Role \
  --launch-template name=Kubedemy_EKS_IMDS_Restricted_Launch_Template,version=1 \
  --capacity-type ON_DEMAND \
  --update-config maxUnavailable=1 \
  --taints "key=CriticalAddonsOnly,value=true,effect=NO_SCHEDULE" "key=CriticalAddonsOnly,value=true,effect=NO_EXECUTE" \
  --labels node.kubernetes.io/scope=system \
  --tags owner=kubedemy

aws eks create-nodegroup \
  --cluster-name kubedemy \
  --nodegroup-name application-imds-restricted-workers-001 \
  --scaling-config minSize=2,maxSize=5,desiredSize=2 \
  --subnets subnet-0ff015478090c2174 subnet-01b107cea804fdff1 subnet-09b7d720aca170608 \
  --node-role arn:aws:iam::231144931069:role/Kubedemy_EKS_Managed_Nodegroup_Role \
  --launch-template name=Kubedemy_EKS_IMDS_Restricted_Launch_Template,version=1 \
  --capacity-type ON_DEMAND \
  --update-config maxUnavailable=1 \
  --labels node.kubernetes.io/scope=application \
  --tags owner=kubedemy
Step 3 – Test IMDS Access in EKS Cluster:
First of all, check worker nodes and addons health with the following commands:
kubectl get no

kubectl get po -A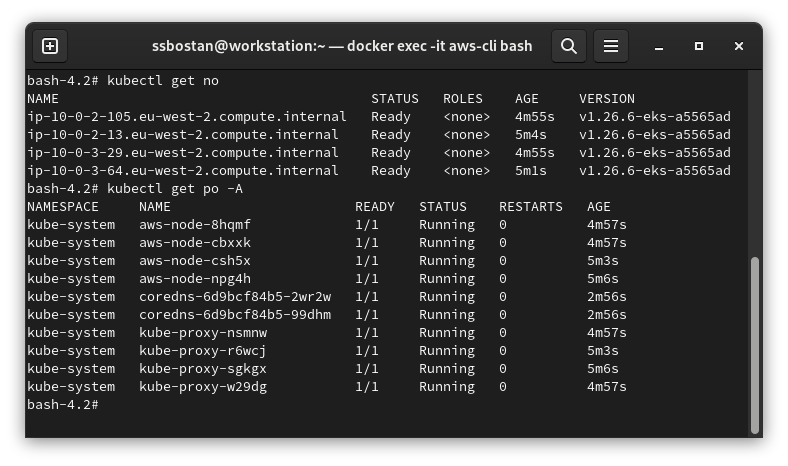
Now, back to Deep dive from the Kubernetes Pod section above and test IMDS access:
IMDSv1 response will be 401 Unauthorized:
kubectl exec -it aws-imds-test -- curl -i -w "\n" http://169.254.169.254/latest/meta-data

kubectl exec -it aws-imds-test -- curl -i -w "\n" http://169.254.169.254/latest/meta-data/iam/security-credentials

kubectl exec -it aws-imds-test -- curl -i -w "\n" http://169.254.169.254/latest/meta-data/iam/security-credentials/Kubedemy_EKS_Managed_Nodegroup_Role
IMDSv2 cannot be done as you can’t create a token inside containers:
kubectl exec -it aws-imds-test -- curl -w "\n" -X PUT "http://169.254.169.254/latest/api/token" -H "X-aws-ec2-metadata-token-ttl-seconds: 21600"IMDS and Kubernetes HostNetwork Pod:
Although we restricted IMDS for Pods, if you run a Pod with hostNetwork option, it could access IMDS because it runs on the same network namespace as the host, and it can request a token like the host instance, and HopLimit has no effect.
apiVersion: v1
kind: Pod
metadata:
  name: aws-imds-test
  labels:
    owner: kubedemy
spec:
  hostNetwork: true
  containers:
    - name: aws-cli
      image: amazon/aws-cli:latest
      command:
        - sleep
        - infinity
To solve this problem, you have two choices that will be explained in future articles:
- Restrict Access to
169.254.169.254IP address with network policies. - Restrict running Pods with
hostNetworkoption using OPA policies.
Conclusion:
Securing Kubernetes clusters, even EKS ones, is challenging and requires knowledge and experience. To setup the least security for your cluster, you need to disable IMDS and use IRSA instead. I will also cover more about EKS security in future articles.
If you like this series of articles, please share them and write your thoughts as comments here. Your feedback encourages me to complete this massively planned program. Just share them and provide feedback. I’ll make you an AWS EKS black belt.
Follow my LinkedIn https://www.linkedin.com/in/ssbostan
Follow Kubedemy LinkedIn https://www.linkedin.com/company/kubedemy
Follow Kubedemy Telegram https://telegram.me/kubedemy
Related Posts
AWS EKS – Part 19 – Kubernetes Authentication with IAM Roles
AWS EKS – Part 4 – Deploy Worker Nodes using Custom Launch Templates
Amazing Workshop. Detailed analysis, really well explained covering all the scenarios. Appreciate the efforts. Cheers!