
AWS EKS – Part 11 – Deploy Workers in Private Subnets behind NAT Gateway
In previous articles, we deployed our cluster and worker nodes in public subnets, but in the real world, we deploy our resources in private subnets behind NAT Gateway to restrict access to them from the internet, and anyone who wants to connect to our resources must connect to VPN or bastion host. In some critical environments like space, military, health, etc., we may need to deploy air-gapped clusters without any access to the internet.
In this article, I will explain how to deploy an EKS cluster with a private API endpoint and worker nodes in a private network behind a NAT Gateway. So, cluster and worker nodes cannot be accessed over the internet, but workers can use the internet to pull container images, download packages, etc., and all Pods and containers also have internet.
Follow our social media:
https://www.linkedin.com/in/ssbostan
https://www.linkedin.com/company/kubedemy
https://www.youtube.com/@kubedemy
Register for the FREE EKS Tutorial:
If you want to access the course materials, register from the following link:
Register for the FREE AWS EKS Black Belt Course
Private cluster deployment procedure:
- Deploy cluster pre-requirements in the AWS account.
- Deploy an EKS cluster with a Private API Endpoint.
- Deploy worker nodes in private subnets behind NAT Gateway.
- Deploy Bastion Host to connect to the cluster.
- Confirm cluster and worker nodes with Kubectl.
- SSH to worker nodes through Bastion host.
Step 1 – Deploy EKS cluster Pre-requirements:
As you remember, in the first article, we deployed all pre-requirements, including VPC, Private subnets, EIP, Nat Gateway, Route table, and route.
AWS EKS – Part 1 – Deploy EKS cluster requirements
| Private Subnets | subnet-02a9b470ef3111fd4 – eu-west-2a – 10.0.11.0/24 subnet-066e961abfc243923 – eu-west-2b – 10.0.12.0/24 subnet-0774243a62c6808aa – eu-west-2c – 10.0.13.0/24 |
| Route Table | rtb-04e5f753ba648101f |
| Elastic IP | eipalloc-0c87f9d1007e5ed0a |
| NAT Gateway | nat-0930f9f4426b9c43d |
Step 2 – Deploy Private API Endpoint Cluster:
To learn more about EKS clusters with a private API endpoint, read the below article. The only difference between what I explained in that article and what we do here is we will deploy our cluster into private subnets behind a NAT gateway.
AWS EKS – Part 10 – Deploy cluster with private API endpoint
aws eks create-cluster \
  --name kubedemy \
  --role-arn arn:aws:iam::231144931069:role/Kubedemy_EKS_Cluster_Role \
  --resources-vpc-config endpointPublicAccess=false,endpointPrivateAccess=true,subnetIds=subnet-02a9b470ef3111fd4,subnet-066e961abfc243923,subnet-0774243a62c6808aa \
  --kubernetes-network-config serviceIpv4Cidr=172.20.0.0/16,ipFamily=ipv4 \
  --kubernetes-version 1.28 \
  --tags owner=kubedemy
Step 3 – Deploy Private-network Worker nodes:
You can deploy EKS Kubernetes worker nodes in any way explained in previous articles. The only difference is private subnets. Read the following articles to learn more:
AWS EKS – Part 3 – Deploy worker nodes using managed node groups
AWS EKS – Part 4 – Deploy worker nodes using custom launch templates
AWS EKS – Part 5 – Deploy self-managed worker nodes
AWS EKS – Part 6 – Deploy Bottlerocket worker nodes and update operator
AWS EKS – Part 7 – Deploy ARM-based Kubernetes Worker nodes
AWS EKS – Part 8 – Deploy Worker nodes using Spot Instances
AWS EKS – Part 9 – Deploy Worker nodes using Fargate Instances
Create cluster critical node group:
These worker nodes will be used to deploy cluster-critical applications like ingress controller, dashboard, monitoring, GitOps, CI/CD, security, etc. tools.
- Worker nodes label
node.kubernetes.io/scope=system - These worker nodes are tainted with
CriticalAddonsOnlykey.
aws eks create-nodegroup \
  --cluster-name kubedemy \
  --nodegroup-name system-managed-workers-001 \
  --scaling-config minSize=2,maxSize=5,desiredSize=2 \
  --subnets subnet-02a9b470ef3111fd4 subnet-066e961abfc243923 subnet-0774243a62c6808aa \
  --node-role arn:aws:iam::231144931069:role/Kubedemy_EKS_Managed_Nodegroup_Role \
  --remote-access ec2SshKey=kubedemy \
  --instance-types t3.medium \
  --ami-type AL2_x86_64 \
  --capacity-type ON_DEMAND \
  --update-config maxUnavailable=1 \
  --taints "key=CriticalAddonsOnly,value=true,effect=NO_SCHEDULE" "key=CriticalAddonsOnly,value=true,effect=NO_EXECUTE" \
  --labels node.kubernetes.io/scope=system \
  --tags owner=kubedemy
Create application node group:
These worker nodes will be used to deploy our workloads and applications.
- Worker nodes label
node.kubernetes.io/scope=application
aws eks create-nodegroup \
  --cluster-name kubedemy \
  --nodegroup-name application-managed-workers-001 \
  --scaling-config minSize=2,maxSize=5,desiredSize=2 \
  --subnets subnet-02a9b470ef3111fd4 subnet-066e961abfc243923 subnet-0774243a62c6808aa \
  --node-role arn:aws:iam::231144931069:role/Kubedemy_EKS_Managed_Nodegroup_Role \
  --remote-access ec2SshKey=kubedemy \
  --instance-types t3.medium \
  --ami-type AL2_x86_64 \
  --capacity-type ON_DEMAND \
  --update-config maxUnavailable=1 \
  --labels node.kubernetes.io/scope=application \
  --tags owner=kubedemy
Step 4 – Deploy Bastion Host instance:
To deploy a Bastion Host and necessary resources, read the previous article:
AWS EKS – Part 10 – Deploy cluster with private API endpoint
aws ec2 run-instances \
  --image-id ami-020737107b4baaa50 \
  --instance-type t2.micro \
  --key-name kubedemy \
  --security-group-ids sg-00cbdaca52422606c \
  --subnet-id subnet-0ff015478090c2174 \
  --tag-specifications "ResourceType=instance,Tags=[{Key=owner,Value=kubedemy}]" \
  --associate-public-ip-address \
  --count 1
Step 5 – Check cluster and worker nodes:
Connect to the bastion host, install kubectl, configure aws CLI and check access.
aws configure

aws eks update-kubeconfig --name kubedemy

kubectl auth can-i "*" "*"

kubectl get no

kubectl get po -A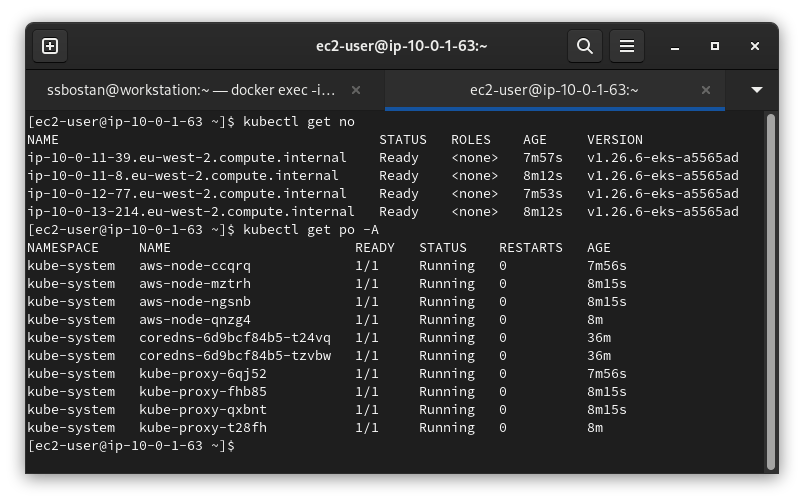
Step 6 – SSH to Worker nodes:
You must copy your SSH private key to the Bastion Host to connect to worker nodes. In future articles, I’ll explain how you can make it more secure with OTP using HashiCorp Vault or manage worker nodes at scale using Teleport.
Conclusion:
Security comes first. You must never expose your resources over the internet until required. In most cases, the private network behind NAT Gateway works, but sometimes, you should deal with Air-gapped environments, which will be explained in future.
If you like this series of articles, please share them and write your thoughts as comments here. Your feedback encourages me to complete this massively planned program. Just share them and provide feedback. I’ll make you an AWS EKS black belt.
Follow my LinkedIn https://www.linkedin.com/in/ssbostan
Follow Kubedemy LinkedIn https://www.linkedin.com/company/kubedemy
Follow Kubedemy Telegram https://telegram.me/kubedemy
Related Posts
AWS EKS – Part 29 – Setup AWS Load Balancer Controller
AWS EKS – Part 12 – Deploy Fully Air-gapped Cluster without Internet