
AWS EKS – Part 21 – Kubernetes Authentication with AWS Cognito
Kubernetes supports user authentication through OAuth2/OIDC providers, and this feature is also available in AWS EKS in addition to all methods explained in the previous articles. This authentication method allows enterprises to use AWS Cognito or other IDP providers like Keycloak for Kubernetes authentication, which helps different teams in the company access Kubernetes clusters through SSO flows like logging to other apps. In this lesson, we will describe how to use AWS Cognito to create an OAuth2/OIDC server and integrate it with AWS EKS so that our engineers can authenticate and access Kubernetes clusters through OIDC protocol. We also use Kubelogin on the client side to login to the OIDC server and fetch tokens. Remember that OAuth2/OIDC is only used for Kubernetes Authentication, and we still use Kubernetes RBAC for authorisation.
Follow our social media:
https://www.linkedin.com/in/ssbostan
https://www.linkedin.com/company/kubedemy
https://www.youtube.com/@kubedemy
Register for the FREE EKS Tutorial:
If you want to access the course materials, register from the following link:
Register for the FREE AWS EKS Black Belt Course
What is OAuth2 Protocol?
OAuth2 is an authorisation protocol/framework that enables users to grant limited access to resources on one website, “the resource server”, to another website or application, “the client”, without sharing their credentials. It operates through a series of interactions where the client obtains an access token for the user from the authorisation server, which the client then presents to the resource server when accessing the user’s protected resources. Learn more from https://oauth.net/2 document.
What is OpenID Connect (OIDC) Protocol?
OpenID Connect (OIDC) is an identity layer built on top of the OAuth2 protocol, designed to provide authentication services. While OAuth2 focuses on authorisation, allowing third-party applications, “the clients”, to access resources on behalf of the user, OIDC extends this functionality to include authentication. OAuth2 servers return a token called access_token, used for authorisation, while OIDC servers return an additional token called id_token, which is utilised for authentication.
What is AWS Cognito?
AWS Cognito is a fully managed identity and user authentication service provided by AWS. It enables developers to add user sign-up and sign-in and access control to web and mobile apps quickly and easily. Cognito supports user pools, which are user directories that handle user registration, authentication, and account recovery, as well as identity pools, which provide temporary AWS credentials for users to access AWS services. To integrate it with AWS EKS, we must use AWS Cognito User Pools.
What is Kubelogin?
Kubelogin is a command-line tool, “a kubectl plugin”, which provides a way to authenticate with identity providers like AWS Cognito, Keycloak, etc., and obtains tokens to be provided to the Kubernetes API Server for authentication. It simplifies user authentication by opening the browser, sending the login request to the authorisation server, fetching the token after successful authentication and preparing it to be sent to the Kubernetes API Server. When you run a kubectl command for the first time, it starts the authentication process and caches the token. It uses the cached token for the next kubectl commands and supports token renewal through refresh tokens.
AWS Cognito and EKS OIDC setup procedure:
- Create AWS Cognito User Pool to manage EKS users and groups.
- Setup AWS Cognito User Pool domain to access OAuth2/OIDC endpoints.
- Create AWS Cognito user group for EKS cluster admins.
- Create AWS Cognito admin user and assign it to the admins group.
- Create AWS Cognito OAuth2/OIDC client for the EKS cluster.
- Associate Cognito OIDC provider config to the EKS cluster.
- Create Kubernetes ClusterRoleBinding for EKS admins.
- Setup and configure Kubelogin on the client machine.
- Access the cluster and check user, group and permissions.
Step 1 – Create AWS Cognito User Pool:
AWS Cognito supports many customisations to setup and configure user pools. You can enable self-registration, configure password policies, change username attributes, add aliases, etc. The following command will create a new pool with custom password policies, use email as the username and disable self-registration. You can also enable delete protection to avoid deleting the user pool by mistake.
aws cognito-idp create-user-pool \
  --pool-name kubedemy \
  --policies "PasswordPolicy={MinimumLength=8,RequireUppercase=true,RequireLowercase=true,RequireNumbers=true,RequireSymbols=true,TemporaryPasswordValidityDays=7}" \
  --deletion-protection INACTIVE \
  --username-attributes email \
  --username-configuration CaseSensitive=false \
  --admin-create-user-config AllowAdminCreateUserOnly=true \
  --user-pool-tags owner=kubedemy
Every user pool has a unique ID, which is used to access OAuth2 and OIDC configuration endpoints. You must save the created pool’s ID needed for the next steps. To access the provider endpoints, you also need the AWS region code.
# AWS Cognito User Pool ID: eu-west-2_Tj3uyJm1Q
# Change it with yours.

# Provider base address:
https://cognito-idp.REGION.amazonaws.com/POOL_ID

# Provider OIDC configuration endpoint:
https://cognito-idp.REGION.amazonaws.com/POOL_ID/.well-known/openid-configuration

https://cognito-idp.eu-west-2.amazonaws.com/eu-west-2_Tj3uyJm1Q
https://cognito-idp.eu-west-2.amazonaws.com/eu-west-2_Tj3uyJm1Q/.well-known/openid-configuration
If you open the provider base address, you may face the following error as we didn’t add a domain for the provider. You may also get the same error for all other endpoints defined for authorisation, token, etc., in the OIDC configuration endpoint.
{"code":"BadRequest","message":"The server did not understand the operation that was requested.","type":"client"}Step 2 – Add Domain to AWS Cognito User Pool:
We must add a domain for our user pool to allow clients, “users and applications”, to access OAuth2/OIDC endpoints and login, logout and profile pages. You can add a custom domain or an AWS-created subdomain for AWS Cognito.
aws cognito-idp create-user-pool-domain \
  --user-pool-id eu-west-2_Tj3uyJm1Q \
  --domain kubedemyeksoidc
Right after running the above command, if you refresh the OIDC configuration page, you can see the changes in endpoints. They must be changed to an AWS-created subdomain for Cognito ending with amazoncognito.com at the moment.
Step 3 – Create Groups in AWS Cognito:
In Kubernetes, you can bind roles to both Users and Groups. The best practice is to use groups and avoid assigning permissions to users directly. On the other hand, in our setup, we used the user email address as the username, which cannot be used within Kubernetes RBAC as the user reference. We used the emails as usernames to have them in Kubernetes Audit Logs for better observation. To create a group in AWS Cognito:
aws cognito-idp create-group \
  --user-pool-id eu-west-2_Tj3uyJm1Q \
  --group-name admins \
  --description "Kubernetes Admins"
Step 4 – Manage Users in AWS Cognito:
To add a new user in AWS Cognito, we must follow a couple of steps as we’ve disabled self-registration. So, the admin should create the user and add it to the proper groups. If you want to send user verifications, temporary passwords, account recovery, etc., through Email/SMS, setup messaging in AWS Cognito. If a valid email is provided, AWS Cognito will automatically send the temporary email to the user.
To create a new user in AWS Cognito User Pool:
aws cognito-idp admin-create-user \
  --user-pool-id eu-west-2_Tj3uyJm1Q \
  --username [email protected]
Add user to AWS Cognito group:
aws cognito-idp admin-add-user-to-group \
  --user-pool-id eu-west-2_Tj3uyJm1Q \
  --username [email protected] \
  --group-name admins
If you didn’t use a valid email, you have to create a new temporary password:
aws cognito-idp admin-set-user-password \
  --user-pool-id eu-west-2_Tj3uyJm1Q \
  --username [email protected] \
  --password H3lloW@rlD \
  --no-permanent
Step 5 – Create Client in AWS Cognito:
In this step, we should create an OAuth2/OIDC application, “client”, to be used in both EKS and Kubelogin. We will use it in Kubelogin to allow the user to login with AWS Cognito and fetch tokens and in EKS to verify the users’ tokens and authenticate them.
Important note: As we must provide the OIDC client info, “endpoint and client ID”, to our users, we don’t need to create a client secret, which is called a public client.
Important note: The redirect URIs mentioned in the following command are Kubelogin’s redirect URIs. Do not change them unless you use a wrapper other than Kubelogin.
aws cognito-idp create-user-pool-client \
  --user-pool-id eu-west-2_Tj3uyJm1Q \
  --client-name eks \
  --no-generate-secret \
  --read-attributes "profile" "email" \
  --write-attributes "profile" \
  --supported-identity-providers COGNITO \
  --callback-urls "http://localhost:8000" "http://localhost:18000" \
  --allowed-o-auth-flows code \
  --allowed-o-auth-scopes openid profile email \
  --allowed-o-auth-flows-user-pool-client
After running the above command, you will get the client ID and other information.
Step 6 – Associate OIDC Provider to EKS Cluster:
The following command associates the identity provider to our EKS cluster. In this command, we must set the provider name, the issuer URL “base address”, client ID, the claim name in the JWT token to be used as the user’s username in Kubernetes, the claim name in the JWT token to extract the user’s groups and an optional setting to add a prefix to the groups. In our example, we added oidc: as a prefix. So, the admins group in AWS Cognito will be oidc:admins in Kubernetes.
aws eks associate-identity-provider-config \
  --cluster-name kubedemy \
  --oidc "identityProviderConfigName=kubedemy,issuerUrl=https://cognito-idp.eu-west-2.amazonaws.com/eu-west-2_Tj3uyJm1Q,clientId=ganda06c18isdkrj0i8f9g0gj,usernameClaim=email,groupsClaim=cognito:groups,groupsPrefix=oidc:" \
  --tags owner=kubedemy
Note: Associating an identity provider to the cluster may take a while.
Step 7 – Create ClusterRoleBinding in EKS Cluster:
Although you can customize user and group permissions using Role and ClusterRole resources, we just want to test the whole process. So, I will use the cluster-admin ClusterRole and bind it to the oidc:admins group.
kubectl create clusterrolebinding oidc:admins \
  --clusterrole cluster-admin \
  --group oidc:admins
Step 8 – Setup and Configure Kubelogin:
As explained, Kubelogin is a wrapper that works as a kubectl plugin to provide a way to authenticate with OIDC providers, fetch tokens and provide it to kubectl command to be sent to the API server for user authentication. Learn more from the following links:
https://github.com/int128/kubelogin
https://kubernetes.io/docs/tasks/extend-kubectl/kubectl-plugins
curl -LO https://github.com/int128/kubelogin/releases/download/v1.28.0/kubelogin_linux_amd64.zip

unzip kubelogin_linux_amd64.zip

install kubelogin /usr/local/bin/kubectl-oidc_login
After installing the plugin, it should be listed with the following command:
kubectl plugin list
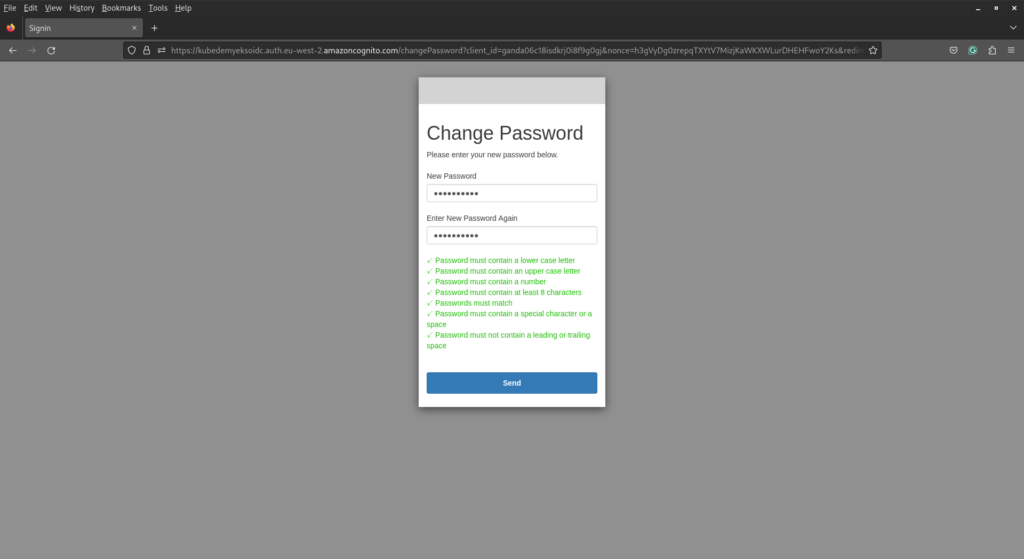
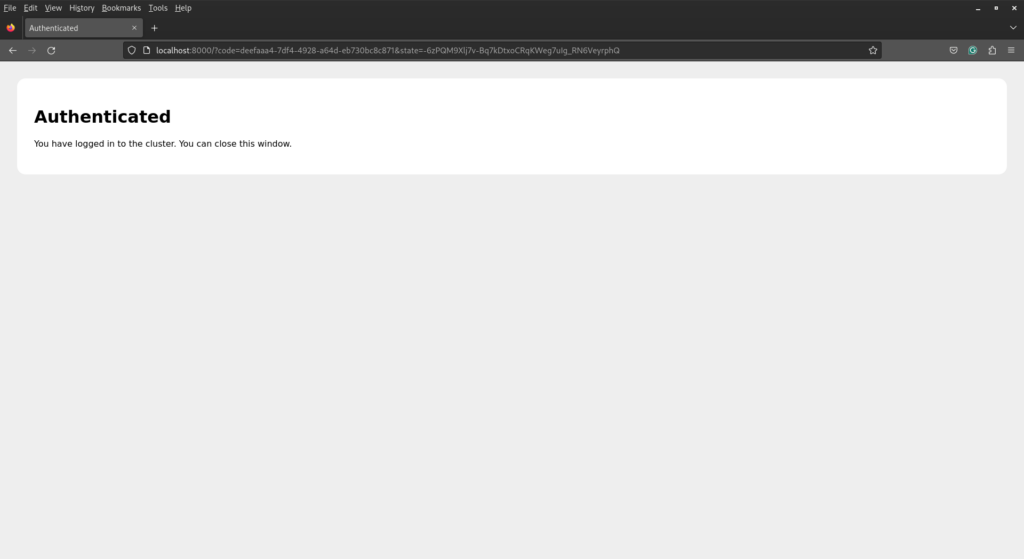
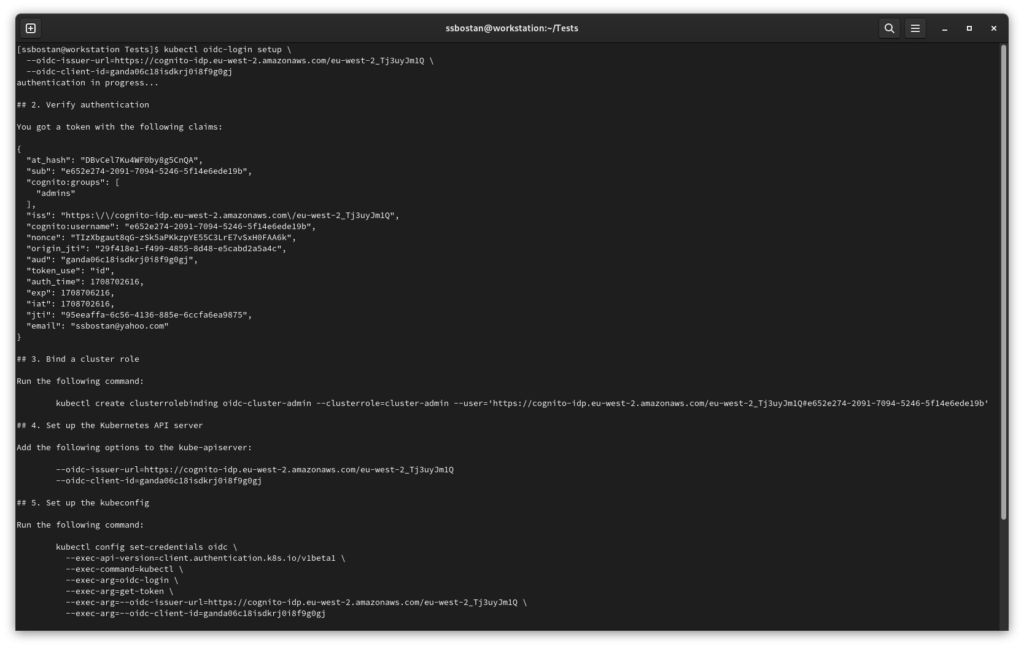
kubectl oidc-login helpTo test OIDC authentication, run the following command, follow the login process and check the result in the terminal. After a successful login, it will show you token info and a couple of commands to setup your kubeconfig file.
kubectl oidc-login setup \
  --oidc-issuer-url=https://cognito-idp.eu-west-2.amazonaws.com/eu-west-2_Tj3uyJm1Q \
  --oidc-client-id=ganda06c18isdkrj0i8f9g0gj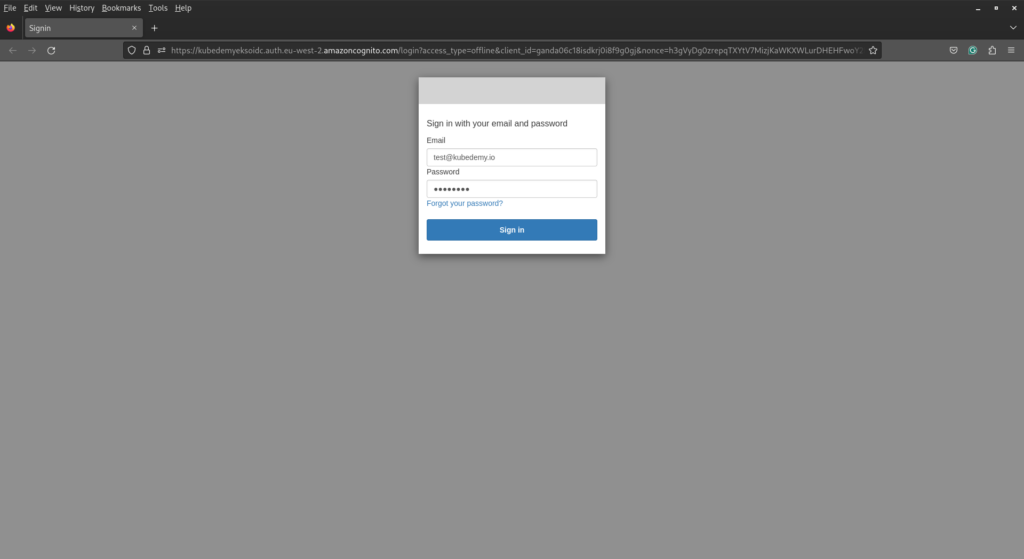
Step 9 – Access Kubernetes EKS with OIDC Token:
To setup the kubeconfig file, we need the API server address, its CA certificate and an exec command to fetch tokens. To create a Kubernetes kubeconfig for AWS EKS + AWS Cognito + OIDC Authentication, run the following commands:
aws eks describe-cluster --name kubedemy --query 'cluster.endpoint' --output text

aws eks describe-cluster --name kubedemy --query 'cluster.certificateAuthority' --output text | base64 -d > ca.crt

kubectl config set-cluster kubedemy \
  --server=https://CB99422E7A48EA91F00A17D969FB455C.gr7.eu-west-2.eks.amazonaws.com \
  --certificate-authority=ca.crt \
  --embed-certs=true

kubectl config set-credentials oidc \
  --exec-api-version=client.authentication.k8s.io/v1beta1 \
  --exec-command=kubectl \
  --exec-arg=oidc-login \
  --exec-arg=get-token \
  --exec-arg=--oidc-issuer-url=https://cognito-idp.eu-west-2.amazonaws.com/eu-west-2_Tj3uyJm1Q \
  --exec-arg=--oidc-client-id=ganda06c18isdkrj0i8f9g0gj

kubectl config set-context default \
  --cluster kubedemy \
  --user oidc

kubectl config use-context default
The kubeconfig file should look like this:
apiVersion: v1
clusters:
- cluster:
    certificate-authority-data: REDUCTED
    server: https://CB99422E7A48EA91F00A17D969FB455C.gr7.eu-west-2.eks.amazonaws.com
  name: kubedemy
contexts:
- context:
    cluster: kubedemy
    user: oidc
  name: default
current-context: default
kind: Config
preferences: {}
users:
- name: oidc
  user:
    exec:
      apiVersion: client.authentication.k8s.io/v1beta1
      command: kubectl
      args:
      - oidc-login
      - get-token
      - --oidc-issuer-url=https://cognito-idp.eu-west-2.amazonaws.com/eu-west-2_Tj3uyJm1Q
      - --oidc-client-id=ganda06c18isdkrj0i8f9g0gj
Now, run the following commands to check your access:
kubectl auth whoami
kubectl auth can-i --list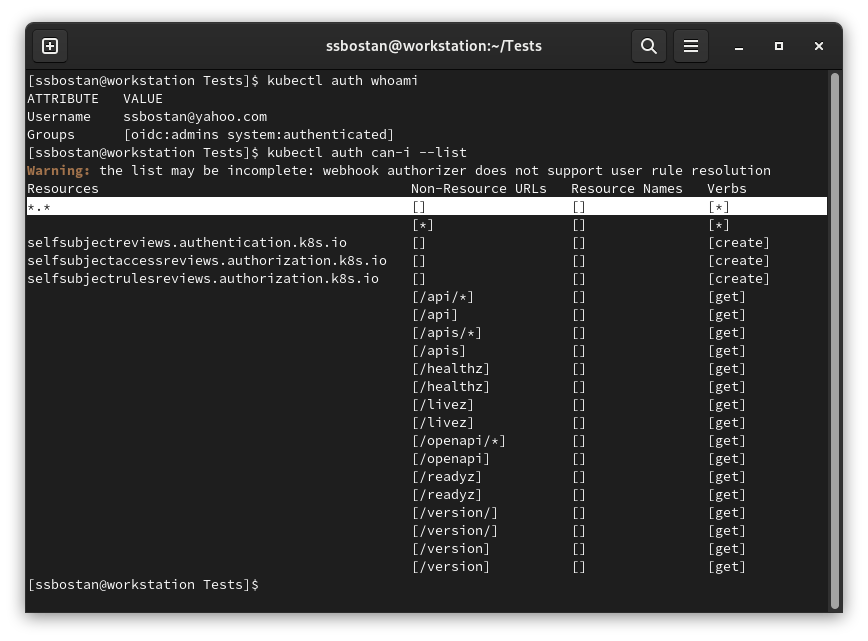
As you can see, we logged in using OIDC authentication and have full permission.
Note: I used my personal email to get the temporary password.
Results:
Here are the results of the previous commands; we need them in the next articles:
| AWS Cognito User Pool ID | eu-west-2_Tj3uyJm1Q |
| AWS Cognito base address | https://cognito-idp.eu-west-2.amazonaws.com/eu-west-2_Tj3uyJm1Q |
| AWS Cognito Domain | https://cognito-idp.eu-west-2.amazonaws.com/eu-west-2_Tj3uyJm1Q/.well-known/openid-configuration |
| Client ID in AWS Cognito | ganda06c18isdkrj0i8f9g0gj |
| Group name in AWS Cognito | admins |
| Group name in Kubernetes | oidc:admins |
| Kubelogin Callback URIs | http://localhost:8000 http://localhost:18000 |
Conclusion:
Integrating Kubernetes with OAuth2/OIDC allows enterprises to setup SSO to access Kubernetes clusters, which makes better security and observation. All the Kubernetes audit logs now contain the client’s email address; you can see which user did what.
If you like this series of articles, please share them and write your thoughts as comments here. Your feedback encourages me to complete this massively planned program. Just share them and provide feedback. I’ll make you an AWS EKS black belt.
Follow my LinkedIn https://www.linkedin.com/in/ssbostan
Follow Kubedemy LinkedIn https://www.linkedin.com/company/kubedemy
Follow Kubedemy Telegram https://telegram.me/kubedemy
Related Posts
AWS EKS – Part 33 – Bring Your Own CNI (BYOCNI) Approach
AWS EKS – Part 26 – Increase VPC CNI Allocatable IP Addresses